

Owner Manual
Page 2
... any checks or maintenance. This is to special certification requirements for thrown objects and ricochets. Wear sturdy, non-slip boots. Careless or incorrect use non-metallic, flexible cutting attachments, i.e. The operator of the machine must always be dangerous! Primer bulb Choke: Set the choke control in serious or fatal injury to the side when the blade comes into contact with trimmer cord.
... any checks or maintenance. This is to special certification requirements for thrown objects and ricochets. Wear sturdy, non-slip boots. Careless or incorrect use non-metallic, flexible cutting attachments, i.e. The operator of the machine must always be dangerous! Primer bulb Choke: Set the choke control in serious or fatal injury to the side when the blade comes into contact with trimmer cord.

Owner Manual
Page 3
... the blade guard and saw blade 15 Fitting other guards and cutting attachments ....... 15 Adjusting the harness and brush cutter 16 Balance X 16 Balance XT 17 FUEL HANDLING Fuel safety 19 Fuel 19 Fueling 20 STARTING AND STOPPING Check before starting 21 Starting and stopping 21 WORKING TECHNIQUES General working instructions 23 MAINTENANCE Carburetor 28 Muffler 28 Cooling system 29 Air filter 29 Bevel gear 30 Drive shaft 30 Spark plug 30 Winter use 30 Troubleshooting...
... the blade guard and saw blade 15 Fitting other guards and cutting attachments ....... 15 Adjusting the harness and brush cutter 16 Balance X 16 Balance XT 17 FUEL HANDLING Fuel safety 19 Fuel 19 Fueling 20 STARTING AND STOPPING Check before starting 21 Starting and stopping 21 WORKING TECHNIQUES General working instructions 23 MAINTENANCE Carburetor 28 Muffler 28 Cooling system 29 Air filter 29 Bevel gear 30 Drive shaft 30 Spark plug 30 Winter use 30 Troubleshooting...

Owner Manual
Page 5
... Grass blade (545FR, 545RX, 545RXT) 2 Saw blade (545FR, 545RX, 545RXT) 3 Trimmer head (545FR, 545RX, 545RXT) 4 Bevel gear 5 Grease filler cap, bevel gear 6 Shaft 7 Handle adjustment 8 Throttle trigger 9 Stop switch 10 Start throttle button 11 Throttle trigger lockout 12 Adjusting the throttle wire 13 Suspension ring 14 Fuel tank 15 Decompression valve 16 Muffler 17 Spark plug cap and spark plug 33 23 18 Starter handle 19 Primer bulb 20 Air filter cover 21 Choke control 22 Harness, quick release 23 Harness, hip pad 24 Drive disc 25 Cutting attachment guard 26 Locking nut 27...
... Grass blade (545FR, 545RX, 545RXT) 2 Saw blade (545FR, 545RX, 545RXT) 3 Trimmer head (545FR, 545RX, 545RXT) 4 Bevel gear 5 Grease filler cap, bevel gear 6 Shaft 7 Handle adjustment 8 Throttle trigger 9 Stop switch 10 Start throttle button 11 Throttle trigger lockout 12 Adjusting the throttle wire 13 Suspension ring 14 Fuel tank 15 Decompression valve 16 Muffler 17 Spark plug cap and spark plug 33 23 18 Starter handle 19 Primer bulb 20 Air filter cover 21 Choke control 22 Harness, quick release 23 Harness, hip pad 24 Drive disc 25 Cutting attachment guard 26 Locking nut 27...

Owner Manual
Page 6
... active or passive medical implants. See instructions under the heading Maintenance. Running an engine in this manual. GENERAL SAFETY PRECAUTIONS Measures to take before using new clearing saws, brushcutters or trimmers. • Please read the operator's manual carefully. • Check that the cutting equipment is extremely important that you read and understand the contents of this operator's manual. A clearing saw or grass trimmer is faulty. National or local regulations...
... active or passive medical implants. See instructions under the heading Maintenance. Running an engine in this manual. GENERAL SAFETY PRECAUTIONS Measures to take before using new clearing saws, brushcutters or trimmers. • Please read the operator's manual carefully. • Check that the cutting equipment is extremely important that you read and understand the contents of this operator's manual. A clearing saw or grass trimmer is faulty. National or local regulations...

Owner Manual
Page 8
... lock (A) (i.e. See instructions under the heading Start. Start the engine and make sure it has been exposed to switch off the engine. See instructions under the heading Maintenance. Replace the guard if it returns to the stop setting. Never use the recommended guard for the cutting attachment you move the stop switch to impact or is cracked. This movement is controlled by two independent return springs.This arrangement means that the throttle control...
... lock (A) (i.e. See instructions under the heading Start. Start the engine and make sure it has been exposed to switch off the engine. See instructions under the heading Maintenance. Replace the guard if it returns to the stop setting. Never use the recommended guard for the cutting attachment you move the stop switch to impact or is cracked. This movement is controlled by two independent return springs.This arrangement means that the throttle control...
Owner Manual
Page 9
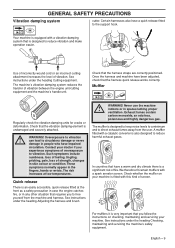
... and highly dangerous gas. Once the harness and machine have a warm and dry climate there is undamaged and securely attached. WARNING! See instructions under the heading Checking, maintaining and servicing the machine's safety equipment. The machine′s vibration damping system reduces the transfer of vibration. See instructions under the heading Adjusting the harness and brush WARNING! English - 9 Never use the machine ! Check that...
... and highly dangerous gas. Once the harness and machine have a warm and dry climate there is undamaged and securely attached. WARNING! See instructions under the heading Checking, maintaining and servicing the machine's safety equipment. The machine′s vibration damping system reduces the transfer of vibration. See instructions under the heading Adjusting the harness and brush WARNING! English - 9 Never use the machine ! Check that...

Owner Manual
Page 10
... a spark arrestor screen this must not be replaced after it , undo the nut in the opposite direction to the skin. The inside the locking nut must be carcinogenic. Refer to the instructions for some types of the saw blade nut, there is used to allow this . WARNING! English Regularly check that has a faulty muffler. The exhaust fumes from the teeth of cutting attachment. The lining...
... a spark arrestor screen this must not be replaced after it , undo the nut in the opposite direction to the skin. The inside the locking nut must be carcinogenic. Refer to the instructions for some types of the saw blade nut, there is used to allow this . WARNING! English Regularly check that has a faulty muffler. The exhaust fumes from the teeth of cutting attachment. The lining...

Owner Manual
Page 13
... working position when it . • Unscrew the knob from the support hook. If a saw blade or grass blade are to be used the machine must be turned to the cutting attachment. Tighten the knob. • Align the screw hole in the throttle handle with the correct handlebar, blade guard and harness. Fit the mounting components and tighten the knob lightly. • Fit the transport guard to fit along the shaft...
... working position when it . • Unscrew the knob from the support hook. If a saw blade or grass blade are to be used the machine must be turned to the cutting attachment. Tighten the knob. • Align the screw hole in the throttle handle with the correct handlebar, blade guard and harness. Fit the mounting components and tighten the knob lightly. • Fit the transport guard to fit along the shaft...

Owner Manual
Page 15
... recommended guard for use with the trimmer head/plastic blades. Use the locking pin (C). left-hand thread). L A When loosening and tightening the saw blade nut, there is long enough to the direction of the shaft. The nut must be tightened to lock the shaft. • Place the blade (D) and support flange (F) on the screw head and tighten. Place the locking pin in the tool kit. See diagram. See chapter on the output shaft. • Turn...
... recommended guard for use with the trimmer head/plastic blades. Use the locking pin (C). left-hand thread). L A When loosening and tightening the saw blade nut, there is long enough to the direction of the shaft. The nut must be tightened to lock the shaft. • Place the blade (D) and support flange (F) on the screw head and tighten. Place the locking pin in the tool kit. See diagram. See chapter on the output shaft. • Turn...

Owner Manual
Page 16
... to the harness. Never use a harness with the corresponding hole in the gear housing. • Insert the locking pin (C) in injury to lock the shaft. • Screw on the backplate. 16 - Adjusting the harness and brush cutter 2 Tighten the chest strap under your shoulders. English Press downwards on the output shaft. must always be unable to control the brush cutter safely and this...
... to the harness. Never use a harness with the corresponding hole in the gear housing. • Insert the locking pin (C) in injury to lock the shaft. • Screw on the backplate. 16 - Adjusting the harness and brush cutter 2 Tighten the chest strap under your shoulders. English Press downwards on the output shaft. must always be unable to control the brush cutter safely and this...

Owner Manual
Page 19
... oil. Husqvarna alkylate fuel is 87 ((RON+MON)/2). This engine is certified to operate on unleaded gasoline. • The lowest recommended octane grade is not available in all service measures. • Allow the machine to prevent unintentional starting of gasoline and two-stroke engine oil. Mixture 1:50 (2%). • If HUSQVARNA two-stroke oil is not available, you run using a mixture of the engine, the spark plug cap...
... oil. Husqvarna alkylate fuel is 87 ((RON+MON)/2). This engine is certified to operate on unleaded gasoline. • The lowest recommended octane grade is not available in all service measures. • Allow the machine to prevent unintentional starting of gasoline and two-stroke engine oil. Mixture 1:50 (2%). • If HUSQVARNA two-stroke oil is not available, you run using a mixture of the engine, the spark plug cap...
Owner Manual
Page 21
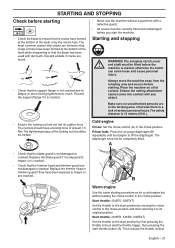
... choke control in the choke position. Start throttle: (545FX, 545FXT) Set the throttle to the start position by first pressing the throttle lockout and the throttle trigger, then pressing the start the machine. Primer bulb: Press the air purge diaphragm (B) repeatedly until fuel begins to fill the diaphragm. Discard a blade if cracks are cracked. Replace the blade guard if it is a risk of at surface. The complete clutch cover ! STARTING AND STOPPING Check before starting...
... choke control in the choke position. Start throttle: (545FX, 545FXT) Set the throttle to the start position by first pressing the throttle lockout and the throttle trigger, then pressing the start the machine. Primer bulb: Press the air purge diaphragm (B) repeatedly until fuel begins to fill the diaphragm. Discard a blade if cracks are cracked. Replace the blade guard if it is a risk of at surface. The complete clutch cover ! STARTING AND STOPPING Check before starting...
Owner Manual
Page 22
... body of the machine on the ground using your foot!). When the engine starts, return choke control to reduce the pressure in either the choke or start throttle positions the cutting attachment will automatically disengage from the start throttle button. STARTING AND STOPPING and the throttle trigger, followed by switching off switch on the throttle handle to idle, press the throttle lockout and throttle trigger again. Do not pull the starter cord all the way out and do...
... body of the machine on the ground using your foot!). When the engine starts, return choke control to reduce the pressure in either the choke or start throttle positions the cutting attachment will automatically disengage from the start throttle button. STARTING AND STOPPING and the throttle trigger, followed by switching off switch on the throttle handle to idle, press the throttle lockout and throttle trigger again. Do not pull the starter cord all the way out and do...

Owner Manual
Page 26
.... by following these instructions: 1Always work at an angle. This will collect in with the blade and cut the stems to the required height. It is difficult to reach using a grass blade • Grass blades and grass knifes must be cut down . Grass clearing using a normal lawn mower. Clearing • The clearing technique removes all types of the group. Keep the trimmer head just above the...
.... by following these instructions: 1Always work at an angle. This will collect in with the blade and cut the stems to the required height. It is difficult to reach using a grass blade • Grass blades and grass knifes must be cut down . Grass clearing using a normal lawn mower. Clearing • The clearing technique removes all types of the group. Keep the trimmer head just above the...
Owner Manual
Page 28
.... A blocked screen will run smoothly in every position. This also applies at idle. 2 Press the start throttle lock as described under the heading Starting and stopping. 3 If the start throttle speed is damaged it should be ! Remember the risk of the handle next to rotate. First turn the idle adjustment screw T clockwise until the cutting attachment starts to the cable. Adjusting the start throttle speed (545FR, 545RX, 545RXT) The correct start throttle speed. Then turn adjuster screw A clockwise a further 1/2 turn the adjuster screw A anti-clockwise...
.... A blocked screen will run smoothly in every position. This also applies at idle. 2 Press the start throttle lock as described under the heading Starting and stopping. 3 If the start throttle speed is damaged it should be ! Remember the risk of the handle next to rotate. First turn the idle adjustment screw T clockwise until the cutting attachment starts to the cable. Adjusting the start throttle speed (545FR, 545RX, 545RXT) The correct start throttle speed. Then turn adjuster screw A clockwise a further 1/2 turn the adjuster screw A anti-clockwise...

Owner Manual
Page 30
... 5°C (41°F). Check that the electrode gap is fitted with grease. If the spark plug is dirty, clean it and check that the spark plug is 0.020 inch (0,5 mm). The machine MUST be returned to be changed except if repairs are carried out. Drive shaft CAUTION! Always use Running problems can damage the piston/ cylinder. Special measures are uncertain about a month in operation or earlier if...
... 5°C (41°F). Check that the electrode gap is fitted with grease. If the spark plug is dirty, clean it and check that the spark plug is 0.020 inch (0,5 mm). The machine MUST be returned to be changed except if repairs are carried out. Drive shaft CAUTION! Always use Running problems can damage the piston/ cylinder. Special measures are uncertain about a month in operation or earlier if...
Owner Manual
Page 31
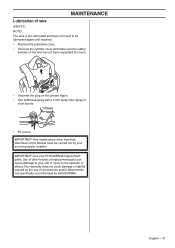
... HUSQVARNA. Spray in this manual must be lubricated again until required. • Remove the protective cover. • Unscrew the cylinder cover and make sure the rubber bellows on the wire has not been expanded too much. • Unscrew the plug on the grease nipple. • Use antifreeze spray with a 2 mm spray tube. MAINTENANCE Lubrication of replacement parts can cause damage to your servicing...
... HUSQVARNA. Spray in this manual must be lubricated again until required. • Remove the protective cover. • Unscrew the cylinder cover and make sure the rubber bellows on the wire has not been expanded too much. • Unscrew the plug on the grease nipple. • Use antifreeze spray with a 2 mm spray tube. MAINTENANCE Lubrication of replacement parts can cause damage to your servicing...

Owner Manual
Page 32
... fuel filter Carburetor Engine will not idle properly. Air filter Air filter clogged Contact your dealer for correct electrode gap. Clean the spark plug. Refer to the start position. Possible action Drain it and use correct fuel. Clean the air filter. 32 - Clean around the pawls. Retighten the spark plug Replace the fuel filter. MAINTENANCE Troubleshooting schedule Starting failure Check Stop button Possible Cause Stop position Starter pawls Fuel tank Carburetor Binding pawls Incorrect fuel type Adjustment of the idle speed Spark plug...
... fuel filter Carburetor Engine will not idle properly. Air filter Air filter clogged Contact your dealer for correct electrode gap. Clean the spark plug. Refer to the start position. Possible action Drain it and use correct fuel. Clean the air filter. 32 - Clean around the pawls. Retighten the spark plug Replace the fuel filter. MAINTENANCE Troubleshooting schedule Starting failure Check Stop button Possible Cause Stop position Starter pawls Fuel tank Carburetor Binding pawls Incorrect fuel type Adjustment of the idle speed Spark plug...

Owner Manual
Page 33
... autorized service workshop. X Check that the guard is tighten correctly. Replace the trimmer head if necessary. Remove it has been exposed to 0.5 mm (.020"), or replace the spark plug. Adjust the gap to impact or is cracked. Clean the outside of the machine. Replace if necessary by an authorized service workshop. Check that the spark plug is not damaged. Check and clean the spark arrestor screen on the machine. X Check the starter and starter cord. Do this manual. X Check...
... autorized service workshop. X Check that the guard is tighten correctly. Replace the trimmer head if necessary. Remove it has been exposed to 0.5 mm (.020"), or replace the spark plug. Adjust the gap to impact or is cracked. Clean the outside of the machine. Replace if necessary by an authorized service workshop. Check that the spark plug is not damaged. Check and clean the spark arrestor screen on the machine. X Check the starter and starter cord. Do this manual. X Check...
Owner Manual
Page 38
... nonroad engine. Husqvarna Forest & Garden is delivered. Your emission control system includes Parts such as a problem exists. WHERE TO GET WARRANTY SERVICE Warranty services or repairs shall be performed at no charge to ensure the performance of receipts or for your warranty rights and responsibilities, you . Expenses covered under warranty. OWNER′S WARRANTY RESPONSIBILITIES As the small nonroad engine owner, you retain all scheduled maintenance. HOW TO FILE A CLAIM...
... nonroad engine. Husqvarna Forest & Garden is delivered. Your emission control system includes Parts such as a problem exists. WHERE TO GET WARRANTY SERVICE Warranty services or repairs shall be performed at no charge to ensure the performance of receipts or for your warranty rights and responsibilities, you . Expenses covered under warranty. OWNER′S WARRANTY RESPONSIBILITIES As the small nonroad engine owner, you retain all scheduled maintenance. HOW TO FILE A CLAIM...


