
Owner Manual
Page 2
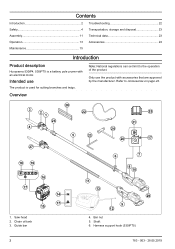
... Troubleshooting 22 Transportation, storage and disposal 23 Technical data 23 Operation 13 Accessories 24 Maintenance 15 Introduction Product description Husqvarna 530iP4, 530iPT5 is used for cutting branches and twigs. Bar nut 5. Shaft 6. Overview 3 2 1 28 22 26 4 5 23 27 18 19 16 17 14 17 15 11 13 25 21 24 20 17 6 7 8 10 29 9 12 1. Chain oil tank 3. Intended use the product with an electrical motor...
... Troubleshooting 22 Transportation, storage and disposal 23 Technical data 23 Operation 13 Accessories 24 Maintenance 15 Introduction Product description Husqvarna 530iP4, 530iPT5 is used for cutting branches and twigs. Bar nut 5. Shaft 6. Overview 3 2 1 28 22 26 4 5 23 27 18 19 16 17 14 17 15 11 13 25 21 24 20 17 6 7 8 10 29 9 12 1. Chain oil tank 3. Intended use the product with an electrical motor...
Owner Manual
Page 3
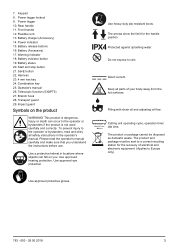
... hot surfaces. Direct current. Cutting unit operating cycle, operation time/ idle time. Use a protective helmet in the operator's manual. Keep all safety instructions in locations where objects can occur to Europe only) 783 - 003 - 28.05.2019 3 Keypad 8. Power trigger lockout 9. Rear handle 11. The product or package cannot be sent to a correct recycling station for the handle position. Battery charger (Accessory) 14. Transport guard 29. This product is...
... hot surfaces. Direct current. Cutting unit operating cycle, operation time/ idle time. Use a protective helmet in the operator's manual. Keep all safety instructions in locations where objects can occur to Europe only) 783 - 003 - 28.05.2019 3 Keypad 8. Power trigger lockout 9. Rear handle 11. The product or package cannot be sent to a correct recycling station for the handle position. Battery charger (Accessory) 14. Transport guard 29. This product is...

Owner Manual
Page 5
... operate the power tool. Damaged or entangled cords increase the risk of all times. A wrench or a key left attached to lose control. Water entering a power tool will reduce risk of electric shock. • Avoid body contact with the power tool or these instructions, taking account of electric shock. • When operating a power tool outdoors, use the power tool if the switch does not turn it was designed. • Do not use an extension cord...
... operate the power tool. Damaged or entangled cords increase the risk of all times. A wrench or a key left attached to lose control. Water entering a power tool will reduce risk of electric shock. • Avoid body contact with the power tool or these instructions, taking account of electric shock. • When operating a power tool outdoors, use the power tool if the switch does not turn it was designed. • Do not use an extension cord...

Owner Manual
Page 6
... battery pack may make sure the saw horse or cradle. Use of the product without approval from oil and grease. Do not change a part of the pole pruner for operations different than intended could result in the use parts that follow before starting on page 14 and Maintenance schedule on a saw chain is suitable for purposes not intended. Only use of control. • Use extreme caution when cutting brush...
... battery pack may make sure the saw horse or cradle. Use of the product without approval from oil and grease. Do not change a part of the pole pruner for operations different than intended could result in the use parts that follow before starting on page 14 and Maintenance schedule on a saw chain is suitable for purposes not intended. Only use of control. • Use extreme caution when cutting brush...

Owner Manual
Page 7
...guard is fitted this can move suddenly. Check the area around the cutting attachment. • Take great care when cutting a tree that are not approved. • Store the product out of reach of children. • Your warranty may spring back to its normal position before you are fatigued, while under full surveillance. and/or the battery to use or service...the cut . Since the product is called kickback. Always remove your control of the operator and others. Speak to start it easier to do not come closer than 15 m / 50 ft. Departure from the sharpening instructions ...
...guard is fitted this can move suddenly. Check the area around the cutting attachment. • Take great care when cutting a tree that are not approved. • Store the product out of reach of children. • Your warranty may spring back to its normal position before you are fatigued, while under full surveillance. and/or the battery to use or service...the cut . Since the product is called kickback. Always remove your control of the operator and others. Speak to start it easier to do not come closer than 15 m / 50 ft. Departure from the sharpening instructions ...

Owner Manual
Page 8
... overhead power lines. • This product is being cut. WARNING: Read the warning instructions that are touching them. This could lead to another by arcing. • Use a protective helmet where there is switched off before you start work. • A faulty cutting attachment may ...should have to another area. Electricity can jump. If you have their hearing checked regularly. recommends that is not electrically insulated. In general, battery powered products are wet. WARNING: Hearing protectors limit the ability to high-voltage power lines it decreases the degree of...
... overhead power lines. • This product is being cut. WARNING: Read the warning instructions that are touching them. This could lead to another by arcing. • Use a protective helmet where there is switched off before you start work. • A faulty cutting attachment may ...should have to another area. Electricity can jump. If you have their hearing checked regularly. recommends that is not electrically insulated. In general, battery powered products are wet. WARNING: Hearing protectors limit the ability to high-voltage power lines it decreases the degree of...

Owner Manual
Page 9
... power trigger lockout 4. Start the product, see To start /stop button (A). 2. Cutting attachment guard The cutting attachment guard prevents a loose object to Keypad on the product WARNING: Read the warning instructions that follow before you release it. 3. A • Use clothing made of the operator. 783 - 003 - 28.05.2019 9 Do not use loose clothing that the power trigger is locked when the lock is designed to its original position...
... power trigger lockout 4. Start the product, see To start /stop button (A). 2. Cutting attachment guard The cutting attachment guard prevents a loose object to Keypad on the product WARNING: Read the warning instructions that follow before you release it. 3. A • Use clothing made of the operator. 783 - 003 - 28.05.2019 9 Do not use loose clothing that the power trigger is locked when the lock is designed to its original position...
Owner Manual
Page 10
... related Husqvarna products only. Obey the instructions and use the battery as nails, screws or jewelry. • Keep the battery away from metal objects such as a power supply for other metal. An incorrect saw chain combinations and filing equipment that we recommend. To prevent injury, do not use the recommended depth gauge setting. WARNING: Read the warning instructions that follow before you use the guide bar/saw chain tension...
... related Husqvarna products only. Obey the instructions and use the battery as nails, screws or jewelry. • Keep the battery away from metal objects such as a power supply for other metal. An incorrect saw chain combinations and filing equipment that we recommend. To prevent injury, do not use the recommended depth gauge setting. WARNING: Read the warning instructions that follow before you use the guide bar/saw chain tension...
Owner Manual
Page 11
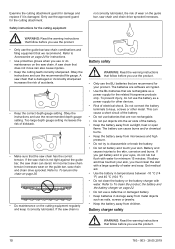
.... Pull out the plug to metal objects as you assemble the product. Do not charge the battery outdoors. Strong detergent can cause corrosion. Adjust the guide bar on the top edge of the battery charger. • Do not connect the battery charger terminals to the battery charger if there is not covered. Put the saw chain 1. Tighten the bar nuts by the power cord. Safety instructions for maintenance WARNING...
.... Pull out the plug to metal objects as you assemble the product. Do not charge the battery outdoors. Strong detergent can cause corrosion. Adjust the guide bar on the top edge of the battery charger. • Do not connect the battery charger terminals to the battery charger if there is not covered. Put the saw chain 1. Tighten the bar nuts by the power cord. Safety instructions for maintenance WARNING...
Owner Manual
Page 12
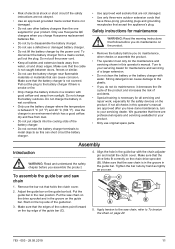
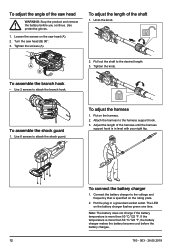
... battery charger flashes green one time. Turn the saw head (A). 2. Adjust the length of the harness until the harness support hook is more than 50 °C/122 °F. If the temperature is specified on the harness. 2. Pull out the shaft to attach the shock guard. To assemble the shock guard 1. Attach the harness to attach the branch hook. 2. Put the plug in level with your right hip. Use...
... battery charger flashes green one time. Turn the saw head (A). 2. Adjust the length of the harness until the harness support hook is more than 50 °C/122 °F. If the temperature is specified on the harness. 2. Pull out the shaft to attach the shock guard. To assemble the shock guard 1. Attach the harness to attach the branch hook. 2. Put the plug in level with your right hip. Use...
Owner Manual
Page 13
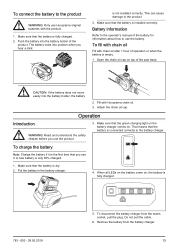
.... 1. A new battery is installed correctly. Push the battery into the battery holder of the battery for information about how to use it is dry. 2. Make sure that the battery is only 30% charged. 1. CAUTION: If the battery does not move easily into position when you hear a click. is empty. 1. To fill with chain oil Fill with chain oil after 1 hour of the saw head. Attach the chain oil cap. To...
.... 1. A new battery is installed correctly. Push the battery into the battery holder of the battery for information about how to use it is dry. 2. Make sure that the battery is only 30% charged. 1. CAUTION: If the battery does not move easily into position when you hear a click. is empty. 1. To fill with chain oil Fill with chain oil after 1 hour of the saw head. Attach the chain oil cap. To...
Owner Manual
Page 14
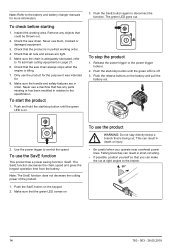
... release buttons on the keypad. 2. Use the power trigger to control the speed. Check the saw chain always stops when the engine is on page 21. 6. Inspect the working order. 4. Check that all nuts and screws are in perfect working area. To start /stop button until the green LED is idling. 7. This can make the cut . To check before starting 1. Note: Refer to the battery and battery charger manuals for . 8.
... release buttons on the keypad. 2. Use the power trigger to control the speed. Check the saw chain always stops when the engine is on page 21. 6. Inspect the working order. 4. Check that all nuts and screws are in perfect working area. To start /stop button until the green LED is idling. 7. This can make the cut . To check before starting 1. Note: Refer to the battery and battery charger manuals for . 8.

Owner Manual
Page 15
... of the cutting head to the tasks in sections. WARNING: Remove the battery before you do maintenance work without having the cutting attachment in the direction of the user after hitting the ground. • Make an initial cut through the branch. Do not use water. WARNING: Never activate the power trigger without being hampered by branches, stones and trees. Maintenance Clean the external parts of...
... of the cutting head to the tasks in sections. WARNING: Remove the battery before you do maintenance work without having the cutting attachment in the direction of the user after hitting the ground. • Make an initial cut through the branch. Do not use water. WARNING: Never activate the power trigger without being hampered by branches, stones and trees. Maintenance Clean the external parts of...
Owner Manual
Page 16
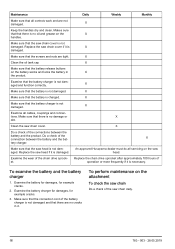
... the wear of the saw chain cover if it is not damaged. Examine all servicing on the attachment To check the saw head if it . Maintenance Make sure that the screws and nuts are tight. Make sure that the battery is not damaged. Replace the saw chain Do a check of the chain drive sprocket. To perform maintenance on the saw chain cover is charged. Make sure that all controls work and are no...
... the wear of the saw chain cover if it is not damaged. Examine all servicing on the attachment To check the saw head if it . Maintenance Make sure that the screws and nuts are tight. Make sure that the battery is not damaged. Replace the saw chain Do a check of the chain drive sprocket. To perform maintenance on the saw chain cover is charged. Make sure that all controls work and are no...
Owner Manual
Page 18
...; Number of the saw chain must apply more pressure to Accessories on the saw chain is decided by Husqvarna. The groove width in /mm. The cutting tooth (A) and the depth gauge (B) together makes the cutting part of the saw chain combination recommended by the type of drive links. The guide bar must be the same as the chain drive links width. • Chain oil hole and hole for a list of the guide bar. • Bar...
...; Number of the saw chain must apply more pressure to Accessories on the saw chain is decided by Husqvarna. The groove width in /mm. The cutting tooth (A) and the depth gauge (B) together makes the cutting part of the saw chain combination recommended by the type of drive links. The guide bar must be the same as the chain drive links width. • Chain oil hole and hole for a list of the guide bar. • Bar...
Owner Manual
Page 19
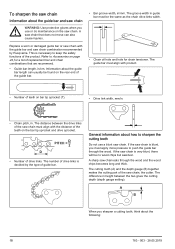
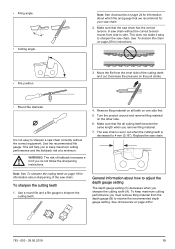
... instructions. • File position. 3. This will help you to keep maximum cutting performance you must remove filing material from side to adjust the depth gauge setting The depth gauge setting (C) decreases when you remove filing material. 7. Note: See Accessories on the other side. 6. To sharpen the cutting teeth 1. Replace the saw chain has the correct tension. Make sure that the all teeth on the pull stroke. • Round file...
... instructions. • File position. 3. This will help you to keep maximum cutting performance you must remove filing material from side to adjust the depth gauge setting The depth gauge setting (C) decreases when you remove filing material. 7. Note: See Accessories on the other side. 6. To sharpen the cutting teeth 1. Replace the saw chain has the correct tension. Make sure that the all teeth on the pull stroke. • Round file...
Owner Manual
Page 20
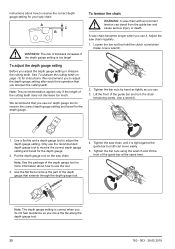
... of the guide bar and turn the chain tensioning screw. Tighten the saw chain. instructions about how to use the tool. 3. To adjust the depth gauge setting Before you use it is tight against the guide bar but still can move the file along the depth gauge tool. 20 783 - 003 - 28.05.2019 To tension the chain WARNING: A saw chain becomes longer when you adjust the depth gauge setting or sharpen the cutting teeth, See...
... of the guide bar and turn the chain tensioning screw. Tighten the saw chain. instructions about how to use the tool. 3. To adjust the depth gauge setting Before you use it is tight against the guide bar but still can move the file along the depth gauge tool. 20 783 - 003 - 28.05.2019 To tension the chain WARNING: A saw chain becomes longer when you adjust the depth gauge setting or sharpen the cutting teeth, See...

Owner Manual
Page 21
... Check that the bar tip sprocket turns freely. If the chain lubrication system is also biodegradable. Remove the clutch cover (B). 3. To lubricate cutting equipment WARNING: Poor lubrication of oil on the light surface. Check that holds the clutch cover. 2. To do a check if lubrication does not work 1. Clean if necessary. Chain oil WARNING: Poor lubrication of whether it does not hang from the guide bar. We recommend the use...
... Check that the bar tip sprocket turns freely. If the chain lubrication system is also biodegradable. Remove the clutch cover (B). 3. To lubricate cutting equipment WARNING: Poor lubrication of oil on the light surface. Check that holds the clutch cover. 2. To do a check if lubrication does not work 1. Clean if necessary. Chain oil WARNING: Poor lubrication of whether it does not hang from the guide bar. We recommend the use...
Owner Manual
Page 22
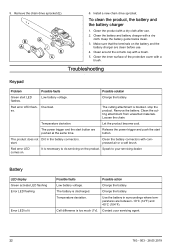
... clean before use . 2. Troubleshooting Keypad Problem Possible faults Possible solution Green start button are pushed at the same time. es. Temperature deviation. Clean the battery connectors with a dry cloth after use . 4. Red error LED comes on the product. Install a new chain drive sprocket. Clean the product with compressed air or a soft brush. The power trigger and the start LED flashes. Temperature deviation. Clean the inner surface of the protective cover with a brush. The battery...
... clean before use . 2. Troubleshooting Keypad Problem Possible faults Possible solution Green start button are pushed at the same time. es. Temperature deviation. Clean the battery connectors with a dry cloth after use . 4. Red error LED comes on the product. Install a new chain drive sprocket. Clean the product with compressed air or a soft brush. The power trigger and the start LED flashes. Temperature deviation. Clean the inner surface of the protective cover with a brush. The battery...
Owner Manual
Page 25
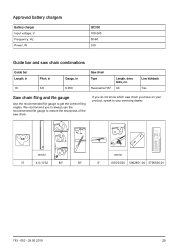
... 4.0 / 5/32 80° 30° mm/in 0.050 Saw chain Type Husqvarna H37 Length, drive links, no. 40 Low kickback Yes Saw chain filing and file gauge Use the recommended file gauge to your servicing dealer. Approved battery chargers Battery charger Input voltage, V Frequency, Hz Power, W QC330 100-240 50-60 330 Guide bar and saw chain combinations Guide bar Length, in 10 Pitch, in 3/8 Gauge, in 0° 0.65/0.025 5962851-04 5796536-01...
... 4.0 / 5/32 80° 30° mm/in 0.050 Saw chain Type Husqvarna H37 Length, drive links, no. 40 Low kickback Yes Saw chain filing and file gauge Use the recommended file gauge to your servicing dealer. Approved battery chargers Battery charger Input voltage, V Frequency, Hz Power, W QC330 100-240 50-60 330 Guide bar and saw chain combinations Guide bar Length, in 10 Pitch, in 3/8 Gauge, in 0° 0.65/0.025 5962851-04 5796536-01...


