
Parts Manual
Page 3
CUTTING EQUIPMENT Ref Part No Description 1 574 30 69-04 CLAMP 2 503 93 55-01 CLAMP.GUARD 3 503 20 20-07 SCREW IHSCM 4 503 20 14-12 SCREW IHSCFMO 5 577 01 83-03 TRIMMER GUARD ASSY 6 574 52 34-01 KNIFE 7 503 21 07-16 SCREW IHSCT 8 577 02 21-06 MOTOR ASSY 9 503 20 07-78 SCREW IHSCFM 10 503 85 63-01 NUT Remark 520iLX QTY KIT 1 11 11 11 1 15 25 1 1 1
CUTTING EQUIPMENT Ref Part No Description 1 574 30 69-04 CLAMP 2 503 93 55-01 CLAMP.GUARD 3 503 20 20-07 SCREW IHSCM 4 503 20 14-12 SCREW IHSCFMO 5 577 01 83-03 TRIMMER GUARD ASSY 6 574 52 34-01 KNIFE 7 503 21 07-16 SCREW IHSCT 8 577 02 21-06 MOTOR ASSY 9 503 20 07-78 SCREW IHSCFM 10 503 85 63-01 NUT Remark 520iLX QTY KIT 1 11 11 11 1 15 25 1 1 1

Parts Manual
Page 5
TUBE Ref 1 2 3 4 5 6 7 Part No 725 23 80-51 503 87 90-01 503 87 19-06 503 94 03-01 502 19 71-01 577 06 14-03 577 84 43-01 Description SCREW EHHM KNOB HANDLE DISTANCE SQUARE NUT TUBE DECAL Remark 520iLX QTY KIT 1 1 1 1 1 1 1
TUBE Ref 1 2 3 4 5 6 7 Part No 725 23 80-51 503 87 90-01 503 87 19-06 503 94 03-01 502 19 71-01 577 06 14-03 577 84 43-01 Description SCREW EHHM KNOB HANDLE DISTANCE SQUARE NUT TUBE DECAL Remark 520iLX QTY KIT 1 1 1 1 1 1 1

Parts Manual
Page 7
US ONLY 520iLX QTY KIT 1 1 1 1 6 1 HANDLE Ref Part No Description 1 577 01 31-01 HANDLE HALF 2 577 01 32-02 HANDLE HALF 3 577 51 23-01 THROTTLE LOCKOUT 4 589 37 79-01 TRIGGER 5 579 21 19-01 SCREW IHSCT 6 589 27 40-01 THROTTLE LOCKOUT Remark From S/N 182500300, 536LiLX -
US ONLY 520iLX QTY KIT 1 1 1 1 6 1 HANDLE Ref Part No Description 1 577 01 31-01 HANDLE HALF 2 577 01 32-02 HANDLE HALF 3 577 51 23-01 THROTTLE LOCKOUT 4 589 37 79-01 TRIGGER 5 579 21 19-01 SCREW IHSCT 6 589 27 40-01 THROTTLE LOCKOUT Remark From S/N 182500300, 536LiLX -

Parts Manual
Page 9
HOUSING Ref Part No Description 1 577 01 41-01 COVER 2 577 00 76-03 HOUSING 3 577 02 22-01 CLAMP 4 579 21 19-01 SCREW IHSCT 5 588 91 98-01 SKID PLATE 6 577 01 30-02 HOUSING 7 585 48 00-01 SPRING 8 577 99 66-01 PUSH BUTTON 9 579 00 62-09 DECAL Remark 520iLX QTY KIT 1 1 1 14 1 1 1 1 1
HOUSING Ref Part No Description 1 577 01 41-01 COVER 2 577 00 76-03 HOUSING 3 577 02 22-01 CLAMP 4 579 21 19-01 SCREW IHSCT 5 588 91 98-01 SKID PLATE 6 577 01 30-02 HOUSING 7 585 48 00-01 SPRING 8 577 99 66-01 PUSH BUTTON 9 579 00 62-09 DECAL Remark 520iLX QTY KIT 1 1 1 14 1 1 1 1 1

Parts Manual
Page 11
ELECTRICAL Ref Part No Description 1 593 89 58-01 SWITCH KIT 2 582 71 37-01 WIRING ASSY 3 582 05 07-01 TRIGGER SWITCH 4 586 32 32-01 CONTROL UNIT 5 503 21 28-13 SCREW CCRPANT 6 577 02 21-06 MOTOR ASSY 7 587 32 72-01 BRACKET 8 593 81 30-01 CONNECTOR Remark 520iLX QTY KIT 1 11 11 1 4 1 1 1
ELECTRICAL Ref Part No Description 1 593 89 58-01 SWITCH KIT 2 582 71 37-01 WIRING ASSY 3 582 05 07-01 TRIGGER SWITCH 4 586 32 32-01 CONTROL UNIT 5 503 21 28-13 SCREW CCRPANT 6 577 02 21-06 MOTOR ASSY 7 587 32 72-01 BRACKET 8 593 81 30-01 CONNECTOR Remark 520iLX QTY KIT 1 11 11 1 4 1 1 1

Parts Manual
Page 13
ACCESSORIES Ref Part No Description 1 503 55 86-01 SPANNER 2 579 29 40-03 TRIMMER HEAD 3 585 51 08-02 HOUSING ASSY 4 577 05 03-01 SPRING 5 577 04 93-01 KNOB 6 578 19 69-01 COVER 7 501 33 04-01 GROMMET 8 583 89 71-01 DIAGNOSTIC TOOL KIT 9 579 62 13-01 WIRING ASSY Remark 520iLX QTY KIT 1 1 12 12 12 12 22 1 18
ACCESSORIES Ref Part No Description 1 503 55 86-01 SPANNER 2 579 29 40-03 TRIMMER HEAD 3 585 51 08-02 HOUSING ASSY 4 577 05 03-01 SPRING 5 577 04 93-01 KNOB 6 578 19 69-01 COVER 7 501 33 04-01 GROMMET 8 583 89 71-01 DIAGNOSTIC TOOL KIT 9 579 62 13-01 WIRING ASSY Remark 520iLX QTY KIT 1 1 12 12 12 12 22 1 18

Owner Manual
Page 3
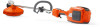
... button 19. This product can cut . Careless or incorrect use metal cutting elements. It is very important that it does not immediately cut off body parts. Do not use can cause injury. 756 - 001 - 24.10.2018 3 Protected against splashing water. Symbols on the battery and/or on the battery charger...
... button 19. This product can cut . Careless or incorrect use metal cutting elements. It is very important that it does not immediately cut off body parts. Do not use can cause injury. 756 - 001 - 24.10.2018 3 Protected against splashing water. Symbols on the battery and/or on the battery charger...

Owner Manual
Page 4
...we are not liable for damages that our product causes if: • the product is incorrectly repaired. • the product is repaired with parts that are not from the manufacturer or not approved by the manufacturer. • the product has an accessory that is not from the engine ...and notes are working area. Gloves should be worn when necessary. • Check that the trimmer head is completely attached to point out specially important parts of wear or damage and repair as stones, broken glass, nails, steel wire, string etc. Always use common sense when operating a power tool...
...we are not liable for damages that our product causes if: • the product is incorrectly repaired. • the product is repaired with parts that are not from the manufacturer or not approved by the manufacturer. • the product has an accessory that is not from the engine ...and notes are working area. Gloves should be worn when necessary. • Check that the trimmer head is completely attached to point out specially important parts of wear or damage and repair as stones, broken glass, nails, steel wire, string etc. Always use common sense when operating a power tool...
Owner Manual
Page 5
.... • Working in bad weather is tiring and often brings added risk. See instructions under the Maintenance heading. • Only use original spare parts. • Always ensure that ventilation openings are kept clear of debris. • Keep handles dry, clean and free from oil and grease. •...for which you should be supervised to ensure that they do the job better and with less likelihood of the product without approval from moving parts. • Wear personal protective equipment. Power tool use and care • The only accessories you use a product that is out of...
.... • Working in bad weather is tiring and often brings added risk. See instructions under the Maintenance heading. • Only use original spare parts. • Always ensure that ventilation openings are kept clear of debris. • Keep handles dry, clean and free from oil and grease. •...for which you should be supervised to ensure that they do the job better and with less likelihood of the product without approval from moving parts. • Wear personal protective equipment. Power tool use and care • The only accessories you use a product that is out of...

Owner Manual
Page 6
... when you work. Since the product is easy to start it is deactivated. • Watch out for stumps of non-authorized accessories or replacement parts. • Under no people or animals come closer than 15 metres while you cut to close supervision. • Ensure that no circumstances may ...in serious personal injury or the death of your hands and feet away from a ladder, stool or any other raised position that no clothes or parts of the manufacturer. Do not overreach. • Deactivate the product before you pass the product to start , children may not cover damage or...
... when you work. Since the product is easy to start it is deactivated. • Watch out for stumps of non-authorized accessories or replacement parts. • Under no people or animals come closer than 15 metres while you cut to close supervision. • Ensure that no circumstances may ...in serious personal injury or the death of your hands and feet away from a ladder, stool or any other raised position that no clothes or parts of the manufacturer. Do not overreach. • Deactivate the product before you pass the product to start , children may not cover damage or...

Owner Manual
Page 8
...availability of professional repairs and service. Different cord lengths can be inspected and maintained as described in water for the address of these parts are not carried out professionally. The product's safety equipment must contact your service agent to their original positions. CAUTION: All servicing... and repair work on any part of the Manual. • Make sure that the cutter on the trimmer guard is wound tightly and evenly around the drum to...
...availability of professional repairs and service. Different cord lengths can be inspected and maintained as described in water for the address of these parts are not carried out professionally. The product's safety equipment must contact your service agent to their original positions. CAUTION: All servicing... and repair work on any part of the Manual. • Make sure that the cutter on the trimmer guard is wound tightly and evenly around the drum to...
Owner Manual
Page 10
...; Do not lift the battery charger by any nonroad engine repair establishment or individual. Use of a cord suitable for your product. Only use original spare parts. • Maintenance, replacement, or repair of electrical shock or short circuit if the safety instructions are not obeyed. • Use an approved grounded mains socket...
...; Do not lift the battery charger by any nonroad engine repair establishment or individual. Use of a cord suitable for your product. Only use original spare parts. • Maintenance, replacement, or repair of electrical shock or short circuit if the safety instructions are not obeyed. • Use an approved grounded mains socket...
Owner Manual
Page 13
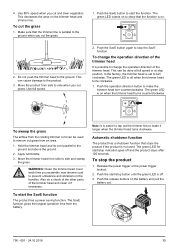
... at stop the product 1. Note: It is off . 3. Make sure that the function is possible to remove cut grass. Also do a check of the other parts of the trimmer head It is on when the trimmer head turns counterclockwise. To start /stop button until the green LED is set to the...
... at stop the product 1. Note: It is off . 3. Make sure that the function is possible to remove cut grass. Also do a check of the other parts of the trimmer head It is on when the trimmer head turns counterclockwise. To start /stop button until the green LED is set to the...

Owner Manual
Page 14
... in the product. Clean the battery and battery charger with a dry cloth. Keep the handles dry, clean and free from dirt. Maintenance Clean the external parts of the maintenance steps that the screws and nuts are not damaged and free from oil and grease. To clean the product, the battery and...
... in the product. Clean the battery and battery charger with a dry cloth. Keep the handles dry, clean and free from dirt. Maintenance Clean the external parts of the maintenance steps that the screws and nuts are not damaged and free from oil and grease. To clean the product, the battery and...


