
Parts Manual
Page 11
ELECTRICAL Ref Part No Description 1 593 89 58-01 SWITCH KIT 2 582 71 37-01 WIRING ASSY 3 582 05 07-01 TRIGGER SWITCH 4 586 32 32-01 CONTROL UNIT 5 503 21 28-13 SCREW CCRPANT 6 577 02 21-06 MOTOR ASSY 7 587 32 72-01 BRACKET 8 593 81 30-01 CONNECTOR Remark 520iLX QTY KIT 1 11 11 1 4 1 1 1
ELECTRICAL Ref Part No Description 1 593 89 58-01 SWITCH KIT 2 582 71 37-01 WIRING ASSY 3 582 05 07-01 TRIGGER SWITCH 4 586 32 32-01 CONTROL UNIT 5 503 21 28-13 SCREW CCRPANT 6 577 02 21-06 MOTOR ASSY 7 587 32 72-01 BRACKET 8 593 81 30-01 CONNECTOR Remark 520iLX QTY KIT 1 11 11 1 4 1 1 1

Parts Manual
Page 13
ACCESSORIES Ref Part No Description 1 503 55 86-01 SPANNER 2 579 29 40-03 TRIMMER HEAD 3 585 51 08-02 HOUSING ASSY 4 577 05 03-01 SPRING 5 577 04 93-01 KNOB 6 578 19 69-01 COVER 7 501 33 04-01 GROMMET 8 583 89 71-01 DIAGNOSTIC TOOL KIT 9 579 62 13-01 WIRING ASSY Remark 520iLX QTY KIT 1 1 12 12 12 12 22 1 18
ACCESSORIES Ref Part No Description 1 503 55 86-01 SPANNER 2 579 29 40-03 TRIMMER HEAD 3 585 51 08-02 HOUSING ASSY 4 577 05 03-01 SPRING 5 577 04 93-01 KNOB 6 578 19 69-01 COVER 7 501 33 04-01 GROMMET 8 583 89 71-01 DIAGNOSTIC TOOL KIT 9 579 62 13-01 WIRING ASSY Remark 520iLX QTY KIT 1 1 12 12 12 12 22 1 18

Owner Manual
Page 2
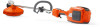
... Technical data 17 Operation 11 Accessories 18 Maintenance 14 Introduction Product description Husqvarna 520iLX is used with an electrical motor. Do not use The product is a battery grass trimmer with a trimmer head to increase your servicing dealer for other tasks than grass trimming and grass clearing. Keypad 2 756 - 001 - 24.10.2018 Note: National regulations can set limit to your safety and efficiency during operation. Trimmer head 2. Cutting attachment guard 3. Product overview 1 3 2 13...
... Technical data 17 Operation 11 Accessories 18 Maintenance 14 Introduction Product description Husqvarna 520iLX is used with an electrical motor. Do not use The product is a battery grass trimmer with a trimmer head to increase your servicing dealer for other tasks than grass trimming and grass clearing. Keypad 2 756 - 001 - 24.10.2018 Note: National regulations can set limit to your safety and efficiency during operation. Trimmer head 2. Cutting attachment guard 3. Product overview 1 3 2 13...

Owner Manual
Page 3
... the operator's manual. Handle adjustment 13. Power on the product WARNING! Protected against splashing water. Power trigger lockout 8. Start and stop button 19. It is the sequential number. Symbols on the battery and/or on the battery charger Recycle this product at a recycling station for the handle position. 7. Rotation direction button 17. Use flexible cutting wire as trimmer line. Keep a minimum distance of 15 m to Europe only) Maximum speed...
... the operator's manual. Handle adjustment 13. Power on the product WARNING! Protected against splashing water. Power trigger lockout 8. Start and stop button 19. It is the sequential number. Symbols on the battery and/or on the battery charger Recycle this product at a recycling station for the handle position. 7. Rotation direction button 17. Use flexible cutting wire as trimmer line. Keep a minimum distance of 15 m to Europe only) Maximum speed...

Owner Manual
Page 4
... instructions for future reference. Check before any impact, check for signs of the manual. Replace the trimmer head or trimmer guard if the have been exposed to your mains-operated (corded) power tool or batteryoperated (cordless) power tool. that is necessary in a given situation. See chapter on the product. • Before using the product and after the product is turned off grass and leaves from the engine using . The term "power tool...
... instructions for future reference. Check before any impact, check for signs of the manual. Replace the trimmer head or trimmer guard if the have been exposed to your mains-operated (corded) power tool or batteryoperated (cordless) power tool. that is necessary in a given situation. See chapter on the product. • Before using the product and after the product is turned off grass and leaves from the engine using . The term "power tool...
Owner Manual
Page 5
... protective equipment" heading. • Always use a product that are approved by trained and qualified specialists. Do not change a part of children and unauthorized persons. • Keep hands and feet away from oil and grease. • All covers, guards and handles must always be caught in this product are not kept under close supervision. Do the safety checks, maintenance and service instructions described in...
... protective equipment" heading. • Always use a product that are approved by trained and qualified specialists. Do not change a part of children and unauthorized persons. • Keep hands and feet away from oil and grease. • All covers, guards and handles must always be caught in this product are not kept under close supervision. Do the safety checks, maintenance and service instructions described in...

Owner Manual
Page 6
... the battery to use or service it. Always use . When several operators are working in the use of the product. Stop the product immediately if anyone approaches. Check the area around you for possible obstacles (roots, rocks, branches, ditches, etcetera) in the fingers, hands or wrists. • Always hold the product with the trimmer head. • Keep your control of...
... the battery to use or service it. Always use . When several operators are working in the use of the product. Stop the product immediately if anyone approaches. Check the area around you for possible obstacles (roots, rocks, branches, ditches, etcetera) in the fingers, hands or wrists. • Always hold the product with the trimmer head. • Keep your control of...

Owner Manual
Page 7
... rotates, as this machine. • Release the power trigger after each working operation to save battery power. • Don't force the product. Do not use hearing protectors when using products for which it was designed. • If any foreign object is wound around the blade shaft or caught between the guard and the cutting attachment. • This product produces an electromagnetic field...
... rotates, as this machine. • Release the power trigger after each working operation to save battery power. • Don't force the product. Do not use hearing protectors when using products for which it was designed. • If any foreign object is wound around the blade shaft or caught between the guard and the cutting attachment. • This product produces an electromagnetic field...

Owner Manual
Page 8
... the cord. B C A a) The product is lit. When you need further information please contact your service agent to their original positions. Press and hold the start/stop button (A). To do a check of the machine′s safety equipment. This will make sure the cutting attachment stops completely before it repaired. See instructions under the heading Product overview on page 18. WARNING: Never use the trimmer line...
... the cord. B C A a) The product is lit. When you need further information please contact your service agent to their original positions. Press and hold the start/stop button (A). To do a check of the machine′s safety equipment. This will make sure the cutting attachment stops completely before it repaired. See instructions under the heading Product overview on page 18. WARNING: Never use the trimmer line...

Owner Manual
Page 9
... cutting attachment guard stops objects that the return springs operate properly. 4. Refer to apply full speed. 6. If you get medical aid. Stop the motor. 2. To do not use a defective or damaged battery. • Keep batteries in its original position when you use the product. • Only use , see Accessories on page 14. • Do not use the battery as a power supply for example cracks. 2. 1. Push the power trigger...
... cutting attachment guard stops objects that the return springs operate properly. 4. Refer to apply full speed. 6. If you get medical aid. Stop the motor. 2. To do not use a defective or damaged battery. • Keep batteries in its original position when you use the product. • Only use , see Accessories on page 14. • Do not use the battery as a power supply for example cracks. 2. 1. Push the power trigger...
Owner Manual
Page 10
Pull out the plug to the battery charger if there is not damaged. • Do not use other checks or assemble the product. • The operator must only do the maintenance and servicing shown in case an electrical fault should occur. • When operating a power tool outdoors, use an extension cord suitable for maintenance and servicing of a larger extension. • Do not clean the battery or the battery charger with good...
Pull out the plug to the battery charger if there is not damaged. • Do not use other checks or assemble the product. • The operator must only do the maintenance and servicing shown in case an electrical fault should occur. • When operating a power tool outdoors, use an extension cord suitable for maintenance and servicing of a larger extension. • Do not clean the battery or the battery charger with good...

Owner Manual
Page 11
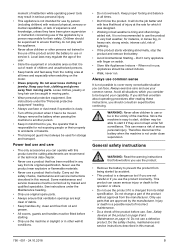
... makes the battery become cool before you use the product. To assemble the loop handle 1. B A 2. Install the nut, the knob and the screw. To assemble the trimmer guard 1. Install the correct trimmer guard for dirt or cracks. Operation Introduction WARNING: Read and understand the safety chapter before the battery charges. Note: The battery does not charge if the battery temperature is necessary. • Examine the trimmer head and cutting attachment guard for damages...
... makes the battery become cool before you use the product. To assemble the loop handle 1. B A 2. Install the nut, the knob and the screw. To assemble the trimmer guard 1. Install the correct trimmer guard for dirt or cracks. Operation Introduction WARNING: Read and understand the safety chapter before the battery charges. Note: The battery does not charge if the battery temperature is necessary. • Examine the trimmer head and cutting attachment guard for damages...
Owner Manual
Page 12
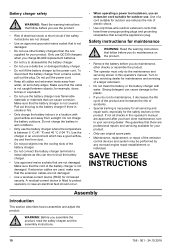
.... To disconnect the battery charger from the battery charger. Remove the battery from the mains socket, pull the plug. Note: Refer to plants. 4. To operate the product To trim the grass 1. Do not push the trimmer line into the battery holder, the battery is connected correctly to use Husqvarna original batteries with the end of the trimmer line around objects in . 3. Decrease the engine speed to decrease the risk...
.... To disconnect the battery charger from the battery charger. Remove the battery from the mains socket, pull the plug. Note: Refer to plants. 4. To operate the product To trim the grass 1. Do not push the trimmer line into the battery holder, the battery is connected correctly to use Husqvarna original batteries with the end of the trimmer line around objects in . 3. Decrease the engine speed to decrease the risk...
Owner Manual
Page 13
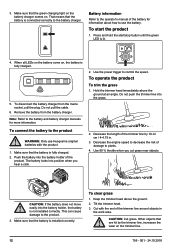
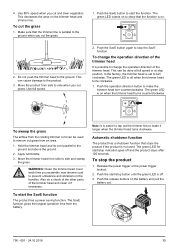
... at full speed or at stop position. Push the start the function. This can cause damage to remove cut the grass 1. WARNING: Clean the trimmer head cover each time you cut grass. Also do a check of the other parts of the trimmer head It is not used to the product. 3. The SavE function gives the longest operation time from side to side when you assemble new trimmer cord to make the trimmer head turn clockwise. To cut grass from...
... at full speed or at stop position. Push the start the function. This can cause damage to remove cut the grass 1. WARNING: Clean the trimmer head cover each time you cut grass. Also do a check of the other parts of the trimmer head It is not used to the product. 3. The SavE function gives the longest operation time from side to side when you assemble new trimmer cord to make the trimmer head turn clockwise. To cut grass from...

Owner Manual
Page 14
... the product. Maintenance schedule WARNING: Remove the battery before you do maintenance. Replace the cutting attachment if it is charged. Replace the cutting attachment guard if it is not damaged. Examine all controls work and are not damaged and free from oil and grease. To clean the product, the battery and the battery charger 1. Make sure that the cutting attachment is damaged. Make sure that the power trigger and the power trigger lockout function...
... the product. Maintenance schedule WARNING: Remove the battery before you do maintenance. Replace the cutting attachment if it is charged. Replace the cutting attachment guard if it is not damaged. Examine all controls work and are not damaged and free from oil and grease. To clean the product, the battery and the battery charger 1. Make sure that the cutting attachment is damaged. Make sure that the power trigger and the power trigger lockout function...

Owner Manual
Page 15
... the manual. 1. Install the trimmer head. Replace the trimmer head. 5. Troubleshooting Keypad LED display Green activate LED flashing Possible faults Low battery voltage. Remove the nut that the terminals on the last pages of days before the battery is assembled. Press the snap-in the battery charger or the product. Put the cord into the hole on the trimmer head and remove the trimmer head and trimmer line. 4. Pull out the line chute assembly. 3. To do a check...
... the manual. 1. Install the trimmer head. Replace the trimmer head. 5. Troubleshooting Keypad LED display Green activate LED flashing Possible faults Low battery voltage. Remove the nut that the terminals on the last pages of days before the battery is assembled. Press the snap-in the battery charger or the product. Put the cord into the hole on the trimmer head and remove the trimmer head and trimmer line. 4. Pull out the line chute assembly. 3. To do a check...

Owner Manual
Page 16
... active. The product needs servicing. Possible action The cutting attachment is lit Possible faults Possible action Low battery voltage. Battery LED display Green activate LED flashing Error LED flashing Error LED is jammed. Use the battery in the battery connectors. Battery charger LED display Possible faults Error LED flashes Temperature deviation. Overvoltage. Remove the battery. Let the product cool down. Clean the battery connectors with red light...
... active. The product needs servicing. Possible action The cutting attachment is lit Possible faults Possible action Low battery voltage. Battery LED display Green activate LED flashing Error LED flashing Error LED is jammed. Use the battery in the battery connectors. Battery charger LED display Possible faults Error LED flashes Temperature deviation. Overvoltage. Remove the battery. Let the product cool down. Clean the battery connectors with red light...

Owner Manual
Page 17
... when you put the battery in a package. Do not keep the battery in an area where static electricity can lock. • Clean the product and do a full servicing before you put the product in storage for a long time. • Use the transportation guard on the product to a person with BLi200, Lbs/kg Water protection level All weather use 520iLX BLDC (brushless) 36...
... when you put the battery in a package. Do not keep the battery in an area where static electricity can lock. • Clean the product and do a full servicing before you put the product in storage for a long time. • Use the transportation guard on the product to a person with BLi200, Lbs/kg Water protection level All weather use 520iLX BLDC (brushless) 36...
Owner Manual
Page 18
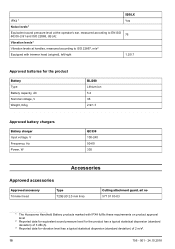
... levels3 Vibration levels at handles, measured according to ISO 22867, m/s2 Equipped with trimmer head (original), left/right 1.2/0.7 Approved batteries for the product Battery Type Battery capacity, Ah Nominal voltage, V Weight, lb/kg BLi200 Lithium-ion 5.2 36 2.9/1.3 Approved battery chargers Battery charger Input voltage, V Frequency, Hz Power, W QC330 100-240 50-60 330 Accessories Approved accessories Approved accessory Trimmer head Type T25B (Ø 2.0 mm line) Cutting attachment guard, art...
... levels3 Vibration levels at handles, measured according to ISO 22867, m/s2 Equipped with trimmer head (original), left/right 1.2/0.7 Approved batteries for the product Battery Type Battery capacity, Ah Nominal voltage, V Weight, lb/kg BLi200 Lithium-ion 5.2 36 2.9/1.3 Approved battery chargers Battery charger Input voltage, V Frequency, Hz Power, W QC330 100-240 50-60 330 Accessories Approved accessories Approved accessory Trimmer head Type T25B (Ø 2.0 mm line) Cutting attachment guard, art...

Owner Manual
Page 19
Approved accessory J-handle set Type J-handle Cutting attachment guard, art no 587 37 50-02 756 - 001 - 24.10.2018 19
Approved accessory J-handle set Type J-handle Cutting attachment guard, art no 587 37 50-02 756 - 001 - 24.10.2018 19


