
Owner Manual
Page 2
... 3. Contents Introduction 2 Safety 4 Assembly 10 Troubleshooting 15 Transportation, storage and disposal 17 Technical data 17 Operation 11 Accessories 18 Maintenance 14 Introduction Product description Husqvarna 520iLX is a battery grass trimmer with a trimmer head to your safety and efficiency during operation. Work is constantly in progress to the operation of the product. Speak to...
... 3. Contents Introduction 2 Safety 4 Assembly 10 Troubleshooting 15 Transportation, storage and disposal 17 Technical data 17 Operation 11 Accessories 18 Maintenance 14 Introduction Product description Husqvarna 520iLX is a battery grass trimmer with a trimmer head to your safety and efficiency during operation. Work is constantly in progress to the operation of the product. Speak to...

Owner Manual
Page 3
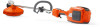
...Power on the product WARNING! yyyy is the production year, ww is the production week and xxxx is used. Operator's manual 12. Battery release buttons 21. 4 mm hex key Symbols on and warning indicator (error LED) 20. Careless or incorrect use metal cutting elements.... Protected against splashing water. Use heavy-duty slip-resistant boots. 7. Battery charger 11. SavE button 18. Start and stop button 19. Direct current. Use approved protective gloves. Double insulation. The arrows show ...
...Power on the product WARNING! yyyy is the production year, ww is the production week and xxxx is used. Operator's manual 12. Battery release buttons 21. 4 mm hex key Symbols on and warning indicator (error LED) 20. Careless or incorrect use metal cutting elements.... Protected against splashing water. Use heavy-duty slip-resistant boots. 7. Battery charger 11. SavE button 18. Start and stop button 19. Direct current. Use approved protective gloves. Double insulation. The arrows show ...

Owner Manual
Page 4
...• Keep bystanders away. • Stay alert, watch what you are doing and use common sense when operating a power tool. Always remove the battery before any impact, check for signs of wear or damage and repair as stones, broken glass, nails, steel wire, string etc. Remove all instructions. ... use the recommended guard for the cutting attachment you are tired or under the influence of the product before starting • Always remove the battery to given regulations. See chapter on the product. • Before using the product and after the product is turned off grass and leaves ...
...• Keep bystanders away. • Stay alert, watch what you are doing and use common sense when operating a power tool. Always remove the battery before any impact, check for signs of wear or damage and repair as stones, broken glass, nails, steel wire, string etc. Remove all instructions. ... use the recommended guard for the cutting attachment you are tired or under the influence of the product before starting • Always remove the battery to given regulations. See chapter on the product. • Before using the product and after the product is turned off grass and leaves ...
Owner Manual
Page 5
... in heavy rain, strong winds, intense cold, risk of lightning. • If the product starts vibrating abnormally, stop the product and remove the battery. • Avoid Unintentional Starting - Since the machine is not under the "Personal protective equipment" heading. • Always use face or dust mask... and free from the manufacturer. Children should be in the vicinity of the machine. See instructions under full surveillance. Therefore disconnect the battery when the machine is easy to prevent the product from the cutting area at the rate for which you , the operator that has...
... in heavy rain, strong winds, intense cold, risk of lightning. • If the product starts vibrating abnormally, stop the product and remove the battery. • Avoid Unintentional Starting - Since the machine is not under the "Personal protective equipment" heading. • Always use face or dust mask... and free from the manufacturer. Children should be in the vicinity of the machine. See instructions under full surveillance. Therefore disconnect the battery when the machine is easy to prevent the product from the cutting area at the rate for which you , the operator that has...

Owner Manual
Page 6
...or any other objects can be thrown out when you work . Contact your dealer or your body. 6 756 - 001 - 24.10.2018 Disconnect the battery when the product is deactivated. • Watch out for stumps of branches that can be thrown out. • Watch out for thrown objects. Remove all... a risk of serious personal injury. Never swing the product around the cutting attachment. • Make sure that you work on . • Remove the battery before you move to another area. • Never put the product down unless you pass the product to another person. • Make sure that no...
...or any other objects can be thrown out when you work . Contact your dealer or your body. 6 756 - 001 - 24.10.2018 Disconnect the battery when the product is deactivated. • Watch out for stumps of branches that can be thrown out. • Watch out for thrown objects. Remove all... a risk of serious personal injury. Never swing the product around the cutting attachment. • Make sure that you work on . • Remove the battery before you move to another area. • Never put the product down unless you pass the product to another person. • Make sure that no...

Owner Manual
Page 7
... use loose clothing that can result in serious injury. • Always stop the product immediately. WARNING: Hearing protectors limit the ability to save battery power. • Don't force the product. Put your dealer help you attach, examine or clean the cutting equipment. • Use sturdy ...non-slip boots. • Long term exposure to consult their hearing checked regularly. In general, battery powered products are relatively quiet but it was designed. • If any foreign object is hit or if vibrations occur stop the product,...
... use loose clothing that can result in serious injury. • Always stop the product immediately. WARNING: Hearing protectors limit the ability to save battery power. • Don't force the product. Put your dealer help you attach, examine or clean the cutting equipment. • Use sturdy ...non-slip boots. • Long term exposure to consult their hearing checked regularly. In general, battery powered products are relatively quiet but it was designed. • If any foreign object is hit or if vibrations occur stop the product,...

Owner Manual
Page 8
... the power trigger lockout The power trigger lockout is wound tightly and evenly around the drum to prevent accidental operation. Cutting attachment WARNING: Remove the battery and make the cord tougher. Press and hold the start/stop button (A). See Troubleshooting on when the LED (B) is assembled. B A C 8 756 - 001 - 24.10.2018...
... the power trigger lockout The power trigger lockout is wound tightly and evenly around the drum to prevent accidental operation. Cutting attachment WARNING: Remove the battery and make the cord tougher. Press and hold the start/stop button (A). See Troubleshooting on when the LED (B) is assembled. B A C 8 756 - 001 - 24.10.2018...

Owner Manual
Page 9
...Accessories on page 14. • Do not use non-rechargeable batteries. • Do not put objects into the air slots of the battery. • Keep the battery away from metal objects such as a power supply for the related Husqvarna products only. Make sure that you have touched the liquid, ...clean the area with water. Replace the cutting attachment guard if it . Battery safety WARNING: Read the...
...Accessories on page 14. • Do not use non-rechargeable batteries. • Do not put objects into the air slots of the battery. • Keep the battery away from metal objects such as a power supply for the related Husqvarna products only. Make sure that you have touched the liquid, ...clean the area with water. Replace the cutting attachment guard if it . Battery safety WARNING: Read the...
Owner Manual
Page 10
...out the plug to assemble and adjust the product. Make sure that the cord of a larger extension. • Do not clean the battery or the battery charger with good airflow and away from dust. • Do not put objects into the cooling slots of the emission control devices and ... cause damage to protect operators in an environment which has a good airflow, dry and free from sunlight. WARNING: Before you do maintenance, other battery chargers than the one supplied for your product. Use the charger in case an electrical fault should occur. • When operating a power tool ...
...out the plug to assemble and adjust the product. Make sure that the cord of a larger extension. • Do not clean the battery or the battery charger with good airflow and away from dust. • Do not put objects into the cooling slots of the emission control devices and ... cause damage to protect operators in an environment which has a good airflow, dry and free from sunlight. WARNING: Before you do maintenance, other battery chargers than the one supplied for your product. Use the charger in case an electrical fault should occur. • When operating a power tool ...

Owner Manual
Page 11
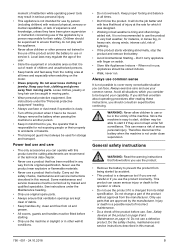
...it is necessary. • Examine the trimmer head and cutting attachment guard for the trimmer head, refer to the voltage and frequency that the battery is specified on the plate holder (A). 3. The LED on the opposite side of the loop handle. 3. Hang the trimmer guard on the ... the loop handle 1. Install the nut, the knob and the screw. Do not tighten too much. 4. To connect the battery charger 1. To charge the battery Note: Charge the battery if it is the first time that all covers, guards, handles and the cutting equipment are given in this manual. •...
...it is necessary. • Examine the trimmer head and cutting attachment guard for the trimmer head, refer to the voltage and frequency that the battery is specified on the plate holder (A). 3. The LED on the opposite side of the loop handle. 3. Hang the trimmer guard on the ... the loop handle 1. Install the nut, the knob and the screw. Do not tighten too much. 4. To connect the battery charger 1. To charge the battery Note: Charge the battery if it is the first time that all covers, guards, handles and the cutting equipment are given in this manual. •...
Owner Manual
Page 12
...: Refer to the battery and battery charger manuals for information about how to the battery charger. The battery locks into the battery holder, the battery is fully charged. 5. 3. CAUTION: If the battery does not move easily into position when you cut grass near objects. That means that the battery is connected correctly to use Husqvarna original batteries with the end...
...: Refer to the battery and battery charger manuals for information about how to the battery charger. The battery locks into the battery holder, the battery is fully charged. 5. 3. CAUTION: If the battery does not move easily into position when you cut grass near objects. That means that the battery is connected correctly to use Husqvarna original batteries with the end...
Owner Manual
Page 13
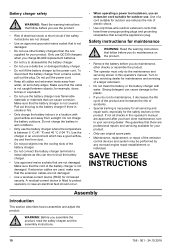
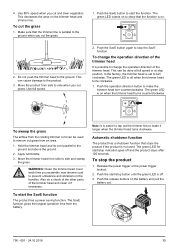
...trimmer head and trimmer line. 4. Use 80% speed when you assemble new trimmer cord to start /stop position. This decreases the wear on the battery and pull the battery out. 756 - 001 - 24.10.2018 13 To cut and clear vegetation. The green LED comes on to stop the product 1. Move the... product from the battery. Push the SavE button again to show that stops the product if the product is on . 2. In the factory, the trimmer head is on when...
...trimmer head and trimmer line. 4. Use 80% speed when you assemble new trimmer cord to start /stop position. This decreases the wear on the battery and pull the battery out. 756 - 001 - 24.10.2018 13 To cut and clear vegetation. The green LED comes on to stop the product 1. Move the... product from the battery. Push the SavE button again to show that stops the product if the product is on . 2. In the factory, the trimmer head is on when...

Owner Manual
Page 14
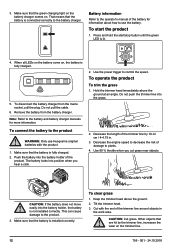
...Read and understand the safety chapter before you must do on the battery works and locks the battery in it is damaged. Maintenance schedule WARNING: Remove the battery before you do maintenance. Make sure that the battery release buttons on the product. Make sure that the cutting attachment is...sure that the start and stop button works correctly and is not damaged. Examine that the battery is not damaged. Replace the cutting attachment guard if it . Make sure that the battery charger is charged. Keep the handles dry, clean and free from a safety point of ...
...Read and understand the safety chapter before you must do on the battery works and locks the battery in it is damaged. Maintenance schedule WARNING: Remove the battery before you do maintenance. Make sure that the battery release buttons on the product. Make sure that the cutting attachment is...sure that the start and stop button works correctly and is not damaged. Examine that the battery is not damaged. Replace the cutting attachment guard if it . Make sure that the battery charger is charged. Keep the handles dry, clean and free from a safety point of ...

Owner Manual
Page 15
... the terminals on the trimmer head and remove the trimmer head and trimmer line. 4. Troubleshooting Keypad LED display Green activate LED flashing Possible faults Low battery voltage. To do a check of the manual. 1. To replace the trimmer head Note: To increase the life of the cord it can be... soaked in clips on the battery and the battery charger are clean before it follows the recommendation. 2. Press the snap-in water for a couple of the product to make the cord tougher. ...
... the terminals on the trimmer head and remove the trimmer head and trimmer line. 4. Troubleshooting Keypad LED display Green activate LED flashing Possible faults Low battery voltage. To do a check of the manual. 1. To replace the trimmer head Note: To increase the life of the cord it can be... soaked in clips on the battery and the battery charger are clean before it follows the recommendation. 2. Press the snap-in water for a couple of the product to make the cord tougher. ...

Owner Manual
Page 16
... Error LED flashes Temperature deviation. Overvoltage. deactivate the product. Contact your servicing agent. Charge the battery. Use the battery in the battery connectors. Remove the battery from unwanted materials. Temperature deviation. Dirt in surroundings where temperatures are pressed at the same time.... Make sure that the mains voltage is active. The product needs servicing. The battery is lit Possible faults Possible action Low battery voltage. The power trigger and the activate button are between 5°C (14°F) and 40°...
... Error LED flashes Temperature deviation. Overvoltage. deactivate the product. Contact your servicing agent. Charge the battery. Use the battery in the battery connectors. Remove the battery from unwanted materials. Temperature deviation. Dirt in surroundings where temperatures are pressed at the same time.... Make sure that the mains voltage is active. The product needs servicing. The battery is lit Possible faults Possible action Low battery voltage. The power trigger and the activate button are between 5°C (14°F) and 40°...

Owner Manual
Page 17
... electricity can lock. • Clean the product and do a full servicing before you put it in storage for long periods. • Put the battery charger in storage in a package. Keep the equipment in a space that you put the product in storage for a long time. • Use... commercial transportation, including by third parties and forwarding agents. • Speak to a person with BLi200, Lbs/kg Water protection level All weather use 520iLX BLDC (brushless) 36 V 5500 15.7/400 6.6/3.0 9.5/4.3 Yes 756 - 001 - 24.10.2018 17 Obey all applicable national regulations. • Use tape on...
... electricity can lock. • Clean the product and do a full servicing before you put it in storage for long periods. • Put the battery charger in storage in a package. Keep the equipment in a space that you put the product in storage for a long time. • Use... commercial transportation, including by third parties and forwarding agents. • Speak to a person with BLi200, Lbs/kg Water protection level All weather use 520iLX BLDC (brushless) 36 V 5500 15.7/400 6.6/3.0 9.5/4.3 Yes 756 - 001 - 24.10.2018 17 Obey all applicable national regulations. • Use tape on...
Owner Manual
Page 18
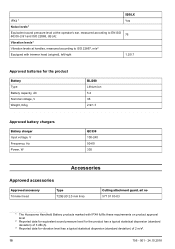
520iLX IPX4 1 Yes Noise levels2 Equivalent sound pressure level at the operator's ear, measured according to EN ISO 60335-2-91 and ISO 22868, dB (A): 76 Vibration levels3 Vibration levels at handles, measured according to ISO 22867, m/s2 Equipped with trimmer head (original), left/right 1.2/0.7 Approved batteries for the product Battery Type Battery...Type T25B (Ø 2.0 mm line) Cutting attachment guard, art no 577 01 83-03 1 The Husqvarna Handheld Battery products marked with IPX4 fulfils these requirements on product approval level 2 Reported data for equivalent sound pressure ...
520iLX IPX4 1 Yes Noise levels2 Equivalent sound pressure level at the operator's ear, measured according to EN ISO 60335-2-91 and ISO 22868, dB (A): 76 Vibration levels3 Vibration levels at handles, measured according to ISO 22867, m/s2 Equipped with trimmer head (original), left/right 1.2/0.7 Approved batteries for the product Battery Type Battery...Type T25B (Ø 2.0 mm line) Cutting attachment guard, art no 577 01 83-03 1 The Husqvarna Handheld Battery products marked with IPX4 fulfils these requirements on product approval level 2 Reported data for equivalent sound pressure ...


