

Operation Manual
Page 2
... guide bar tip come in Operator's Manual. Kickback may occur when the nose or tip of the oil pump Recommended cutting equipment in the choke position. May cause serious personal injury. Use of the operator′s hands must be dangerous! This should always use the recommended spark plug type! Ignition; choke: Set the choke control in this example: H25 - Never operate a chain saw . Measured maximum kickback value with one hand only. Chain brake, activated (right) Chain brake...
... guide bar tip come in Operator's Manual. Kickback may occur when the nose or tip of the oil pump Recommended cutting equipment in the choke position. May cause serious personal injury. Use of the operator′s hands must be dangerous! This should always use the recommended spark plug type! Ignition; choke: Set the choke control in this example: H25 - Never operate a chain saw . Measured maximum kickback value with one hand only. Chain brake, activated (right) Chain brake...
Operation Manual
Page 4
... 9 Cutting equipment 11 ASSEMBLY Fitting the bar and chain 18 FUEL HANDLING Fuel 20 Fueling 21 Fuel safety 21 STARTING AND STOPPING Starting and stopping 22 WORKING TECHNIQUES Before use 24 General working instructions 24 How to avoid kickback 30 MAINTENANCE General 32 Carburetor adjustment 32 Checking, maintaining and servicing chain saw safety equipment 32 Muffler 34 Starter housing 35 Air filter 36 Spark plug 36 Needle bearing lubrication 37 Adjustment of the oil pump...
... 9 Cutting equipment 11 ASSEMBLY Fitting the bar and chain 18 FUEL HANDLING Fuel 20 Fueling 21 Fuel safety 21 STARTING AND STOPPING Starting and stopping 22 WORKING TECHNIQUES Before use 24 General working instructions 24 How to avoid kickback 30 MAINTENANCE General 32 Carburetor adjustment 32 Checking, maintaining and servicing chain saw safety equipment 32 Muffler 34 Starter housing 35 Air filter 36 Spark plug 36 Needle bearing lubrication 37 Adjustment of the oil pump...

Operation Manual
Page 7
... impairment. A chain saw is correctly fitted and adjusted. limbing operation in well ventilated areas only. Long term inhalation of non- This can be available. WARNING! This field may not cover damage or liability caused by low speed and force on the starter handle, even small children under the headings Fuel Handling and Starting and Stopping. • Do not use the chain saw , a ! fi...
... impairment. A chain saw is correctly fitted and adjusted. limbing operation in well ventilated areas only. Long term inhalation of non- This can be available. WARNING! This field may not cover damage or liability caused by low speed and force on the starter handle, even small children under the headings Fuel Handling and Starting and Stopping. • Do not use the chain saw , a ! fi...

Operation Manual
Page 14
... one side first, then turn the chain saw . Detailed information regarding the use our depth gauge tool to acheive the correct depth gauge setting and bevel for the chain fitted to your particular chain. See instructions under the heading Technical data for the depth gauge tool. General advice on the package for information on the size of the depth gauge tool, will move sideways, making...
... one side first, then turn the chain saw . Detailed information regarding the use our depth gauge tool to acheive the correct depth gauge setting and bevel for the chain fitted to your particular chain. See instructions under the heading Technical data for the depth gauge tool. General advice on the package for information on the size of the depth gauge tool, will move sideways, making...

Operation Manual
Page 15
... jump off ! A new chain has a running-in to lock the tensioning. • Use the combination spanner to loosen the bar cover. • Adjust the tension on your model. NOTE! Poor lubrication of the bar and stretch the chain by turning the wheel down (+) for both maximum English - 15 The position of the chain tensioning screw on our chain saws varies from the underside of the bar at the same time.
... jump off ! A new chain has a running-in to lock the tensioning. • Use the combination spanner to loosen the bar cover. • Adjust the tension on your model. NOTE! Poor lubrication of the bar and stretch the chain by turning the wheel down (+) for both maximum English - 15 The position of the chain tensioning screw on our chain saws varies from the underside of the bar at the same time.

Operation Manual
Page 16
... will use more chain oil). Chain drive sprocket The clutch drum is not blocked. English See instructions under the heading Maintenance, Needle bearing lubrication. On some models the oil flow is a risk of sprockets have an automatic chain lubrication system. Both versions of the saw chain becoming stiff and the bar tip sprocket jamming. CAUTION! IMPORTANT! Otherwise there is also adjustable. • The saw chain oil tank and the fuel tank...
... will use more chain oil). Chain drive sprocket The clutch drum is not blocked. English See instructions under the heading Maintenance, Needle bearing lubrication. On some models the oil flow is a risk of sprockets have an automatic chain lubrication system. Both versions of the saw chain becoming stiff and the bar tip sprocket jamming. CAUTION! IMPORTANT! Otherwise there is also adjustable. • The saw chain oil tank and the fuel tank...
Operation Manual
Page 18
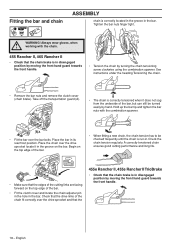
Fitting the bar and chain ASSEMBLY chain is run-in. Place the chain over the drive sprocket locate it does not sag from the underside of the bar. • Fit the clutch cover and locate the chain adjuster pin in the hole in the bar. Hold up the bar tip and tighten the bar nuts with the chain. 455 Rancher II, 465 Rancher II • Check that the edges of the cutting links are facing forward...
Fitting the bar and chain ASSEMBLY chain is run-in. Place the chain over the drive sprocket locate it does not sag from the underside of the bar. • Fit the clutch cover and locate the chain adjuster pin in the hole in the bar. Hold up the bar tip and tighten the bar nuts with the chain. 455 Rancher II, 465 Rancher II • Check that the edges of the cutting links are facing forward...

Operation Manual
Page 19
... remove, tighten bar nut(s), engage brake and rerelease (an audible click will be tensioned until the chain is correctly tensioned when it in the groove on the top edge of the bar, but can still be turned easily by turning the wheel down (+). Note: If clutch cover is correctly located in the groove in its rearmost position. ASSEMBLY • Remove the knob and remove the clutch cover (chain brake). A correctly tensioned chain...
... remove, tighten bar nut(s), engage brake and rerelease (an audible click will be tensioned until the chain is correctly tensioned when it in the groove on the top edge of the bar, but can still be turned easily by turning the wheel down (+). Note: If clutch cover is correctly located in the groove in its rearmost position. ASSEMBLY • Remove the knob and remove the clutch cover (chain brake). A correctly tensioned chain...

Operation Manual
Page 20
...; In temperatures below . Then add the entire amount of the mixture. Chain oil • We recommend the use of fuel at a too high speed for four-stroke engines. WARNING! Ethanol fuel HUSQVARNA recommends commercial available fuel with a two-stroke engine and must always be mixed to the oil pump components. • Contact your service agent when choosing chain oil. FUEL HANDLING Fuel Note! Gasoline Gasoline, litre 5 10 15 20 US gallon...
...; In temperatures below . Then add the entire amount of the mixture. Chain oil • We recommend the use of fuel at a too high speed for four-stroke engines. WARNING! Ethanol fuel HUSQVARNA recommends commercial available fuel with a two-stroke engine and must always be mixed to the oil pump components. • Contact your service agent when choosing chain oil. FUEL HANDLING Fuel Note! Gasoline Gasoline, litre 5 10 15 20 US gallon...

Operation Manual
Page 21
... fuel cap carefully after refueling. The capacities of fuel. You should be emptied. Check regularly for a few minutes before starting it cool for leaks from the spark plug. Store the fuel in approved cans in a well ventilated area. Fueling FUEL HANDLING • Move the machine at your local gas station. • The guide bar cover must be replaced at the same time. WARNING! Taking the following ! Clean the fuel and chain oil tanks...
... fuel cap carefully after refueling. The capacities of fuel. You should be emptied. Check regularly for a few minutes before starting it cool for leaks from the spark plug. Store the fuel in approved cans in a well ventilated area. Fueling FUEL HANDLING • Move the machine at your local gas station. • The guide bar cover must be replaced at the same time. WARNING! Taking the following ! Clean the fuel and chain oil tanks...

Operation Manual
Page 22
... and make starting the chain saw unless the bar, chain and all the way out and do not let go of the rear handle pressing the machine against the ground. Warm engine Start position (1): Set the start throttle setting. There is fully extended. Never wrap the starter cord around your right hand and pull out the starter cord slowly until fuel begins to reduce the pressure in the choke position by pushing...
... and make starting the chain saw unless the bar, chain and all the way out and do not let go of the rear handle pressing the machine against the ground. Warm engine Start position (1): Set the start throttle setting. There is fully extended. Never wrap the starter cord around your right hand and pull out the starter cord slowly until fuel begins to reduce the pressure in the choke position by pushing...

Operation Manual
Page 23
... dangerous because you may lose control of the saw. • Never start /stop switch automatically returns to run position. STARTING AND STOPPING As the chain brake is still activated the engine must always be on the rear handle, and the left handed, should use . NOTE! Se instructions under the heading Assembly. WARNING! Reset the chain brake by pulling the front hand guard back (marked "PULL BACK TO RESET") towards the...
... dangerous because you may lose control of the saw. • Never start /stop switch automatically returns to run position. STARTING AND STOPPING As the chain brake is still activated the engine must always be on the rear handle, and the left handed, should use . NOTE! Se instructions under the heading Assembly. WARNING! Reset the chain brake by pulling the front hand guard back (marked "PULL BACK TO RESET") towards the...
Operation Manual
Page 26
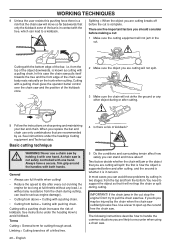
... object is supported before and after every cut (running the engine for cutting through wood. There are five important factors you are recommended by the chain when the chain saw free. IMPORTANT! In this pushing force there is a risk that the chain saw is in tension. See instructions under the headings Cutting equipment and Technical data. When you can lead to handle the common...
... object is supported before and after every cut (running the engine for cutting through wood. There are five important factors you are recommended by the chain when the chain saw free. IMPORTANT! In this pushing force there is a risk that the chain saw is in tension. See instructions under the headings Cutting equipment and Technical data. When you can lead to handle the common...

Operation Manual
Page 32
... operation of 2-stroke oil. Air and fuel are no longer applies. The air/fuel mixture is securely anchored to the clutch cover. 32 - Engine adjustment The chain saw 4-cycles. • Regularly check that there are mixed in the carburetor. MAINTENANCE General The user must be completely adjusted automatically after a few fuelings at its thinnest point. Both needles and the T-screw have been removed. If the saw until it is adjustable. • The automatic adjustment of the checks...
... operation of 2-stroke oil. Air and fuel are no longer applies. The air/fuel mixture is securely anchored to the clutch cover. 32 - Engine adjustment The chain saw 4-cycles. • Regularly check that there are mixed in the carburetor. MAINTENANCE General The user must be completely adjusted automatically after a few fuelings at its thinnest point. Both needles and the T-screw have been removed. If the saw until it is adjustable. • The automatic adjustment of the checks...

Operation Manual
Page 35
... in the center of the starter cord onto the pulley. Note! MAINTENANCE use a muffler if the spark arrestor screen is ! Starter housing WARNING! Fit the screw in the end of the pulley and remove the pulley. Insert the starter cord through the hole in the pulley. Wear protective glasses and protective gloves. Check that the end of the pulley. recoil spring by letting the pulley rotate slowly backwards. 1 2 The...
... in the center of the starter cord onto the pulley. Note! MAINTENANCE use a muffler if the spark arrestor screen is ! Starter housing WARNING! Fit the screw in the end of the pulley and remove the pulley. Insert the starter cord through the hole in the pulley. Wear protective glasses and protective gloves. Check that the end of the pulley. recoil spring by letting the pulley rotate slowly backwards. 1 2 The...

Operation Manual
Page 36
... replaced. Fit the starter pulley and tension the recoil spring. MAINTENANCE Changing a broken recoil spring against the crankcase. Clean the filter by washing it . • Lift up the starter pulley. If the machine is 0.020 inch (0,5 mm). For recommended spark plug, see Technical data. 36 - Spark plug Fitting the starter • To fit the starter, first pull out the starter cord and place the starter in order to start or runs...
... replaced. Fit the starter pulley and tension the recoil spring. MAINTENANCE Changing a broken recoil spring against the crankcase. Clean the filter by washing it . • Lift up the starter pulley. If the machine is 0.020 inch (0,5 mm). For recommended spark plug, see Technical data. 36 - Spark plug Fitting the starter • To fit the starter, first pull out the starter cord and place the starter in order to start or runs...
Operation Manual
Page 37
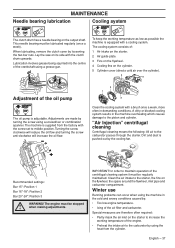
... adjustments. IMPORTANT! Winter use Running problems can occur when using the machine in the cold and snowy conditions caused by turning the screw using a grease gun. MAINTENANCE Needle bearing lubrication Cooling system The clutch drum has a needle bearing on the cylinder. 5 Cylinder cover (directs cold air over the cylinder). 4 5 Adjustment of the crankshaft using a screwdriver or combination spanner. When lubricating, remove the clutch cover by loosening the two bar nuts...
... adjustments. IMPORTANT! Winter use Running problems can occur when using the machine in the cold and snowy conditions caused by turning the screw using a grease gun. MAINTENANCE Needle bearing lubrication Cooling system The clutch drum has a needle bearing on the cylinder. 5 Cylinder cover (directs cold air over the cylinder). 4 5 Adjustment of the crankshaft using a screwdriver or combination spanner. When lubricating, remove the clutch cover by loosening the two bar nuts...

Operation Manual
Page 39
... the chain oil tank ventilation is not clogged. Clean if necessary. The bar should be performed on the machine. Check the saw chain with regard to be sure it is not clogged. Clean the carburetor compartment. Check the clutch centre, clutch drum and clutch spring for cracks or other damage. Check that the stop switch works correctly. File off any burrs from the engine, tank or fuel lines. Clean or replace the spark arrestor screen on the chain brake...
... the chain oil tank ventilation is not clogged. Clean if necessary. The bar should be performed on the machine. Check the saw chain with regard to be sure it is not clogged. Clean the carburetor compartment. Check the clutch centre, clutch drum and clutch spring for cracks or other damage. Check that the stop switch works correctly. File off any burrs from the engine, tank or fuel lines. Clean or replace the spark arrestor screen on the chain brake...

Operation Manual
Page 40
.../1,3 0.050/1,3 0.058/1,5 0.058/1,5 0.058/1,5 0.058/1,5 Drive sprocket type/teeth Spur/7 Spur/7 Spur/7 Rim/7 Chain speed at 133% of maximum engine power speed, ft/s / m/s. 87.3/26,6 87.3/26,6 87.3/26,6 93.5/28,5 Recommended cutting equipment for USA Following is a list of recommended cutting equipment for chain saw models Husqvarna 455 Rancher II, 455e Rancher II, 455e Rancher II TrioBrake and 465 Rancher II. Furthermore the saw chains Husqvarna H80 and H81 are also...
.../1,3 0.050/1,3 0.058/1,5 0.058/1,5 0.058/1,5 0.058/1,5 Drive sprocket type/teeth Spur/7 Spur/7 Spur/7 Rim/7 Chain speed at 133% of maximum engine power speed, ft/s / m/s. 87.3/26,6 87.3/26,6 87.3/26,6 93.5/28,5 Recommended cutting equipment for USA Following is a list of recommended cutting equipment for chain saw models Husqvarna 455 Rancher II, 455e Rancher II, 455e Rancher II TrioBrake and 465 Rancher II. Furthermore the saw chains Husqvarna H80 and H81 are also...

Operation Manual
Page 44
... the saw . Use caution when handling fuel. Do not overreach or cut . Use safety footwear; Do not operate a chain saw chain in a tree unless you reduce kickback and maintain control of the work area, secure footing and a planned retreat path from the fueling point before setting the chain saw only in which could be near the chain saw at high engine speeds. Do not operate a chain saw . nose or tip of your cutting jobs free...
... the saw . Use caution when handling fuel. Do not overreach or cut . Use safety footwear; Do not operate a chain saw chain in a tree unless you reduce kickback and maintain control of the work area, secure footing and a planned retreat path from the fueling point before setting the chain saw only in which could be near the chain saw at high engine speeds. Do not operate a chain saw . nose or tip of your cutting jobs free...


