
Operation Manual
Page 2
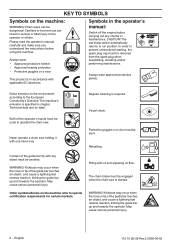
... prevent unintentional starting, the spark plug cap must be dangerous! Visual check. Kickback may occur when the nose or tip of the guide bar touches an object, and cause a lightning fast reverse reaction, kicking the guide bar up and towards the operator. Chain saws can result in the operator's manual: Switch off the engine before using the machine. Noise emission to the environment according to run position. Protective goggles...
... prevent unintentional starting, the spark plug cap must be dangerous! Visual check. Kickback may occur when the nose or tip of the guide bar touches an object, and cause a lightning fast reverse reaction, kicking the guide bar up and towards the operator. Chain saws can result in the operator's manual: Switch off the engine before using the machine. Noise emission to the environment according to run position. Protective goggles...
Operation Manual
Page 3
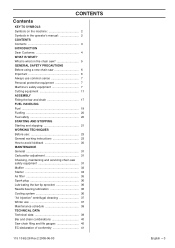
... equipment 7 Cutting equipment 11 ASSEMBLY Fitting the bar and chain 17 FUEL HANDLING Fuel 19 Fuelling 20 Fuel safety 20 STARTING AND STOPPING Starting and stopping 21 WORKING TECHNIQUES Before use 23 General working instructions 23 How to avoid kickback 30 MAINTENANCE General 31 Carburettor adjustment 31 Checking, maintaining and servicing chain saw safety equipment 31 Muffler 33 Starter 34 Air filter 35 Spark plug 36 Lubricating the bar tip...
... equipment 7 Cutting equipment 11 ASSEMBLY Fitting the bar and chain 17 FUEL HANDLING Fuel 19 Fuelling 20 Fuel safety 20 STARTING AND STOPPING Starting and stopping 21 WORKING TECHNIQUES Before use 23 General working instructions 23 How to avoid kickback 30 MAINTENANCE General 31 Carburettor adjustment 31 Checking, maintaining and servicing chain saw safety equipment 31 Muffler 33 Starter 34 Air filter 35 Spark plug 36 Lubricating the bar tip...
Operation Manual
Page 6
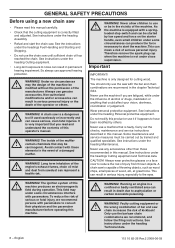
... are fatigued, while under the headings Fuel Handling and Starting and Stopping. • Do not use the bar/saw until sufficient chain oil has reached the chain. CAUTION! The ignition system of a damaged muffler. Avoid contact with pacemakers. Faulty cutting equipment or ! See the instructions under the in permanent hearing impairment. Never use ! tool if used carelessly or incorrectly and can result...
... are fatigued, while under the headings Fuel Handling and Starting and Stopping. • Do not use the bar/saw until sufficient chain oil has reached the chain. CAUTION! The ignition system of a damaged muffler. Avoid contact with pacemakers. Faulty cutting equipment or ! See the instructions under the in permanent hearing impairment. Never use ! tool if used carelessly or incorrectly and can result...
Operation Manual
Page 11
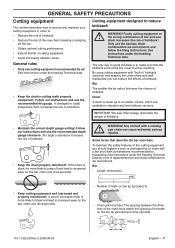
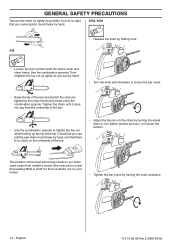
...! By using cutting equipment with "built-in" kickback reduction and keeping the chain sharp and wellmaintained you should replace a worn or damaged bar or chain with a rotating ! saw chain can reduce the effects of kickback. IMPORTANT! Follow our instructions and use the recommended file gauge. See instructions under the heading Technical Data for a list of accidents. A poorly lubricated chain is made up of a number of kickback...
...! By using cutting equipment with "built-in" kickback reduction and keeping the chain sharp and wellmaintained you should replace a worn or damaged bar or chain with a rotating ! saw chain can reduce the effects of kickback. IMPORTANT! Follow our instructions and use the recommended file gauge. See instructions under the heading Technical Data for a list of accidents. A poorly lubricated chain is made up of a number of kickback...

Operation Manual
Page 13
... is too large! Sharpening cutting teeth WARNING! increased if the depth gauge setting is therefore important to adjust the chain regularly to file off ! See instructions under the heading Technical data for the depth gauge tool. A slack chain may jump off the tip of the depth gauge tool, will decrease. Check the chain tension every time you sharpen the cutting tooth (A) the depth gauge setting (C) will be replaced.
... is too large! Sharpening cutting teeth WARNING! increased if the depth gauge setting is therefore important to adjust the chain regularly to file off ! See instructions under the heading Technical data for the depth gauge tool. A slack chain may jump off the tip of the depth gauge tool, will decrease. Check the chain tension every time you sharpen the cutting tooth (A) the depth gauge setting (C) will be replaced.
Operation Manual
Page 14
...; Turn the knob anti clockwise to loosen the bar cover. • Raise the tip of the bar. • Adjust the tension on the chain by turning the wheel down (+) for tighter tension and up the tip of the chain tensioning screw on our chain saws varies from the underside of the bar. • Use the combination spanner to tighten the bar nut while holding up (-) to model. See instructions...
...; Turn the knob anti clockwise to loosen the bar cover. • Raise the tip of the bar. • Adjust the tension on the chain by turning the wheel down (+) for tighter tension and up the tip of the chain tensioning screw on our chain saws varies from the underside of the bar. • Use the combination spanner to tighten the bar nut while holding up (-) to model. See instructions...

Operation Manual
Page 15
... our chain saws have developed an optimal chain oil which could lead to lock the tensioning. Checking chain lubrication • Check the chain lubrication each time you also use waste oil! equipment may mean that the fuel lasts longer than the oil) and that the fuel runs out before long-term storage. IMPORTANT! Clean if necessary. • Check that is also biodegradable. See instructions under the heading Lubricating the bar tip...
... our chain saws have developed an optimal chain oil which could lead to lock the tensioning. Checking chain lubrication • Check the chain lubrication each time you also use waste oil! equipment may mean that the fuel lasts longer than the oil) and that the fuel runs out before long-term storage. IMPORTANT! Clean if necessary. • Check that is also biodegradable. See instructions under the heading Lubricating the bar tip...

Operation Manual
Page 17
... the bar. Unscrew the bar nut and remove the clutch cover (chain brake). Remove the transport guard. (A) Make sure that the edges of the cutting links are facing forward on the top edge of the bar. Place the chain over the bar bolt. Tighten the bar nut with your fingers. When fitting a new chain, the chain tension has to fit the chain adjuster pin in the hole in . Check that the drive links...
... the bar. Unscrew the bar nut and remove the clutch cover (chain brake). Remove the transport guard. (A) Make sure that the edges of the cutting links are facing forward on the top edge of the bar. Place the chain over the bar bolt. Tighten the bar nut with your fingers. When fitting a new chain, the chain tension has to fit the chain adjuster pin in the hole in . Check that the drive links...
Operation Manual
Page 19
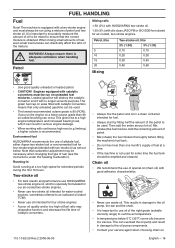
... for our air-cooled two-stroke engines. • Never use oil intended for some oils become too viscous. This gives rise to as set out below 0°C (32°F) some time the fuel tank should be run on unleaded fuel mixtures. This can drastically affect the ratio of petrol and twostroke oil. FUEL HANDLING Fuel Note! Petrol Mixing ratio 1:50 (2%) with HUSQVARNA two-stroke oil. 1:33 (3%) with a two-stroke engine and must...
... for our air-cooled two-stroke engines. • Never use oil intended for some oils become too viscous. This gives rise to as set out below 0°C (32°F) some time the fuel tank should be run on unleaded fuel mixtures. This can drastically affect the ratio of petrol and twostroke oil. FUEL HANDLING Fuel Note! Petrol Mixing ratio 1:50 (2%) with HUSQVARNA two-stroke oil. 1:33 (3%) with a two-stroke engine and must...
Operation Manual
Page 20
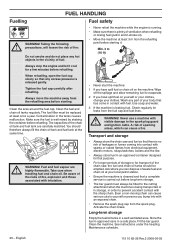
... part of sparking arises, which can cause serious cuts to the spark plug guard and ignition cable. highly flammable. Long-term storage Empty the fuel/oil tanks in a safe place. Store the fuel in approved cans in a well ventilated area. See instructions under the heading Maintenance schedule. 20 - When refuelling, open the fuel cap slowly so that purpose. • For longer periods of the chain oil tank and fuel tank are ! WARNING! Use...
... part of sparking arises, which can cause serious cuts to the spark plug guard and ignition cable. highly flammable. Long-term storage Empty the fuel/oil tanks in a safe place. Store the fuel in approved cans in a well ventilated area. See instructions under the heading Maintenance schedule. 20 - When refuelling, open the fuel cap slowly so that purpose. • For longer periods of the chain oil tank and fuel tank are ! WARNING! Use...
Operation Manual
Page 21
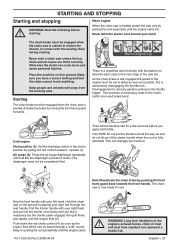
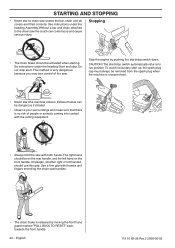
... pull the starter cord all covers are fitted correctly. English - 21 STARTING AND STOPPING Starting and stopping WARNING! The chain brake must be engaged when the chain saw is a simplified start reminder with illustrations to reduce the chance of the engine must be completely filled. Never start /stop switch in the choke position by placing your left hand. The chain saw (A). Grip the front handle...
... pull the starter cord all covers are fitted correctly. English - 21 STARTING AND STOPPING Starting and stopping WARNING! The chain brake must be engaged when the chain saw is a simplified start reminder with illustrations to reduce the chance of the engine must be completely filled. Never start /stop switch in the choke position by placing your left hand. The chain saw (A). Grip the front handle...
Operation Manual
Page 22
... you may lose control of people or animals coming into contact with both hands. Se instructions under the heading Assembly. The start /stop . The right hand should use this grip. This method is no risk of the saw the clutch can be on the rear handle, and the left hand on the front handle. Without a bar and chain attached to run position. CAUTION! Stop the...
... you may lose control of people or animals coming into contact with both hands. Se instructions under the heading Assembly. The start /stop . The right hand should use this grip. This method is no risk of the saw the clutch can be on the rear handle, and the left hand on the front handle. Without a bar and chain attached to run position. CAUTION! Stop the...
Operation Manual
Page 25
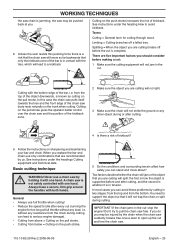
...;rst is how the object is supported before making a cut and free the chain saw by the chain when the chain saw suddenly breaks free. Use a lever to idle after every cut . There are five important factors you are cutting will not trap the chain or split during cutting. Cutting on the pull stroke gives the operator better control over the chain saw and the position of the kickback zone. 2 Make sure...
...;rst is how the object is supported before making a cut and free the chain saw by the chain when the chain saw suddenly breaks free. Use a lever to idle after every cut . There are five important factors you are cutting will not trap the chain or split during cutting. Cutting on the pull stroke gives the operator better control over the chain saw and the position of the kickback zone. 2 Make sure...
Operation Manual
Page 31
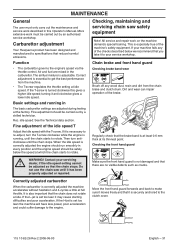
... turning it has been properly adjusted or repaired. idle speed: See the Technical data section. When the idle speed is correctly adjusted the machine accelerates without hesitation and 4-cycles a little at which the chain starts to rotate. If your machine fails any wood dust, resin and dirt from the machine. • The T-screw regulates the throttle setting at idle. Checking the front hand guard WARNING! Contact your service...
... turning it has been properly adjusted or repaired. idle speed: See the Technical data section. When the idle speed is correctly adjusted the machine accelerates without hesitation and 4-cycles a little at which the chain starts to rotate. If your machine fails any wood dust, resin and dirt from the machine. • The T-screw regulates the throttle setting at idle. Checking the front hand guard WARNING! Contact your service...
Operation Manual
Page 32
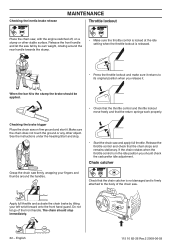
... brake release MAINTENANCE Throttle lockout Place the chain saw, with the engine switched off, on firm ground and start it. Checking the brake trigger Place the chain saw fall by tilting your fingers and thumbs around the rear handle towards the stump. • Make sure the throttle control is locked at the idle setting when the throttle lockout is in the idle position you release it. See the instructions under the heading Start...
... brake release MAINTENANCE Throttle lockout Place the chain saw, with the engine switched off, on firm ground and start it. Checking the brake trigger Place the chain saw fall by tilting your fingers and thumbs around the rear handle towards the stump. • Make sure the throttle control is locked at the idle setting when the throttle lockout is in the idle position you release it. See the instructions under the heading Start...
Operation Manual
Page 33
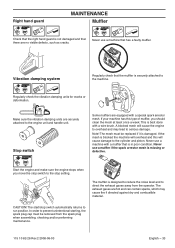
... move the stop switch to the stop switch automatically returns to prevent unintentional starting, the spark plug cap must be removed from the operator. Note! In order to run position. Right hand guard MAINTENANCE Muffler Check that the right hand guard is not damaged and that has a faulty muffler. Start the engine and make sure the engine stops when you should clean the mesh...
... move the stop switch to the stop switch automatically returns to prevent unintentional starting, the spark plug cap must be removed from the operator. Note! In order to run position. Right hand guard MAINTENANCE Muffler Check that the right hand guard is not damaged and that has a faulty muffler. Start the engine and make sure the engine stops when you should clean the mesh...
Operation Manual
Page 34
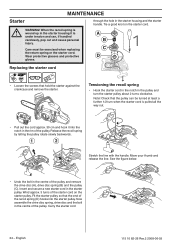
... the pulley. Fit the starter pulley so that hold the starter against the crankcase and remove the starter. English 115 10 82-26 Rev.2 2008-06-03 Insert and secure a new starter cord in the starter housing and the starter handle. Carry the starter cord 34 - Wear protective glasses and protective gloves. Now assemble the drive disc spring, drive disc and the bolt in the pulley and turn when the starter cord is pulled all...
... the pulley. Fit the starter pulley so that hold the starter against the crankcase and remove the starter. English 115 10 82-26 Rev.2 2008-06-03 Insert and secure a new starter cord in the starter housing and the starter handle. Carry the starter cord 34 - Wear protective glasses and protective gloves. Now assemble the drive disc spring, drive disc and the bolt in the pulley and turn when the starter cord is pulled all...
Operation Manual
Page 35
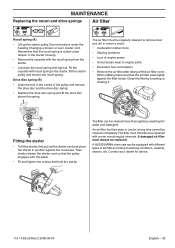
... time cannot be replaced. See instructions under tension in the starter housing. • Remove the cassette with the recoil spring from the starter. • Lubricate the recoil spring with recoil spring in water and detergent. Fit the cassette with light oil. Drive disc spring (B) • Undo the bolt in position against the filter holder. A damaged air filter must therefore be regularly cleaned to engine parts. • Excessive fuel...
... time cannot be replaced. See instructions under tension in the starter housing. • Remove the cassette with the recoil spring from the starter. • Lubricate the recoil spring with recoil spring in water and detergent. Fit the cassette with light oil. Drive disc spring (B) • Undo the bolt in position against the filter holder. A damaged air filter must therefore be regularly cleaned to engine parts. • Excessive fuel...
Operation Manual
Page 36
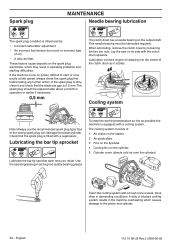
... on the spark plug electrodes, which causes damage to start or runs poorly at idle speed: always check the spark plug first before taking any further action. These factors cause deposits on the cylinder. 5 Cylinder cover (directs cold air over the cylinder). When lubricating, remove the clutch cover by : • Incorrect carburettor adjustment. • An incorrect fuel mixture (too much or incorrect type of the wrong spark plug can...
... on the spark plug electrodes, which causes damage to start or runs poorly at idle speed: always check the spark plug first before taking any further action. These factors cause deposits on the cylinder. 5 Cylinder cover (directs cold air over the cylinder). When lubricating, remove the clutch cover by : • Incorrect carburettor adjustment. • An incorrect fuel mixture (too much or incorrect type of the wrong spark plug can...
Operation Manual
Page 37
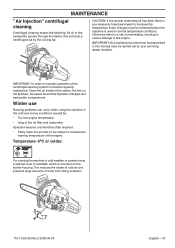
... increase the working temperature of the air filter and carburettor. Temperature -5°C or colder: For running the machine in the cold and snowy conditions caused by: • Too low engine temperature. • Icing of the engine. Winter use Running problems can occur when using the machine in cold weather or powder snow, a special cover is available, which is mounted...
... increase the working temperature of the air filter and carburettor. Temperature -5°C or colder: For running the machine in the cold and snowy conditions caused by: • Too low engine temperature. • Icing of the engine. Winter use Running problems can occur when using the machine in cold weather or powder snow, a special cover is available, which is mounted...


