

Owner Manual
Page 3
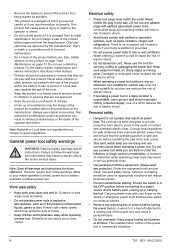
... Warnings, cautions and notes are not obeyed. 25. Transport guard Symbols on you. Use approved eye protection. Do not expose to point out specially important parts of at least 10 m between the product and high-voltage power lines and/or any objects that no persons or animals come closer than 15...
... Warnings, cautions and notes are not obeyed. 25. Transport guard Symbols on you. Use approved eye protection. Do not expose to point out specially important parts of at least 10 m between the product and high-voltage power lines and/or any objects that no persons or animals come closer than 15...
Owner Manual
Page 4
... result in the OFF-position before use a ground fault circuit interrupter (GFCI) protected supply. A wrench or a key left attached to a rotating part of electric shock. • Avoid body contact with earthed (grounded) power tools. • Remove the battery to prevent the product from being started... with your finger on page 13. A moment of the product be supervised to provide protection from heat, oil, sharp edges or moving parts. This enables better control of electric shock. Comply to rain or wet conditions. Electrical safety • Power tool plugs must match the ...
... result in the OFF-position before use a ground fault circuit interrupter (GFCI) protected supply. A wrench or a key left attached to a rotating part of electric shock. • Avoid body contact with earthed (grounded) power tools. • Remove the battery to prevent the product from being started... with your finger on page 13. A moment of the product be supervised to provide protection from heat, oil, sharp edges or moving parts. This enables better control of electric shock. Comply to rain or wet conditions. Electrical safety • Power tool plugs must match the ...

Owner Manual
Page 5
...Saw chains contacting a "live " and could result in a hazardous situation. Further protective equipment for misalignment or binding of moving parts, breakage of dust extraction and collection facilities, ensure these instructions to become complacement and ignore tool safety principles. Power tools are provided...when it on the rear handle and your application. A careless action can make sure the saw chain when using only identical replacement parts. Use of a second. • The vibration emission during actual use . A charger that can cause severe injury within a...
...Saw chains contacting a "live " and could result in a hazardous situation. Further protective equipment for misalignment or binding of moving parts, breakage of dust extraction and collection facilities, ensure these instructions to become complacement and ignore tool safety principles. Power tools are provided...when it on the rear handle and your application. A careless action can make sure the saw chain when using only identical replacement parts. Use of a second. • The vibration emission during actual use . A charger that can cause severe injury within a...

Owner Manual
Page 7
... service and/or repairs are located on twigs and branches. This is off. 2. b) The product is off when the LED is especially true of these parts are not carried out professionally. If you buy any of the machine′s safety equipment. When you need further information please contact your product. C •...
... service and/or repairs are located on twigs and branches. This is off. 2. b) The product is off when the LED is especially true of these parts are not carried out professionally. If you buy any of the machine′s safety equipment. When you need further information please contact your product. C •...

Owner Manual
Page 10
... at temperatures below -10°C the product and the battery must only do maintenance, it could lead to your product. • Only use original spare parts. If the product touches or comes close to high-voltage power lines it decreases the life cycle of the product and increases the risk of...
... at temperatures below -10°C the product and the battery must only do maintenance, it could lead to your product. • Only use original spare parts. If the product touches or comes close to high-voltage power lines it decreases the life cycle of the product and increases the risk of...

Owner Manual
Page 12
... the longest operation time from bouncing on the underside of fungal attack. • Use the stop at right angles to prevent jamming. Push the lower part of the cutting head to the tree. Make sure that you hear a click. 4. 3. The battery locks into the battery holder. To start the SavE function...
... the longest operation time from bouncing on the underside of fungal attack. • Use the stop at right angles to prevent jamming. Push the lower part of the cutting head to the tree. Make sure that you hear a click. 4. 3. The battery locks into the battery holder. To start the SavE function...

Owner Manual
Page 13
... and clean. Make sure that the function is a list of the product with a dry cloth. 1. The following is on the product. Maintenance Clean the external parts of the maintenance steps that the battery release buttons on the product. Push the 2 release buttons and pull out the battery. 2. Clean the oil tank...
... and clean. Make sure that the function is a list of the product with a dry cloth. 1. The following is on the product. Maintenance Clean the external parts of the maintenance steps that the battery release buttons on the product. Push the 2 release buttons and pull out the battery. 2. Clean the oil tank...
Owner Manual
Page 14
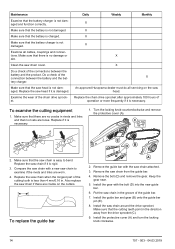
.... Make sure that there is necessary. 1. Examine the wear of the guide bar. 7. To examine the cutting equipment 1. Replace the saw chain when the longest part of operation or more frequently if it is no damage or dirt. Keep the gear near. 5. Install the gear with the saw chain in . Put... the saw chain cover. C E DB 2. To replace the guide bar A 2. Make sure that the saw chain from the drive sprocket (C). 9. Daily X X X X Weekly Monthly X X X An approved Husqvarna dealer must do all cables, couplings and connections.
.... Make sure that there is necessary. 1. Examine the wear of the guide bar. 7. To examine the cutting equipment 1. Replace the saw chain when the longest part of operation or more frequently if it is no damage or dirt. Keep the gear near. 5. Install the gear with the saw chain in . Put... the saw chain cover. C E DB 2. To replace the guide bar A 2. Make sure that the saw chain from the drive sprocket (C). 9. Daily X X X X Weekly Monthly X X X An approved Husqvarna dealer must do all cables, couplings and connections.
Owner Manual
Page 16
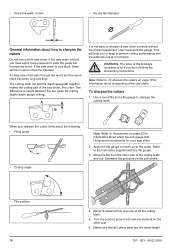
...; Drive link width, mm/in height between the two gives the cutting depth (depth gauge setting). Use Husqvarna file gauge. WARNING: The force of the saw chain. 2. Make sure that Husqvarna recommends for your saw chain. A sharp saw chain correctly without the correct equipment. A B It is ... information about the following: • Filing angle. • Cutting angle. The cutting tooth (A) and the depth gauge (B) together makes the cutting part of all cutting teeth are the same length. 707 - 003 - 04.03.2019 This will be no wood chips but sawdust. Decrease the pressure...
...; Drive link width, mm/in height between the two gives the cutting depth (depth gauge setting). Use Husqvarna file gauge. WARNING: The force of the saw chain. 2. Make sure that Husqvarna recommends for your saw chain. A sharp saw chain correctly without the correct equipment. A B It is ... information about the following: • Filing angle. • Cutting angle. The cutting tooth (A) and the depth gauge (B) together makes the cutting part of all cutting teeth are the same length. 707 - 003 - 04.03.2019 This will be no wood chips but sawdust. Decrease the pressure...

Owner Manual
Page 17
... you adjust the depth gauge setting or sharpen the cutters, refer to General information about how to the saw chain regularly to remove the part of the depth gauge tool for instructions. Apply as possible, but it does not hang from the guide bar and cause serious injury or... adjust the depth gauge setting. To lubricate cutting equipment WARNING: Poor lubrication of the saw chain has a running-in period. We recommend you use Husqvarna depth gauge tool to serious, even fatal injuries. We recommend that you to receive the correct depth gauge setting and bevel for the depth gauge...
... you adjust the depth gauge setting or sharpen the cutters, refer to General information about how to the saw chain regularly to remove the part of the depth gauge tool for instructions. Apply as possible, but it does not hang from the guide bar and cause serious injury or... adjust the depth gauge setting. To lubricate cutting equipment WARNING: Poor lubrication of the saw chain has a running-in period. We recommend you use Husqvarna depth gauge tool to serious, even fatal injuries. We recommend that you to receive the correct depth gauge setting and bevel for the depth gauge...


