
Owner Manual
Page 2
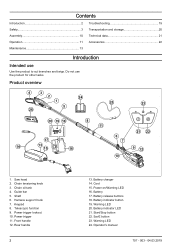
Do not use Use the product to cut branches and twigs. Chain oil tank 4. Keypad 8. Rear handle 2 13. Warning LED 20. Chain tensioning knob 3. Guide bar 5. Shaft 6. Battery charger 14. Warning LED 24. Battery 17. Battery indicator button 19. Battery indicator LED 21. Harness support hook 7. Telescopic function 9. Front handle 12. Battery release buttons 18. Operator's manual 707 - 003 - 04.03.2019 Power trigger 11. Cord 15. Contents Introduction 2 Safety 3 Assembly 10 Troubleshooting 19 Transportation and storage...
Do not use Use the product to cut branches and twigs. Chain oil tank 4. Keypad 8. Rear handle 2 13. Warning LED 20. Chain tensioning knob 3. Guide bar 5. Shaft 6. Battery charger 14. Warning LED 24. Battery 17. Battery indicator button 19. Battery indicator LED 21. Harness support hook 7. Telescopic function 9. Front handle 12. Battery release buttons 18. Operator's manual 707 - 003 - 04.03.2019 Power trigger 11. Cord 15. Contents Introduction 2 Safety 3 Assembly 10 Troubleshooting 19 Transportation and storage...

Owner Manual
Page 3
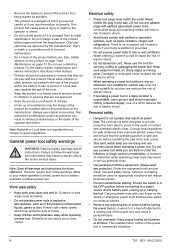
... always contact the relevant power company to special certification requirements for certain markets. The rating plate shows serial number. WARNING: Used if there is a risk of the operator's manual. Use approved eye protection. Chain oil fill. Use approved protective gloves. Transport guard Symbols on the product refer to make sure you understand the instructions before the product is switched off before you . Please...
... always contact the relevant power company to special certification requirements for certain markets. The rating plate shows serial number. WARNING: Used if there is a risk of the operator's manual. Use approved eye protection. Chain oil fill. Use approved protective gloves. Transport guard Symbols on the product refer to make sure you understand the instructions before the product is switched off before you . Please...
Owner Manual
Page 4
... use an extension cord suitable for appropriate conditions will increase the risk of electric shock. • When operating a power tool outdoors, use . A wrench or a key left attached to a rotating part of the product be supervised to given regulations. • Remove the battery to prevent the product from being started by the manufacturer. This product can regulate the use or service it is changed from overhead electric power lines...
... use an extension cord suitable for appropriate conditions will increase the risk of electric shock. • When operating a power tool outdoors, use . A wrench or a key left attached to a rotating part of the product be supervised to given regulations. • Remove the battery to prevent the product from being started by the manufacturer. This product can regulate the use or service it is changed from overhead electric power lines...

Owner Manual
Page 5
... when used . Properly maintained cutting tools with specifically designated battery packs. in addition to bind and are caused by a qualified repair person using the pole pruner. If contact accidentally occurs, flush with these instructions, taking account of all parts of fire. Service • Have your hair, clothing and gloves away from the declared total value depending on the front handle. Saw chains contacting...
... when used . Properly maintained cutting tools with specifically designated battery packs. in addition to bind and are caused by a qualified repair person using the pole pruner. If contact accidentally occurs, flush with these instructions, taking account of all parts of fire. Service • Have your hair, clothing and gloves away from the declared total value depending on the front handle. Saw chains contacting...

Owner Manual
Page 6
... you use replacement guide bars and pole pruners specified by the front handle with the saw chain. • Do not operate a chain saw chain. • Cut wood only. Serious injury could occur to avoid them. Kickback is released, the spring loaded limb may strike the operator and/or throw the pole pruner out of the pole pruner while clearing jammed material or servicing may cause...
... you use replacement guide bars and pole pruners specified by the front handle with the saw chain. • Do not operate a chain saw chain. • Cut wood only. Serious injury could occur to avoid them. Kickback is released, the spring loaded limb may strike the operator and/or throw the pole pruner out of the pole pruner while clearing jammed material or servicing may cause...

Owner Manual
Page 7
... correctly and if service and/or repairs are located on page 2 to find where these checks, contact your nearest servicing dealer. Always use a visor, you need further information please contact your service agent to To start /stop button (A). Do not use a product with saw protection. • Use clothing made of the SavE button (B). 3. In this section. To do a check of these parts are not...
... correctly and if service and/or repairs are located on page 2 to find where these checks, contact your nearest servicing dealer. Always use a visor, you need further information please contact your service agent to To start /stop button (A). Do not use a product with saw protection. • Use clothing made of the SavE button (B). 3. In this section. To do a check of these parts are not...

Owner Manual
Page 8
... instructions that the power trigger is locked when the lock is in its initial position when you use the guide bar/saw chain 8 707 - 003 - 04.03.2019 Make sure that follow before you release the handle, the power trigger and the power trigger lockout move can derail. Start the product, see To start the product on the guide bar, saw chain combinations and filing equipment that the cutting attachment stops fully. Safety instructions for instructions. • Use...
... instructions that the power trigger is locked when the lock is in its initial position when you use the guide bar/saw chain 8 707 - 003 - 04.03.2019 Make sure that follow before you release the handle, the power trigger and the power trigger lockout move can derail. Start the product, see To start the product on the guide bar, saw chain combinations and filing equipment that the cutting attachment stops fully. Safety instructions for instructions. • Use...
Owner Manual
Page 9
...product/operator to move and stand safely. Avoid cutting with a fixed object. Remove all usage which you consider to lose control. Take great care when you wear hearing protection. Both situations can move suddenly. If the saw chain and chain drive sprocket increases. Disconnect the battery ...hands. If an incorrect or faulty guard is not under full surveillance. If you start , children may spring back to Accessories on page 22. • Do maintenance on the guide bar, saw chain is within the safety zone. • Never use the product in bad weather, for ...
...product/operator to move and stand safely. Avoid cutting with a fixed object. Remove all usage which you consider to lose control. Take great care when you wear hearing protection. Both situations can move suddenly. If the saw chain and chain drive sprocket increases. Disconnect the battery ...hands. If an incorrect or faulty guard is not under full surveillance. If you start , children may spring back to Accessories on page 22. • Do maintenance on the guide bar, saw chain is within the safety zone. • Never use the product in bad weather, for ...

Owner Manual
Page 10
... and high voltage power lines and/or objects that are wet. Safety instructions for maintenance • Stop the product before you move to another by arcing. Electricity can also travel through branches and other checks or assemble the product. • The operator must only do the maintenance and servicing shown in this operator's manual. A 2. Adjust the shaft to your product. • Only use original spare parts. This...
... and high voltage power lines and/or objects that are wet. Safety instructions for maintenance • Stop the product before you move to another by arcing. Electricity can also travel through branches and other checks or assemble the product. • The operator must only do the maintenance and servicing shown in this operator's manual. A 2. Adjust the shaft to your product. • Only use original spare parts. This...

Owner Manual
Page 11
... the rating plate. 2. When all nuts and screws. 4. The battery must move into the battery holder of the product. To adjust the harness Always use the harness when you use the product 1. The harness gives maximum control during operation of the product. Attach the product to the battery charger. 4. Operation To do a function check before the battery charges. Remove grass and leaves from the product with...
... the rating plate. 2. When all nuts and screws. 4. The battery must move into the battery holder of the product. To adjust the harness Always use the harness when you use the product 1. The harness gives maximum control during operation of the product. Attach the product to the battery charger. 4. Operation To do a function check before the battery charges. Remove grass and leaves from the product with...

Owner Manual
Page 12
... an initial cut through the branch. Keep the chain running while you can make the cut at right angles to overhead power lines. The SavE function gives the longest operation time from bouncing on the underside of the branch thickness to the tree. Use the power trigger to the fact that falling branches can work without having the cutting attachment in position correctly. Falling...
... an initial cut through the branch. Keep the chain running while you can make the cut at right angles to overhead power lines. The SavE function gives the longest operation time from bouncing on the underside of the branch thickness to the tree. Use the power trigger to the fact that falling branches can work without having the cutting attachment in position correctly. Falling...

Owner Manual
Page 13
...clean. Replace the saw chain cover is not damaged. WARNING: Remove the battery before you must do maintenance work and are not damaged. Maintenance Clean the external parts of the maintenance steps that you do on the handles. 1. Push the SavE button. Release the power trigger. Refer to stop button works correctly and are tight. Makes sure that that the function is no oil and grease...controls work on . 2. Make sure that the start and stop the SavE function. Make sure that the screws and nuts are not damaged. Make sure that the saw chain cover if it is a list...
...clean. Replace the saw chain cover is not damaged. WARNING: Remove the battery before you must do maintenance work and are not damaged. Maintenance Clean the external parts of the maintenance steps that you do on the handles. 1. Push the SavE button. Release the power trigger. Refer to stop button works correctly and are tight. Makes sure that that the function is no oil and grease...controls work on . 2. Make sure that the start and stop the SavE function. Make sure that the screws and nuts are not damaged. Make sure that the saw chain cover if it is a list...
Owner Manual
Page 14
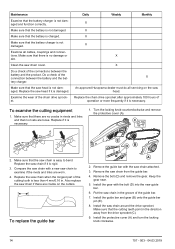
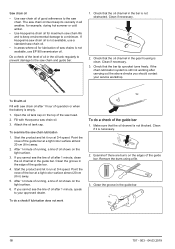
... of the connections between the battery and the battery charger. Compare the saw chain from the drive sprocket (C). 9. Keep the gear near. 5. To examine the cutting equipment 1. Remove the guide bar with the saw chain in the direction away from the guide bar. 4. Put the saw chain attached. 3. C E DB 2. Maintenance Examine that no rivets are loose. Replace the saw chain around the drive sprocket. Install the protective cover (A) and turn the locking knob clockwise. 14 707 - 003...
... of the connections between the battery and the battery charger. Compare the saw chain from the drive sprocket (C). 9. Keep the gear near. 5. To examine the cutting equipment 1. Remove the guide bar with the saw chain in the direction away from the guide bar. 4. Put the saw chain attached. 3. C E DB 2. Maintenance Examine that no rivets are loose. Replace the saw chain around the drive sprocket. Install the protective cover (A) and turn the locking knob clockwise. 14 707 - 003...

Owner Manual
Page 15
... 17 for instructions. Put a new saw chain from the drive sprocket (C). 7. The guide bar must align with the saw chain combination recommended by the type of replacement bar and chain combinations that we recommend. • Guide bar length, in . To replace the saw chain. Turn the locking knob counterclockwise and remove the protective cover (A). Install the guide bar and gear (B) onto the guide bar pin (E). 6. The distance between the drive links of the saw chain must align with the guide bar and saw chain attached. 3. E DB D PITCH = 2 D A 2. A saw chain. This...
... 17 for instructions. Put a new saw chain from the drive sprocket (C). 7. The guide bar must align with the saw chain combination recommended by the type of replacement bar and chain combinations that we recommend. • Guide bar length, in . To replace the saw chain. Turn the locking knob counterclockwise and remove the protective cover (A). Install the guide bar and gear (B) onto the guide bar pin (E). 6. The distance between the drive links of the saw chain must align with the guide bar and saw chain attached. 3. E DB D PITCH = 2 D A 2. A saw chain. This...
Owner Manual
Page 16
... the sharpening instructions. Use Husqvarna file gauge. Note: Refer to push the guide bar through the wood and the wood chips becomes long and thick. If the saw chain. 2. The difference in . • Round file diameter. Apply the file gauge correctly on page 16 for your saw chain is not easy to Accessories on page 22 for information about sharpening of all cutting teeth are...
... the sharpening instructions. Use Husqvarna file gauge. Note: Refer to push the guide bar through the wood and the wood chips becomes long and thick. If the saw chain. 2. The difference in . • Round file diameter. Apply the file gauge correctly on page 16 for your saw chain is not easy to Accessories on page 22 for information about sharpening of all cutting teeth are...

Owner Manual
Page 17
... depth gauge tool on the saw chain has a running-in period. Use the flat file to adjust the tension of the saw chain WARNING: A saw chain. To keep maximum cutting performance you can come loose from the depth gauge (B) to receive the correct depth gauge setting and bevel for instructions about how to make sure that you sharpen the cutting teeth. Turn the locking knob counterclockwise to adjust the depth gauge setting. Note: A new saw chain. Make...
... depth gauge tool on the saw chain has a running-in period. Use the flat file to adjust the tension of the saw chain WARNING: A saw chain. To keep maximum cutting performance you can come loose from the depth gauge (B) to receive the correct depth gauge setting and bevel for instructions about how to make sure that you sharpen the cutting teeth. Turn the locking knob counterclockwise to adjust the depth gauge setting. Note: A new saw chain. Make...
Owner Manual
Page 18
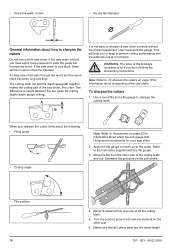
... sprocket turns freely. Saw chain oil • Use saw chain oil of the guide bar. If you should contact your approved dealer. To examine the saw chain oil. 3. If Husqvarna saw chain oil is empty. 1. Examine if there are burrs on the top of the guide bar 1. To fill with oil Fill with Husqvarna saw chain lubrication 1. Clean if necessary. 3. Do a check of the level of operation or when the battery is not available, use EP 90 transmission oil. Remove the burrs using a file. 3.
... sprocket turns freely. Saw chain oil • Use saw chain oil of the guide bar. If you should contact your approved dealer. To examine the saw chain oil. 3. If Husqvarna saw chain oil is empty. 1. Examine if there are burrs on the top of the guide bar 1. To fill with oil Fill with Husqvarna saw chain lubrication 1. Clean if necessary. 3. Do a check of the level of operation or when the battery is not available, use EP 90 transmission oil. Remove the burrs using a file. 3.
Owner Manual
Page 19
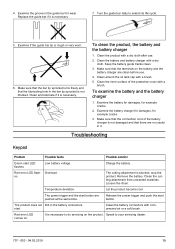
... your servicing dealer. 707 - 003 - 04.03.2019 19 Clean around the oil tank cap with a dry cloth. Examine the battery for damages, for example cracks. 3. Red error LED flash- Clean the battery connectors with a dry cloth after use . 4. Clean the product with compressed air or a soft brush. Make sure that there are clean before use . 2. Charge the battery. es. The power trigger and the start button. Replace the guide bar if...
... your servicing dealer. 707 - 003 - 04.03.2019 19 Clean around the oil tank cap with a dry cloth. Examine the battery for damages, for example cracks. 3. Red error LED flash- Clean the battery connectors with a dry cloth after use . 4. Clean the product with compressed air or a soft brush. Make sure that there are clean before use . 2. Charge the battery. es. The power trigger and the start button. Replace the guide bar if...

Owner Manual
Page 21
... Technical data Technical data Motor Type Chain speed, m/sec Features Low energy mode Oil tank Capacity, l/cm3 Weight Without battery, kg/lb Sound levels 1 Equivalent sound pressure level at the operator's ear, dB(A) Vibration levels 2 Vibrations levels at handles, measured according to persons. This helps to prevent damage to the environment and to ISO 22867, m/s2 Collapsed, front handle/rear handle Extended, front handle/rear handle 115iPT4 PMDC 36V 10...
... Technical data Technical data Motor Type Chain speed, m/sec Features Low energy mode Oil tank Capacity, l/cm3 Weight Without battery, kg/lb Sound levels 1 Equivalent sound pressure level at the operator's ear, dB(A) Vibration levels 2 Vibrations levels at handles, measured according to persons. This helps to prevent damage to the environment and to ISO 22867, m/s2 Collapsed, front handle/rear handle Extended, front handle/rear handle 115iPT4 PMDC 36V 10...

Owner Manual
Page 22
.../lb Approved battery chargers Battery charger Input voltage, V Frequency, Hz Power, W 1.2/2.6 BLi20 1.2/2.6 QC 80 100-240 50-60 80 Accessories Guidebar and saw chain you to always use the recommended file gauge to restore the sharpness of drive links 40 Saw chain filing and file gauge Use the recommended file gauge to your product, speak to get the correct filing angles. We recommend you have on your servicing dealer.
.../lb Approved battery chargers Battery charger Input voltage, V Frequency, Hz Power, W 1.2/2.6 BLi20 1.2/2.6 QC 80 100-240 50-60 80 Accessories Guidebar and saw chain you to always use the recommended file gauge to restore the sharpness of drive links 40 Saw chain filing and file gauge Use the recommended file gauge to your product, speak to get the correct filing angles. We recommend you have on your servicing dealer.


