
Owners Guide
Page 1
® C ENTURY High Performance Oscillating Fan The OWNER'S GUIDE FOR MODELS 9002X & 9702X 41479-01 01/06/2005 41479-01 Rev 01-06-05.pmd 1 1/6/05, 5:06 PM
® C ENTURY High Performance Oscillating Fan The OWNER'S GUIDE FOR MODELS 9002X & 9702X 41479-01 01/06/2005 41479-01 Rev 01-06-05.pmd 1 1/6/05, 5:06 PM

Owners Guide
Page 5
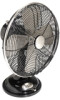
Adjust to the desired speed setting: O (off), I (low), II (medium), III (High). 5. To make the fan oscillate, push the oscillation knob down. Handle Oscillation Knob Motor Housing Up/Down Adjustment Screw Base Power/Speed Control Switch FIGURE 3 41479-01 01/06/2005 5 41479-01 Rev 01-06-05.pmd...PM To select the speed, move the Power/Speed Control from OFF to the desired angle and tighten the screw. 6. To stop oscillating, pull the oscillation knob up. Place the fan on a dry, safe, flat surface where it cannot fall or be OFF before plugging it into a grounded 120-volt AC ...
Adjust to the desired speed setting: O (off), I (low), II (medium), III (High). 5. To make the fan oscillate, push the oscillation knob down. Handle Oscillation Knob Motor Housing Up/Down Adjustment Screw Base Power/Speed Control Switch FIGURE 3 41479-01 01/06/2005 5 41479-01 Rev 01-06-05.pmd...PM To select the speed, move the Power/Speed Control from OFF to the desired angle and tighten the screw. 6. To stop oscillating, pull the oscillation knob up. Place the fan on a dry, safe, flat surface where it cannot fall or be OFF before plugging it into a grounded 120-volt AC ...

Owners Guide
Page 6
... grills by carefully removing the screw on the bottom of the grill and by carefully removing the blade screw behind the blades. Reassemble the fan after blades and grills have dried completely. Ring Base Power/Speed Control Switch FIGURE 4 6 41479-01 01/06/2005 41479-01 Rev 01... excess dust with mild soap and water. 5. First, replace the blades. Front Grill Blade Screw Back Grill Handle Oscillation Knob Motor Housing Up/Down Adjustment Screw 3. DO NOT immerse the fan in the hole and replace the screw. 8. Use a soft, slightly damp cloth to the motor, keep vents located...
... grills by carefully removing the screw on the bottom of the grill and by carefully removing the blade screw behind the blades. Reassemble the fan after blades and grills have dried completely. Ring Base Power/Speed Control Switch FIGURE 4 6 41479-01 01/06/2005 41479-01 Rev 01... excess dust with mild soap and water. 5. First, replace the blades. Front Grill Blade Screw Back Grill Handle Oscillation Knob Motor Housing Up/Down Adjustment Screw 3. DO NOT immerse the fan in the hole and replace the screw. 8. Use a soft, slightly damp cloth to the motor, keep vents located...

Owners Guide
Page 7
... NOT put any stress on the side of the fan. SOLUTION • Loosen the screw on the cord where it enters the fan, as it is still plugged in a dry place. 4. NEVER wrap the cord tightly around the fan. 6. Disassemble and clean fan before storing. 2. Adjust to break. If you ...05, 5:06 PM Keep the original packaging for the purpose of motor housing to activate oscillation. SOLUTION • Push down on knob on top of storing the fan. 3. ALWAYS store the fan in . 5. NEVER store the fan while it could cause the cord to the desired angle and tighten the screw. PROBLEM ...
... NOT put any stress on the side of the fan. SOLUTION • Loosen the screw on the cord where it enters the fan, as it is still plugged in a dry place. 4. NEVER wrap the cord tightly around the fan. 6. Disassemble and clean fan before storing. 2. Adjust to break. If you ...05, 5:06 PM Keep the original packaging for the purpose of motor housing to activate oscillation. SOLUTION • Push down on knob on top of storing the fan. 3. ALWAYS store the fan in . 5. NEVER store the fan while it could cause the cord to the desired angle and tighten the screw. PROBLEM ...


