Owner's Manual
Page 1
Electronic/Mechanical Thermostat installation and operation manual Model 40135 1 44017-01 04-01-2008
Electronic/Mechanical Thermostat installation and operation manual Model 40135 1 44017-01 04-01-2008
Owner's Manual
Page 3
Table of Contents Important Information 5 Tools 6 Uninstalling the Existing Unit 9 Installing the Thermostat 12 Installing the wall plate 14 connecting the wires 15 attaching the thermostat 17 Operation 20 Indicators & Adjustments 22 Troubleshooting 25 Wiring Diagrams 27 3
Table of Contents Important Information 5 Tools 6 Uninstalling the Existing Unit 9 Installing the Thermostat 12 Installing the wall plate 14 connecting the wires 15 attaching the thermostat 17 Operation 20 Indicators & Adjustments 22 Troubleshooting 25 Wiring Diagrams 27 3
Owner's Manual
Page 4
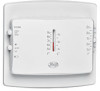
Electronic/Mechanical Thermostat Model 40135 Congratulations! Thank you for complete operation instructions. 4 Please read this manual before beginning installation and save this booklet for choosing a Hunter thermostat. Your new Hunter thermostat will provide years of reliable service and year-round energy savings.
Electronic/Mechanical Thermostat Model 40135 Congratulations! Thank you for complete operation instructions. 4 Please read this manual before beginning installation and save this booklet for choosing a Hunter thermostat. Your new Hunter thermostat will provide years of reliable service and year-round energy savings.
Owner's Manual
Page 6
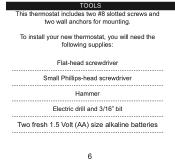
To install your new thermostat, you will need the following supplies: Flat-head screwdriver Small Phillips-head screwdriver Hammer Electric drill and 3/16" bit Two fresh 1.5 Volt (AA) size alkaline batteries 6 Tools This thermostat includes two #8 slotted screws and two wall anchors for mounting.
To install your new thermostat, you will need the following supplies: Flat-head screwdriver Small Phillips-head screwdriver Hammer Electric drill and 3/16" bit Two fresh 1.5 Volt (AA) size alkaline batteries 6 Tools This thermostat includes two #8 slotted screws and two wall anchors for mounting.

Owner's Manual
Page 12
installing the thermostat INSTALLING THE THERMOSTAT 1. Remove the new thermostat from the back plate by pulling the two halves apart. Wall Plate Thermostat 12
installing the thermostat INSTALLING THE THERMOSTAT 1. Remove the new thermostat from the back plate by pulling the two halves apart. Wall Plate Thermostat 12

Owner's Manual
Page 14
Tap the plastic anchors into the anchors. installing the thermostat, cont. Reposition the wall plate on the Hunter wall plate, or if there are flush with the wall. 6. INSTALLING THE WALL PLATE 2. If the existing holes do not match those on the wall, pulling the wires through the opening . 3. Insert the mounting screws through ...
Tap the plastic anchors into the anchors. installing the thermostat, cont. Reposition the wall plate on the Hunter wall plate, or if there are flush with the wall. 6. INSTALLING THE WALL PLATE 2. If the existing holes do not match those on the wall, pulling the wires through the opening . 3. Insert the mounting screws through ...
Owner's Manual
Page 16
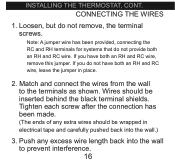
... to prevent interference. 16 If you have both an RH and RC wire, remove this jumper. Wires should be inserted behind the black terminal shields. installing the thermostat, cont. Tighten each screw after the connection has been made. (The ends of any excess wire length back into the wall.) 3. Note: A jumper wire...
... to prevent interference. 16 If you have both an RH and RC wire, remove this jumper. Wires should be inserted behind the black terminal shields. installing the thermostat, cont. Tighten each screw after the connection has been made. (The ends of any excess wire length back into the wall.) 3. Note: A jumper wire...
Owner's Manual
Page 18
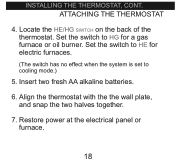
Locate the HE/HG switch on the back of the thermostat. Insert two fresh AA alkaline batteries. 6. Restore power at the electrical panel or furnace. 18 Set the switch to HE for electric furnaces. (The switch has no effect when the system is set to HG for a gas furnace or oil burner. Align the thermostat with the the wall plate, and snap the two halves together. 7. installing the thermostat, cont. Set the switch to cooling mode.) 5. ATTACHING THE THERMOSTAT 4.
Locate the HE/HG switch on the back of the thermostat. Insert two fresh AA alkaline batteries. 6. Restore power at the electrical panel or furnace. 18 Set the switch to HE for electric furnaces. (The switch has no effect when the system is set to HG for a gas furnace or oil burner. Align the thermostat with the the wall plate, and snap the two halves together. 7. installing the thermostat, cont. Set the switch to cooling mode.) 5. ATTACHING THE THERMOSTAT 4.
Owner's Manual
Page 22
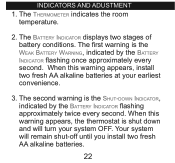
When this warning appears, the thermostat is shut down Indicator, indicated by the Battery Indicator flashing once approximately every second. The second warning is the Weak Battery Warning, indicated by the Battery Indicator flashing approximately twice every second. When this warning appears, install two fresh AA alkaline batteries at your system OFF. The... and adustment 1. The Battery Indicator displays two stages of battery conditions. The first warning is the Shut-down and will remain shut-off until you install two fresh AA alkaline batteries. 22
When this warning appears, the thermostat is shut down Indicator, indicated by the Battery Indicator flashing once approximately every second. The second warning is the Weak Battery Warning, indicated by the Battery Indicator flashing approximately twice every second. When this warning appears, install two fresh AA alkaline batteries at your system OFF. The... and adustment 1. The Battery Indicator displays two stages of battery conditions. The first warning is the Shut-down and will remain shut-off until you install two fresh AA alkaline batteries. 22
Owner's Manual
Page 25
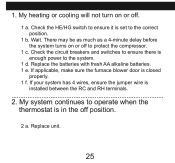
... correct position. 1 b. 1. Check the HE/HG switch to the system. 1 d. My system continues to operate when the thermostat is set to protect the compressor. 1 c. If your system has 4 wires, ensure the jumper wire is installed between the RC and RH terminals. 2. Replace the batteries with fresh AA alkaline batteries. 1 e. Replace unit. 25...
... correct position. 1 b. 1. Check the HE/HG switch to the system. 1 d. My system continues to operate when the thermostat is set to protect the compressor. 1 c. If your system has 4 wires, ensure the jumper wire is installed between the RC and RH terminals. 2. Replace the batteries with fresh AA alkaline batteries. 1 e. Replace unit. 25...
Owner's Manual
Page 6
les outils This thermostat includes two #8 slotted screws and two wall anchors for mounting. To install your new thermostat, you will need the following supplies: Tournevis à tête plate Petit tournevis Phillips Marteau Perceuse électrique et mèche de 3/16 Deux batteries alcalines de 1,5 Volts (AA 6
les outils This thermostat includes two #8 slotted screws and two wall anchors for mounting. To install your new thermostat, you will need the following supplies: Tournevis à tête plate Petit tournevis Phillips Marteau Perceuse électrique et mèche de 3/16 Deux batteries alcalines de 1,5 Volts (AA 6


