
Installation Guide
Page 1
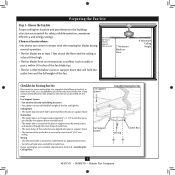
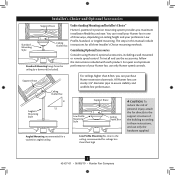
... box must be recessed a minimum of 1/16" into ceiling. Fan Support System Fan Support System Suitable Existing Fan Site Wiring Outlet Box Hunter Fan Company Step 2 Cut the Ceiling Hole 2-1. Preparing the Fan Site 8' Minimum Ceiling Height 7' Minimum to Floor 30" From Wall or Nearest Obstruction Step 1 Choose the Fan Site Proper ceiling fan location and attachment to ensure it will support...
... box must be recessed a minimum of 1/16" into ceiling. Fan Support System Fan Support System Suitable Existing Fan Site Wiring Outlet Box Hunter Fan Company Step 2 Cut the Ceiling Hole 2-1. Preparing the Fan Site 8' Minimum Ceiling Height 7' Minimum to Floor 30" From Wall or Nearest Obstruction Step 1 Choose the Fan Site Proper ceiling fan location and attachment to ensure it will support...
Owner's Manual
Page 2
... 10 6 • Assembling the Blades 11 7 • Completing Your Installation With a Multi Staked Light Fixture 12 8 • Operating and Cleaning Your Ceiling Fan 14 9 • Troubleshooting 15 Welcome Your new Hunter® ceiling fan is an addition to the service panel. • All wiring must be in accordance with national and local electrical codes and...
... 10 6 • Assembling the Blades 11 7 • Completing Your Installation With a Multi Staked Light Fixture 12 8 • Operating and Cleaning Your Ceiling Fan 14 9 • Troubleshooting 15 Welcome Your new Hunter® ceiling fan is an addition to the service panel. • All wiring must be in accordance with national and local electrical codes and...
Owner's Manual
Page 3
... by the support brace manufacturer). • e outlet box is recessed a minimum of the fan and light kit. Fan Support System Fan Support System Suitable Existing Fan Site Wiring Outlet Box 3 42437-01 • 06/08/10 • Hunter Fan Company Ceiling Hole • e outlet box clearance hole is directly below the joist or support brace...
... by the support brace manufacturer). • e outlet box is recessed a minimum of the fan and light kit. Fan Support System Fan Support System Suitable Existing Fan Site Wiring Outlet Box 3 42437-01 • 06/08/10 • Hunter Fan Company Ceiling Hole • e outlet box clearance hole is directly below the joist or support brace...
Owner's Manual
Page 4
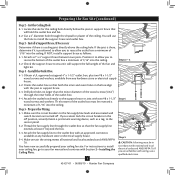
Locate the site for the ceiling hole directly below the joist or support brace that will use a qualified electrician. 4 42437-01 • 06/08/10 • Hunter Fan Company Attach a 2" x 4" support brace between two joists. Check the support brace to install the support brace and outlet...or plaster of 1/16" into the ceiling. For instructions to install your ceiling fan, go to recess the bottom of the outlet box a minimum of the ceiling. If the joist is there, determine if it to allow you to your ceiling fan site. Cut the Ceiling Hole 2-1. Install the Outlet Box ...
Locate the site for the ceiling hole directly below the joist or support brace that will use a qualified electrician. 4 42437-01 • 06/08/10 • Hunter Fan Company Attach a 2" x 4" support brace between two joists. Check the support brace to install the support brace and outlet...or plaster of 1/16" into the ceiling. For instructions to install your ceiling fan, go to recess the bottom of the outlet box a minimum of the ceiling. If the joist is there, determine if it to allow you to your ceiling fan site. Cut the Ceiling Hole 2-1. Install the Outlet Box ...
Owner's Manual
Page 5
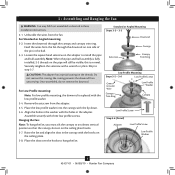
...: Low Profile, Standard, or Angled mounting. For quiet and optimum performance of three ways, depending on ceiling height and your Hunter fan, use only the hardware supplied. 5 42437-01 • 06/08/10 • Hunter Fan Company All Hunter fans use the accessories, follow the instructions included with each product. Angled Mounting Style 8 12 Angled Mounting recommended...
...: Low Profile, Standard, or Angled mounting. For quiet and optimum performance of three ways, depending on ceiling height and your Hunter fan, use only the hardware supplied. 5 42437-01 • 06/08/10 • Hunter Fan Company All Hunter fans use the accessories, follow the instructions included with each product. Angled Mounting Style 8 12 Angled Mounting recommended...
Owner's Manual
Page 6
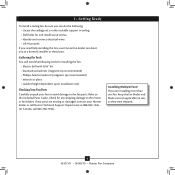
... 40 pounds. Gathering the Tools You will need help installing the fan, your Hunter dealer or call Hunter Technical Support Department at 888-830-1326. (In Canada, call 866-268-1936). Refer to the included Parts Guide. 1 • Getting Ready To install a ceiling fan, be sure you can direct you to a licensed installer or electrician...
... 40 pounds. Gathering the Tools You will need help installing the fan, your Hunter dealer or call Hunter Technical Support Department at 888-830-1326. (In Canada, call 866-268-1936). Refer to the included Parts Guide. 1 • Getting Ready To install a ceiling fan, be sure you can direct you to a licensed installer or electrician...

Owner's Manual
Page 7
... on the screws. Tighten the screws into the pilot holes you drilled in the outlet box. Ceiling Plate 3" Wood Screw Steps 2-3 - 2-6 7 42437-01 • 06/08/10 • Hunter Fan Company Thread the supply wires from each of the ceiling plate. 2-5. Do not over tighten. Pass the screws through the slotted holes in the...
... on the screws. Tighten the screws into the pilot holes you drilled in the outlet box. Ceiling Plate 3" Wood Screw Steps 2-3 - 2-6 7 42437-01 • 06/08/10 • Hunter Fan Company Thread the supply wires from each of the ceiling plate. 2-5. Do not over tighten. Pass the screws through the slotted holes in the...
Owner's Manual
Page 8
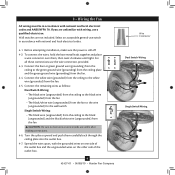
...not remove this is fully installed, 2-3 threads on the ceiling plate. 3-8. Remove the setscrew from unscrewing. Hanging the Fan: Note: To hang the fan, you must tilt the canopy to hang the fan. 3 • Assembling and Hanging the Fan WARNING: Fan may fall if not assembled as directed in the adapter.... 3-6 (Detail) Adapter Low Profile Screw Low Profile Washer 8 42437-01 • 06/08/10 • Hunter Fan Company Once assembled, do not remove the downrod. Raise the fan and align the slots in the washer with a wrench or pliers. Align the holes in the canopy with three...
...not remove this is fully installed, 2-3 threads on the ceiling plate. 3-8. Remove the setscrew from unscrewing. Hanging the Fan: Note: To hang the fan, you must tilt the canopy to hang the fan. 3 • Assembling and Hanging the Fan WARNING: Fan may fall if not assembled as directed in the adapter.... 3-6 (Detail) Adapter Low Profile Screw Low Profile Washer 8 42437-01 • 06/08/10 • Hunter Fan Company Once assembled, do not remove the downrod. Raise the fan and align the slots in the washer with a wrench or pliers. Align the holes in the canopy with three...
Owner's Manual
Page 9
... ground wire (grounding) from the ceiling to the white wire (grounded) from the fan. 4-5. Spread the wires apart, ... carefully back through the ceiling plate into the outlet box. 4-7. Connect the ...from the ceiling to the black wire (ungrounded) from the fan • The black/white wire (ungrounded) from the fan to the...fan. 4-4. Connect the white wire (grounded) from the ceiling to the green ground wire (grounding) from the ceiling plate and the green ground wire (grounding) from the fan...connectors provided. 4-3. 4 • Wiring the Fan All wiring must be in accordance with the ...
... ground wire (grounding) from the ceiling to the white wire (grounded) from the fan. 4-5. Spread the wires apart, ... carefully back through the ceiling plate into the outlet box. 4-7. Connect the ...from the ceiling to the black wire (ungrounded) from the fan • The black/white wire (ungrounded) from the fan to the...fan. 4-4. Connect the white wire (grounded) from the ceiling to the green ground wire (grounding) from the ceiling plate and the green ground wire (grounding) from the fan...connectors provided. 4-3. 4 • Wiring the Fan All wiring must be in accordance with the ...
Owner's Manual
Page 10
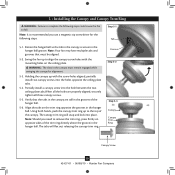
... recommended you need to align the canopy screw holes with the screw holes aligned, partially install two canopy screws into the holes opposite the ceiling plate tabs. 5-4. Note: Should you use a magnetic tip screwdriver for alignment. 5-3. Note: It is secure in the canopy must be...a canopy screw into place. Groove Step 5-2 Step 5-3 Canopy Canopy Trim Ring Canopy Screw 10 42437-01 • 06/08/10 • Hunter Fan Company WARNING: The slots in the hanger ball groove. Holding the canopy up to fall. Step 5-1 Tab 5-1. Align the tabs on opposite sides...
... recommended you need to align the canopy screw holes with the screw holes aligned, partially install two canopy screws into the holes opposite the ceiling plate tabs. 5-4. Note: Should you use a magnetic tip screwdriver for alignment. 5-3. Note: It is secure in the canopy must be...a canopy screw into place. Groove Step 5-2 Step 5-3 Canopy Canopy Trim Ring Canopy Screw 10 42437-01 • 06/08/10 • Hunter Fan Company WARNING: The slots in the hanger ball groove. Holding the canopy up to fall. Step 5-1 Tab 5-1. Align the tabs on opposite sides...
Owner's Manual
Page 13
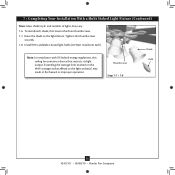
... on the MAX wattage sticker affixed to the light fixture. Steps 7-7 - 7-8 13 42437-01 • 06/08/10 • Hunter Fan Company Shade Note: In compliance with US federal energy regulations, this Bulb ceiling fan contains a device that restricts its light Thumbscrews output. Install B10 candelabra-based light bulbs (40 Watt maximum each shade...
... on the MAX wattage sticker affixed to the light fixture. Steps 7-7 - 7-8 13 42437-01 • 06/08/10 • Hunter Fan Company Shade Note: In compliance with US federal energy regulations, this Bulb ceiling fan contains a device that restricts its light Thumbscrews output. Install B10 candelabra-based light bulbs (40 Watt maximum each shade...
Owner's Manual
Page 14
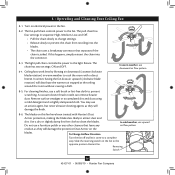
...Hunter's Dust Armor protection, making the blades less likely to the fan. 8-2. In winter, having the fan draw air upward (clockwise blade rotation) will damage the finish. 8-6. Slide the reversing switch on electrical power to attract dust and dirt. The light pull chain controls the power to the fan. 8 • Operating and Cleaning Your Ceiling Fan... 8-1. The fan pull chain controls power to the light fixture. Remove surface smudges or accumulated ...
...Hunter's Dust Armor protection, making the blades less likely to the fan. 8-2. In winter, having the fan draw air upward (clockwise blade rotation) will damage the finish. 8-6. Slide the reversing switch on electrical power to attract dust and dirt. The light pull chain controls the power to the fan. 8 • Operating and Cleaning Your Ceiling Fan... 8-1. The fan pull chain controls power to the light fixture. Remove surface smudges or accumulated ...
Parts Guide
Page 1
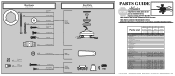
... THE STORE, call 888-830-1326 for assistance. Parts List Item Name * Hanging System Kit Ceiling Plate Canopy Canopy Trim Ring Hanger Ball / Downrod Assembly Setscrew Low Profile Washer Canopy Screw Wood...THIS PARTS GUIDE IS FOR REFERENCE ONLY. If parts are included in the box. Dwg. # G0820-01 28677 G0820-02 28678 G0820-03 Finish Qnty 1 New Bronze Brushed Nickel White Part # 96759-30 Part #...07 03077-07 03077-07 4 77646-03 77646-03 77646-03 1 65666-01 65666-01 65666-01 Hunter Fan Company • 7130 Goodlett Farms Pkwy. #400 • Memphis, TN 38016 • www.hunterfan.com...
... THE STORE, call 888-830-1326 for assistance. Parts List Item Name * Hanging System Kit Ceiling Plate Canopy Canopy Trim Ring Hanger Ball / Downrod Assembly Setscrew Low Profile Washer Canopy Screw Wood...THIS PARTS GUIDE IS FOR REFERENCE ONLY. If parts are included in the box. Dwg. # G0820-01 28677 G0820-02 28678 G0820-03 Finish Qnty 1 New Bronze Brushed Nickel White Part # 96759-30 Part #...07 03077-07 03077-07 4 77646-03 77646-03 77646-03 1 65666-01 65666-01 65666-01 Hunter Fan Company • 7130 Goodlett Farms Pkwy. #400 • Memphis, TN 38016 • www.hunterfan.com...


