
Installation Guide
Page 1
... hardware store or electrical supply house. 5-4. o e bottom of the fan and light kit. Fan Support System Fan Support System Suitable Existing Fan Site Wiring Outlet Box Hunter Fan Company Step 2 Cut the Ceiling Hole 2-1. You will use the hole to...approved octagonal 4" x 1-1/2" outlet box • Two #8 x 1-1/2" wood screws and washers • Approved connector for electrical wire Checklist for your new Hunter fan. Locate the site for safety, reliable operation, maximum efficiency, and energy savings. Steps 2 - 3 Step 3 Install a Support Brace, If Necessary ...
... hardware store or electrical supply house. 5-4. o e bottom of the fan and light kit. Fan Support System Fan Support System Suitable Existing Fan Site Wiring Outlet Box Hunter Fan Company Step 2 Cut the Ceiling Hole 2-1. You will use the hole to...approved octagonal 4" x 1-1/2" outlet box • Two #8 x 1-1/2" wood screws and washers • Approved connector for electrical wire Checklist for your new Hunter fan. Locate the site for safety, reliable operation, maximum efficiency, and energy savings. Steps 2 - 3 Step 3 Install a Support Brace, If Necessary ...
Owner's Manual
Page 2
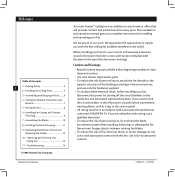
...8226; Operating the Remote Control and Mounting the Holder 12 10 • Operating and Cleaning Your Ceiling Fan 13 11 • Troubleshooting 14 © 2005 Hunter Fan Company Your new Hunter® ceiling fan is an addition to your records and warranty assistance, record information from the carton and...• To reduce the risk of our work. If you with the best ceiling fan available anywhere in accordance with this entire manual carefully before installing your fan. Use only Hunter speed controls. We are unfamiliar with wiring, use a solid-state speed control with national...
...8226; Operating the Remote Control and Mounting the Holder 12 10 • Operating and Cleaning Your Ceiling Fan 13 11 • Troubleshooting 14 © 2005 Hunter Fan Company Your new Hunter® ceiling fan is an addition to your records and warranty assistance, record information from the carton and...• To reduce the risk of our work. If you with the best ceiling fan available anywhere in accordance with this entire manual carefully before installing your fan. Use only Hunter speed controls. We are unfamiliar with wiring, use a solid-state speed control with national...
Owner's Manual
Page 3
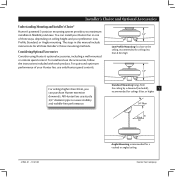
...For quiet and optimum performance of three ways, depending on ceiling height and your Hunter fan, use the accessories, follow the instructions included with each product. All Hunter fans use sturdy 3/4" diameter pipe to the ceiling, recommended for ceilings less than 8 ...-mounted or remote speed control. You can purchase Hunter extension downrods. Installer's Choice and Optional Accessories Understanding Mounting and Installer's Choice® Hunter's patented 3-position mounting system provides you can install your Hunter fan in one of your preference: Low Profile, Standard...
...For quiet and optimum performance of three ways, depending on ceiling height and your Hunter fan, use the accessories, follow the instructions included with each product. All Hunter fans use sturdy 3/4" diameter pipe to the ceiling, recommended for ceilings less than 8 ...-mounted or remote speed control. You can purchase Hunter extension downrods. Installer's Choice and Optional Accessories Understanding Mounting and Installer's Choice® Hunter's patented 3-position mounting system provides you can install your Hunter fan in one of your preference: Low Profile, Standard...
Owner's Manual
Page 4
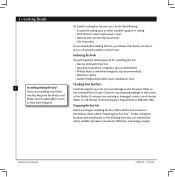
...screwdriver (magnetic tip recommended) • Wrench or pliers • Ladder (height dependent upon installation site) Checking Your Fan Parts Carefully unpack your Hunter dealer or call Hunter Technical Support Department at 888-830-1326. If any shipping damage to the building structure are missing or damaged, contact ...your fan to avoid damage to the fan parts. Hunter Fan Company 41923-01 • 11/21/05 If you need the following : • Locate the ceiling joist or...
...screwdriver (magnetic tip recommended) • Wrench or pliers • Ladder (height dependent upon installation site) Checking Your Fan Parts Carefully unpack your Hunter dealer or call Hunter Technical Support Department at 888-830-1326. If any shipping damage to the building structure are missing or damaged, contact ...your fan to avoid damage to the fan parts. Hunter Fan Company 41923-01 • 11/21/05 If you need the following : • Locate the ceiling joist or...

Owner's Manual
Page 5
...middle of the two 3" screws and pass the screws through the hole in diameter. 2-2. 2 • Installing the Ceiling Plate 2-1. Your fan comes with the pilot holes you drilled. For proper alignment use lubricants on each isolator into the 9/64" pilot holes; do not use ... ceiling by inserting the raised areas on the screws. Place a flat washer on the ceiling plate are pointing towards the ceiling peak. Hunter Fan Company Align the slotted holes in the ceiling plate with four neoprene noise isolators ("Isolators"). Note: e isolators should be flush against...
...middle of the two 3" screws and pass the screws through the hole in diameter. 2-2. 2 • Installing the Ceiling Plate 2-1. Your fan comes with the pilot holes you drilled. For proper alignment use lubricants on each isolator into the 9/64" pilot holes; do not use ... ceiling by inserting the raised areas on the screws. Place a flat washer on the ceiling plate are pointing towards the ceiling peak. Hunter Fan Company Align the slotted holes in the ceiling plate with four neoprene noise isolators ("Isolators"). Note: e isolators should be flush against...

Owner's Manual
Page 6
... ceiling. 3-5. the coating prevents the downrod from a flat or angled ceiling, insert the downrod through the downrod. 3-2. To assemble the fan to install the pipe and ball assembly. Step 3-6 U-shaped Hole Hunter Fan Company 41923-01 • 11/21/05 Skip to hang down from unscrewing. Once assembled, do not remove the downrod...
... ceiling. 3-5. the coating prevents the downrod from a flat or angled ceiling, insert the downrod through the downrod. 3-2. To assemble the fan to install the pipe and ball assembly. Step 3-6 U-shaped Hole Hunter Fan Company 41923-01 • 11/21/05 Skip to hang down from unscrewing. Once assembled, do not remove the downrod...

Owner's Manual
Page 7
... 432 1 Tr4an3sm2itt1er 2 432 1 Setting Jumpers When two or more fans are very small. Changes or modifications not expressly approved by Hunter Fan Company could void your authority to operate this product. 41923-01 • 11/21/05 Hunter Fan Company Operation is subject to the following two conditions: 1. ... of pliers or tweezers. You can access the jumpers from the battery compartment. e jumpers are located near each other fans. Install the included 12-volt battery into the transmitter. In the transmitter you change a jumper, make sure the battery is...
... 432 1 Tr4an3sm2itt1er 2 432 1 Setting Jumpers When two or more fans are very small. Changes or modifications not expressly approved by Hunter Fan Company could void your authority to operate this product. 41923-01 • 11/21/05 Hunter Fan Company Operation is subject to the following two conditions: 1. ... of pliers or tweezers. You can access the jumpers from the battery compartment. e jumpers are located near each other fans. Install the included 12-volt battery into the transmitter. In the transmitter you change a jumper, make sure the battery is...

Owner's Manual
Page 8
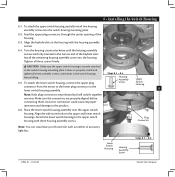
... ground wire from the receiver (marked on red tag "LIVE IN") 5-5. Steps 5-3 - 5-7 5-4. Using the small wire nuts, connect the wires from the fan as follows: 8 Large Wire Nut • e white (common) power wire from the ceiling to the white wire from the receiver (marked on red ... wire from the receiver (marked on white tag "COMMON OUT") 5-6. Push all these connections use a qualified electrician. 5-1. Hunter Fan Company 41923-01 • 11/21/05 5• Wiring the Fan Receiver All wiring must be in the ceiling plate so that it to the edge of the slots in accordance...
... ground wire from the receiver (marked on red tag "LIVE IN") 5-5. Steps 5-3 - 5-7 5-4. Using the small wire nuts, connect the wires from the fan as follows: 8 Large Wire Nut • e white (common) power wire from the ceiling to the white wire from the receiver (marked on red ... wire from the receiver (marked on white tag "COMMON OUT") 5-6. Push all these connections use a qualified electrician. 5-1. Hunter Fan Company 41923-01 • 11/21/05 5• Wiring the Fan Receiver All wiring must be in the ceiling plate so that it to the edge of the slots in accordance...

Owner's Manual
Page 9
... lock into the canopy one at a time. Once all three screws are in the canopy. 6-4. Steps 6-4 - 6-5 Step 6-3 41923-01 • 11/21/05 Canopy Screw Hunter Fan Company Locate the tab indicators, small bumps on the ceiling plate. 6-3. Align the slots in the canopy with the slots in , tighten them. 6-5. 6 • Installing...
... lock into the canopy one at a time. Once all three screws are in the canopy. 6-4. Steps 6-4 - 6-5 Step 6-3 41923-01 • 11/21/05 Canopy Screw Hunter Fan Company Locate the tab indicators, small bumps on the ceiling plate. 6-3. Align the slots in the canopy with the slots in , tighten them. 6-5. 6 • Installing...

Owner's Manual
Page 10
... is normal. 7-3. Remove the blade mountings screws and rubber bumpers from the motor. For each blade to secure shipping blocks. Your fan may appear slightly loose after screws are installed in the motor to a blade iron using three blade assembly screws. If you used ... insert one blade mounting screw through the Blade Assembly Screws blade iron, and attach lightly to the fan). 7-1. Save the screws and discard the bumpers. 7-4. Steps 7-1 - 7-2 Use without grommet Blade Mounting Screw Hunter Fan Company Step 7-4 41923-01 • 11/21/05 7 • Assembling the Blades Step 7-1...
... is normal. 7-3. Remove the blade mountings screws and rubber bumpers from the motor. For each blade to secure shipping blocks. Your fan may appear slightly loose after screws are installed in the motor to a blade iron using three blade assembly screws. If you used ... insert one blade mounting screw through the Blade Assembly Screws blade iron, and attach lightly to the fan). 7-1. Save the screws and discard the bumpers. 7-4. Steps 7-1 - 7-2 Use without grommet Blade Mounting Screw Hunter Fan Company Step 7-4 41923-01 • 11/21/05 7 • Assembling the Blades Step 7-1...
Owner's Manual
Page 11
...the upper and lower switch housings. Lower Switch Housing Housing Assembly Screw Steps 8-5 - 8-6 41923-01 • 11/21/05 Hunter Fan Company To attach the upper switch housing, partially install two housing assembly screws into the housing. Feed the upper plug connector through...slots. Align the side screw holes in the switch housing Steps 8-1 - 8-4 fixture falling. 8-5. Plug Connector Note: You can customize your Hunter fan with the housing assembly screws. 8-4. 8 • Installing the Switch Housing 8-1. To attach the lower switch housing, connect the upper plug ...
...the upper and lower switch housings. Lower Switch Housing Housing Assembly Screw Steps 8-5 - 8-6 41923-01 • 11/21/05 Hunter Fan Company To attach the upper switch housing, partially install two housing assembly screws into the housing. Feed the upper plug connector through...slots. Align the side screw holes in the switch housing Steps 8-1 - 8-4 fixture falling. 8-5. Plug Connector Note: You can customize your Hunter fan with the housing assembly screws. 8-4. 8 • Installing the Switch Housing 8-1. To attach the lower switch housing, connect the upper plug ...
Owner's Manual
Page 12
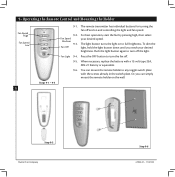
...turn off . 9-5. 9• Operating the Remote Control and Mounting the Holder Fan Speed High Fan Speed Low 12 Steps 9-1 - 9-4 9-1. e remote transmitter has individual buttons for turning the fan off and on to full brightness. Step 9-5 Hunter Fan Company Step 9-6 41923-01 • 11/21/05 To dim the light... wall. Or, you reach your desired speed. e light button turns the light on and controlling the light and fan speed. 9-2. Fan Light 9-4. Fan Speed Medium 9-3. Fan Off For best operation, start the fan by pressing high, then select your desired brightness.
...turn off . 9-5. 9• Operating the Remote Control and Mounting the Holder Fan Speed High Fan Speed Low 12 Steps 9-1 - 9-4 9-1. e remote transmitter has individual buttons for turning the fan off and on to full brightness. Step 9-5 Hunter Fan Company Step 9-6 41923-01 • 11/21/05 To dim the light... wall. Or, you reach your desired speed. e light button turns the light on and controlling the light and fan speed. 9-2. Fan Light 9-4. Fan Speed Medium 9-3. Fan Off For best operation, start the fan by pressing high, then select your desired brightness.
Owner's Manual
Page 13
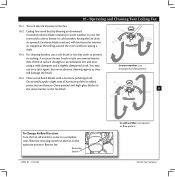
... rotation) will damage the finish. 10-4. A vacuum cleaner brush nozzle can remove heavier dust. In warm weather, use upward air flow pattern Hunter Fan Company Clean wood finish blades with a direct breeze. Occasionally, apply a light coat of furniture polish for added protection and beauty. Reversing Switch...the room without causing a draft. 10-3. You may use a soft brush or lint-free cloth to the opposite position. Turn on the fan to prevent scratching. Remove surface smudges or accumulated dirt and dust using a mild detergent and a slightly dampened cloth. 10 • Operating ...
... rotation) will damage the finish. 10-4. A vacuum cleaner brush nozzle can remove heavier dust. In warm weather, use upward air flow pattern Hunter Fan Company Clean wood finish blades with a direct breeze. Occasionally, apply a light coat of furniture polish for added protection and beauty. Reversing Switch...the room without causing a draft. 10-3. You may use a soft brush or lint-free cloth to the opposite position. Turn on the fan to prevent scratching. Remove surface smudges or accumulated dirt and dust using a mild detergent and a slightly dampened cloth. 10 • Operating ...

Owner's Manual
Page 14
... the enclosed balancing kit and instructions to the wiring the fan section. 3. Refer to ensure that the hanger ball is engaged. 5. Hunter Fan Company 2500 Frisco Avenue Memphis, Tennessee 38114 Hunter Fan Company 41923-01 • 11/21/05 Tighten the blade bracket screws until snug. 3. fan does not move. 1. Check the plug connection in the...
... the enclosed balancing kit and instructions to the wiring the fan section. 3. Refer to ensure that the hanger ball is engaged. 5. Hunter Fan Company 2500 Frisco Avenue Memphis, Tennessee 38114 Hunter Fan Company 41923-01 • 11/21/05 Tighten the blade bracket screws until snug. 3. fan does not move. 1. Check the plug connection in the...

Parts Guide
Page 1
...ASSEMBLY INSTRUCTIONS. Dwg. # Finish Qnty 1 23688 96684-01 New Bronze Part # 94945-30 23685 96684-02 Antique Pewter Part # 94945-14 1 96682-30 96682-14 1 93475-05 93475...-36 1 64801-01 64801-01 1 85095-02 85095-02 1 85093-01 85093-01 1 85482-04 85482-04 Hunter Fan Company • 7130 Goodlett Farms Pkwy. #400 • Memphis, TN 38016 • www.HunterFan.com •... Screw, Switch Housing Assembly Screw, Machine, 6-32 Hanger Bracket Assembly Blade Assembly Switch Housing Assembly Fan Parts (Not Drawn to Scale) PARTS GUIDE Using this Parts Guide, make sure all parts are...
...ASSEMBLY INSTRUCTIONS. Dwg. # Finish Qnty 1 23688 96684-01 New Bronze Part # 94945-30 23685 96684-02 Antique Pewter Part # 94945-14 1 96682-30 96682-14 1 93475-05 93475...-36 1 64801-01 64801-01 1 85095-02 85095-02 1 85093-01 85093-01 1 85482-04 85482-04 Hunter Fan Company • 7130 Goodlett Farms Pkwy. #400 • Memphis, TN 38016 • www.HunterFan.com •... Screw, Switch Housing Assembly Screw, Machine, 6-32 Hanger Bracket Assembly Blade Assembly Switch Housing Assembly Fan Parts (Not Drawn to Scale) PARTS GUIDE Using this Parts Guide, make sure all parts are...


