
Installation Guide
Page 1
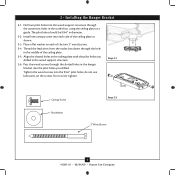
... cannot check off . Preparing the Fan Site 8' Minimum Ceiling Height 7' Minimum to Floor 30" From Wall or Nearest Obstruction Step 1 Choose the Fan Site Proper ceiling fan location and attachment to the building structure are essential for your new Hunter fan. Choose a fan site where: • No object... are at least 7 feet above the ceiling hole. Orient the outlet box so that will hold the outlet box and fan. 2-2. Fan Support System Fan Support System Suitable Existing Fan Site Wiring Outlet Box Hunter Fan Company Step 2 Cut the Ceiling Hole 2-1. If you to the joist ...
... cannot check off . Preparing the Fan Site 8' Minimum Ceiling Height 7' Minimum to Floor 30" From Wall or Nearest Obstruction Step 1 Choose the Fan Site Proper ceiling fan location and attachment to the building structure are essential for your new Hunter fan. Choose a fan site where: • No object... are at least 7 feet above the ceiling hole. Orient the outlet box so that will hold the outlet box and fan. 2-2. Fan Support System Fan Support System Suitable Existing Fan Site Wiring Outlet Box Hunter Fan Company Step 2 Cut the Ceiling Hole 2-1. If you to the joist ...
Owner's Manual
Page 2
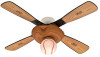
...; Getting Ready 4 2 • Installing the Hanger Bracket 5 3 • Assembling and Hanging the Fan . . . . 6 4 • Wiring the Fan 8 5 • Installing the Canopy 9 6 • Installing the Light Fixture 10 7 • Operating and Cleaning Your Ceiling Fan 11 8 • Troubleshooting 12 Your new Hunter® ceiling fan is an addition to the outlet box and associated wall switch location. This...
...; Getting Ready 4 2 • Installing the Hanger Bracket 5 3 • Assembling and Hanging the Fan . . . . 6 4 • Wiring the Fan 8 5 • Installing the Canopy 9 6 • Installing the Light Fixture 10 7 • Operating and Cleaning Your Ceiling Fan 11 8 • Troubleshooting 12 Your new Hunter® ceiling fan is an addition to the outlet box and associated wall switch location. This...
Owner's Manual
Page 3
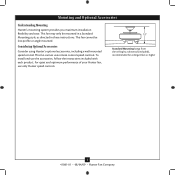
... or angle mounted. For quiet and optimum performance of your Hunter fan, use only Hunter speed controls. Standard Mounting hangs from the ceiling by a downrod (included), recommended for ceilings 8 feet or higher 3 41081-01 • 08/04/09 • Hunter Fan Company Mounting and Optional Accessories Understanding Mounting Hunter's mounting system provides you maximum installation flexibility and ease.
... or angle mounted. For quiet and optimum performance of your Hunter fan, use only Hunter speed controls. Standard Mounting hangs from the ceiling by a downrod (included), recommended for ceilings 8 feet or higher 3 41081-01 • 08/04/09 • Hunter Fan Company Mounting and Optional Accessories Understanding Mounting Hunter's mounting system provides you maximum installation flexibility and ease.
Owner's Manual
Page 4
...; 08/04/09 • Hunter Fan Company Gathering the Tools You will need help installing the fan, your fan to avoid damage to the included "Parts Guide" for and install wood screws. • Identify and connect electrical wires. • Lift 40 pounds. Proper ceiling fan location and attachment to a licensed...sets, as they were shipped. 1 • Getting Ready To install a ceiling fan, be sure you can direct you to the building structure are essential for any parts are missing or damaged, contact the Hunter Technical Support Department at 888-830-1326 (In Canada, call 1-866-268-...
...; 08/04/09 • Hunter Fan Company Gathering the Tools You will need help installing the fan, your fan to avoid damage to the included "Parts Guide" for and install wood screws. • Identify and connect electrical wires. • Lift 40 pounds. Proper ceiling fan location and attachment to a licensed...sets, as they were shipped. 1 • Getting Ready To install a ceiling fan, be sure you can direct you to the building structure are essential for any parts are missing or damaged, contact the Hunter Technical Support Department at 888-830-1326 (In Canada, call 1-866-268-...
Owner's Manual
Page 5
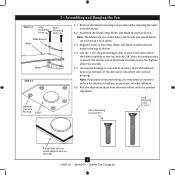
...2-5. Place a flat washer on the screws. Drill two pilot holes into the pilot holes you drilled in the outlet box, using the ceiling plate as shown. 2-3. Pass the wood screws through the slotted holes in the hanger bracket into the wood support structure through the hole in...guide. Do not over tighten. The pilot holes should be 9/64" in the ceiling plate with the pilot holes you drilled. Step 2-1 Canopy Screw Flat Washer Step 2-2 3" Wood Screw 5 41081-01 • 08/04/09 • Hunter Fan Company Thread the lead wires from the outlet box down through the outermost holes...
...2-5. Place a flat washer on the screws. Drill two pilot holes into the pilot holes you drilled in the outlet box, using the ceiling plate as shown. 2-3. Pass the wood screws through the slotted holes in the hanger bracket into the wood support structure through the hole in...guide. Do not over tighten. The pilot holes should be 9/64" in the ceiling plate with the pilot holes you drilled. Step 2-1 Canopy Screw Flat Washer Step 2-2 3" Wood Screw 5 41081-01 • 08/04/09 • Hunter Fan Company Thread the lead wires from the outlet box down through the outermost holes...
Owner's Manual
Page 6
...and blade bracket with Backing Decal 3-1. Use the 1 1/4" long mounting screws to attach the taller end of the blade assembly to the fan, and the 7/8" short mounting screws to attach the shorter end of the blade assembly to see and install it face-down . Rest the... adhesive. 3-6. Leaving the backing on this side) 6 41081-01 • 08/04/09 • Hunter Fan Company Tighten all screws securely. 3-5. Note: If you have a textured ceiling, you would like to the fan. Short Mounting Screw (7/8") Long Mounting Screw (1 1/4") Printed Side (do not install adhesive dots on one side...
...and blade bracket with Backing Decal 3-1. Use the 1 1/4" long mounting screws to attach the taller end of the blade assembly to the fan, and the 7/8" short mounting screws to attach the shorter end of the blade assembly to see and install it face-down . Rest the... adhesive. 3-6. Leaving the backing on this side) 6 41081-01 • 08/04/09 • Hunter Fan Company Tighten all screws securely. 3-5. Note: If you have a textured ceiling, you would like to the fan. Short Mounting Screw (7/8") Long Mounting Screw (1 1/4") Printed Side (do not install adhesive dots on one side...
Owner's Manual
Page 7
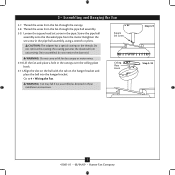
...the canopy. 3-8. Retighten the set screw in these installation instructions. WARNING: Fan may fall if not assembled as directed in the pipe. Loosen the square head set screw in the canopy over the ceiling plate hook. 3-11.Align the slot on the ball with the tab on... ball into the hanger bracket. the coating prevents the downrod from the motor. Square Set Screw Ceiling Plate Hook Step 3-9 Step 3-10 7 41081-01 • 08/04/09 • Hunter Fan Company 3 • Assembling and Hanging the Fan 3-7. Thread the wires from the fan through the pipe ball assembly. 3-9.
...the canopy. 3-8. Retighten the set screw in these installation instructions. WARNING: Fan may fall if not assembled as directed in the pipe. Loosen the square head set screw in the canopy over the ceiling plate hook. 3-11.Align the slot on the ball with the tab on... ball into the hanger bracket. the coating prevents the downrod from the motor. Square Set Screw Ceiling Plate Hook Step 3-9 Step 3-10 7 41081-01 • 08/04/09 • Hunter Fan Company 3 • Assembling and Hanging the Fan 3-7. Thread the wires from the fan through the pipe ball assembly. 3-9.

Owner's Manual
Page 8
...wire from the pipe ball assembly • The white wire from the ceiling to the white wire from the fan • The black wire from the ceiling to the black wire from the fan • The black/white wire from the fan to the wire for the wall switch CAUTION: Be sure no bare wire.../Green White Black Dual Switch Wiring White Wall Switch Ground/Green Black Black/ White Ground/Green White Black 8 41081-01 • 08/04/09 • Hunter Fan Company Push all wires and wire connectors into the outlet box. To connect the wires, hold the bare metal leads together and place a wire connector...
...wire from the pipe ball assembly • The white wire from the ceiling to the white wire from the fan • The black wire from the ceiling to the black wire from the fan • The black/white wire from the fan to the wire for the wall switch CAUTION: Be sure no bare wire.../Green White Black Dual Switch Wiring White Wall Switch Ground/Green Black Black/ White Ground/Green White Black 8 41081-01 • 08/04/09 • Hunter Fan Company Push all wires and wire connectors into the outlet box. To connect the wires, hold the bare metal leads together and place a wire connector...

Owner's Manual
Page 9
... installed screws in the canopy and into the ceiling plate. 5-3. Remove the backing from the adhesive dots, position the decal on the ceiling, and press the decal to adhere to engage the screws in the narrow ends of the ceiling plate hook. Install the remaining two screws through... the holes in the ceiling plate. Lift the canopy off of the keyholes and securely tighten the screws. 5-2. Canopy Screw 9 41081-01 • 08/04/09 • Hunter Fan Company Steps 5-1 - 5-2 Screw 5 •...
... installed screws in the canopy and into the ceiling plate. 5-3. Remove the backing from the adhesive dots, position the decal on the ceiling, and press the decal to adhere to engage the screws in the narrow ends of the ceiling plate hook. Install the remaining two screws through... the holes in the ceiling plate. Lift the canopy off of the keyholes and securely tighten the screws. 5-2. Canopy Screw 9 41081-01 • 08/04/09 • Hunter Fan Company Steps 5-1 - 5-2 Screw 5 •...

Owner's Manual
Page 11
...; Hunter Fan Company The pull chain has four settings in warm weather to a complete stop. The pull chain has two settings: On and Off. 7-4. Turn on the fan to prevent scratching. You may use a soft brush or lint-free cloth to the opposite position. Ceiling fans work...• Pull the chain slowly to change settings. • Release slowly to the fan. 7-2. Occasionally, apply a light coat of furniture polish for added protection and beauty. 7 • Operating and Cleaning Your Ceiling Fan In warm weather, use downward air flow pattern In cold weather, use upward air ...
...; Hunter Fan Company The pull chain has four settings in warm weather to a complete stop. The pull chain has two settings: On and Off. 7-4. Turn on the fan to prevent scratching. You may use a soft brush or lint-free cloth to the opposite position. Ceiling fans work...• Pull the chain slowly to change settings. • Release slowly to the fan. 7-2. Occasionally, apply a light coat of furniture polish for added protection and beauty. 7 • Operating and Cleaning Your Ceiling Fan In warm weather, use downward air flow pattern In cold weather, use upward air ...
Parts Guide
Page 1
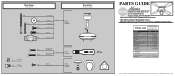
... Canopy Hanger Ball / Downrod Assembly Setscrew Ceiling Decal Blade Mounting Screw, #1/4-20x1.06 Mounting Screw, #1/4-20x1.38 Mounting Block Globe Fitter Globe/Shade Hardware Kit Canopy Screw Wood Screw 1.5" Wood Screw 3" Flat Washer Screw, Machine, 6-32 Balancing Kit Model # 23252 Asm. Hardware (Drawn to Scale) x 2 x 3 3"...02 1 84140-00 4 84109-01 4 63994-01 4 63994-02 4 73837-01 1 73040-01 1 84110-01 1 92595-00-850 1 07570-01 Hunter Fan Company • 7130 Goodlett Farms Pkwy. #400 • Memphis, TN 38016 • www.hunterfan.com • 98000-01-290 08-04-2009 &#...
... Canopy Hanger Ball / Downrod Assembly Setscrew Ceiling Decal Blade Mounting Screw, #1/4-20x1.06 Mounting Screw, #1/4-20x1.38 Mounting Block Globe Fitter Globe/Shade Hardware Kit Canopy Screw Wood Screw 1.5" Wood Screw 3" Flat Washer Screw, Machine, 6-32 Balancing Kit Model # 23252 Asm. Hardware (Drawn to Scale) x 2 x 3 3"...02 1 84140-00 4 84109-01 4 63994-01 4 63994-02 4 73837-01 1 73040-01 1 84110-01 1 92595-00-850 1 07570-01 Hunter Fan Company • 7130 Goodlett Farms Pkwy. #400 • Memphis, TN 38016 • www.hunterfan.com • 98000-01-290 08-04-2009 &#...


