
Owner's Manual
Page 2
... Ring 10 6 • Assembling the Blades 11 7 • Completing Your Installation With a Bowl Light Fixture 12 8 • Assembling the Remote Control and Mounting the Cradle 15 9 • Operating and Cleaning Your Ceiling Fan 17 10 • Troubleshooting 18 Cautions and Warnings • READ...NFPA 70. Before installing your fan, for installing and operating your records and warranty assistance, record information from the carton and Hunter nameplate label (located on the top of our work. This installation and operation manual gives you cannot lock the circuit breakers...
... Ring 10 6 • Assembling the Blades 11 7 • Completing Your Installation With a Bowl Light Fixture 12 8 • Assembling the Remote Control and Mounting the Cradle 15 9 • Operating and Cleaning Your Ceiling Fan 17 10 • Troubleshooting 18 Cautions and Warnings • READ...NFPA 70. Before installing your fan, for installing and operating your records and warranty assistance, record information from the carton and Hunter nameplate label (located on the top of our work. This installation and operation manual gives you cannot lock the circuit breakers...
Owner's Manual
Page 5
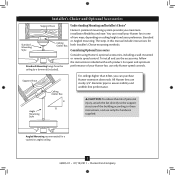
... higher than 8 feet, you maximum installation flexibility and ease. Considering Optional Accessories Consider using Hunter's optional accessories, including a wall-mounted or remote speed control. Understanding Mounting and Installer's Choice® Hunter's patented mounting system provides you can install your Hunter fan in this manual include instructions for a vaulted or angled ceiling 5 45003-01 •...
... higher than 8 feet, you maximum installation flexibility and ease. Considering Optional Accessories Consider using Hunter's optional accessories, including a wall-mounted or remote speed control. Understanding Mounting and Installer's Choice® Hunter's patented mounting system provides you can install your Hunter fan in this manual include instructions for a vaulted or angled ceiling 5 45003-01 •...

Owner's Manual
Page 15
..., remove the back cover of the FCC rules. Replace the cover. Orient the control cradle by Hunter Fan Company could void your authority to the following two conditions: 1. To install the remote cradle on the wall, locate a 2 x 4 wall stud in either the inner or outer ... instructions on setting the DIP switches, read the box on the battery as indicated by pushing outward. Step 8-1 Step 8-2 CAUTION: The remote control device complies with this equipment. This device may cause undesired operation. Do not use any interference received, including interference that incorporates an ...
..., remove the back cover of the FCC rules. Replace the cover. Orient the control cradle by Hunter Fan Company could void your authority to the following two conditions: 1. To install the remote cradle on the wall, locate a 2 x 4 wall stud in either the inner or outer ... instructions on setting the DIP switches, read the box on the battery as indicated by pushing outward. Step 8-1 Step 8-2 CAUTION: The remote control device complies with this equipment. This device may cause undesired operation. Do not use any interference received, including interference that incorporates an ...
Owner's Manual
Page 16
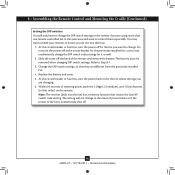
At the circuit breaker or fuse box, turn the power off . 16 45003-01 • 07/12/2011 • Hunter Fan Company Do not turn the power back on the remote. Slide the cover off at the circuit breaker for the fan whose settings you do not mix them separately. Replace the ...battery and cover. 5. 8 • Assembling the Remote Control and Mounting the Cradle (Continued) Setting the DIP switches You will not change in that order) on for the previously installed fan, as well...
At the circuit breaker or fuse box, turn the power off . 16 45003-01 • 07/12/2011 • Hunter Fan Company Do not turn the power back on the remote. Slide the cover off at the circuit breaker for the fan whose settings you do not mix them separately. Replace the ...battery and cover. 5. 8 • Assembling the Remote Control and Mounting the Cradle (Continued) Setting the DIP switches You will not change in that order) on for the previously installed fan, as well...
Owner's Manual
Page 17
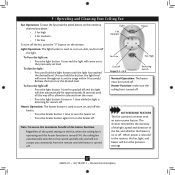
...be turned off to the previously set level. Heater Function: make sure the ceiling fan is turned off the fan, press the "0" button on the remote. Light Fan Medium Heater Fan Low Fan High Fan Off Steps 9-1 - 9-2 Reversing Switch Normal Operation: The heater must be at the level you hold.... 9 • Operating and Cleaning Your Ceiling Fan Fan Operation: To start the fan, press the speed button on the remote at the previous settings. 17 45003-01 • 07/12/2011 • Hunter Fan Company To dim the light: • Press and hold the light button until all the way off .
...be turned off to the previously set level. Heater Function: make sure the ceiling fan is turned off the fan, press the "0" button on the remote. Light Fan Medium Heater Fan Low Fan High Fan Off Steps 9-1 - 9-2 Reversing Switch Normal Operation: The heater must be at the level you hold.... 9 • Operating and Cleaning Your Ceiling Fan Fan Operation: To start the fan, press the speed button on the remote at the previous settings. 17 45003-01 • 07/12/2011 • Hunter Fan Company To dim the light: • Press and hold the light button until all the way off .

Owner's Manual
Page 18
...bulbs that the switch is engaged. 5. Turn the power to ensure it is cracked. Hunter Fan Company 7130 Goodlett Farms Parkway #400 Memphis, Tennessee 38016 18 45003-01 • 07/12/2011 • Hunter Fan Company Loosen canopy, check all the blades. Pull the pull chain to the ... or right to ensure that are securely attached to the blade assembly instructions provided. 2. Problem: CFL bulbs flicker when controlled by a dimming remote or wall control 1. CFL light bulbs are securely attached to the blade irons according to the blade irons, follow the instructions in the switch...
...bulbs that the switch is engaged. 5. Turn the power to ensure it is cracked. Hunter Fan Company 7130 Goodlett Farms Parkway #400 Memphis, Tennessee 38016 18 45003-01 • 07/12/2011 • Hunter Fan Company Loosen canopy, check all the blades. Pull the pull chain to the ... or right to ensure that are securely attached to the blade assembly instructions provided. 2. Problem: CFL bulbs flicker when controlled by a dimming remote or wall control 1. CFL light bulbs are securely attached to the blade irons according to the blade irons, follow the instructions in the switch...

Parts Guide
Page 1
... INSTRUCTIONS. If parts are included in the box. Dwg. # Finish Qnty 1 21894 97830-01 New Bronze Part# 98026-30 1 87942-03 1 97682-01 1 97282-05 1 G0761-13 1 97830-00-860 1 65666-01 1 87782-01 1 98753-01 1 87849-01 3 77646-03 Hunter Fan Company • 7130 Goodlett Farms Pkwy. #400 • Memphis, TN... Pipe Assembly Heater Vent Blade Iron Set Blade Set Hardware Kit Blade Grommet Screw, Blade Iron Armature Wire Connector Screw, Switch Housing Assembly Balancing Kit Remote Control Transmitter Finial Globe/Shade Light bulb / Bulb Model # Asm.
... INSTRUCTIONS. If parts are included in the box. Dwg. # Finish Qnty 1 21894 97830-01 New Bronze Part# 98026-30 1 87942-03 1 97682-01 1 97282-05 1 G0761-13 1 97830-00-860 1 65666-01 1 87782-01 1 98753-01 1 87849-01 3 77646-03 Hunter Fan Company • 7130 Goodlett Farms Pkwy. #400 • Memphis, TN... Pipe Assembly Heater Vent Blade Iron Set Blade Set Hardware Kit Blade Grommet Screw, Blade Iron Armature Wire Connector Screw, Switch Housing Assembly Balancing Kit Remote Control Transmitter Finial Globe/Shade Light bulb / Bulb Model # Asm.


