

User Manual
Page 1
Digital Terrestrial MHP Receiver The default PIN Code is set to 0000. User's Manual DTV 4700
Digital Terrestrial MHP Receiver The default PIN Code is set to 0000. User's Manual DTV 4700

User Manual
Page 2
...be copied, used or translated in this user's manual next to safely install, use and maintain the installation. Please read this user's manual carefully to misuse of copyright and copyright law. Copyright (Copyright © 2010 HUMAX Corporation) Not to be able to your product ...for purchasing a HUMAX product. Notice Thank you for future reference. The information in ...
...be copied, used or translated in this user's manual next to safely install, use and maintain the installation. Please read this user's manual carefully to misuse of copyright and copyright law. Copyright (Copyright © 2010 HUMAX Corporation) Not to be able to your product ...for purchasing a HUMAX product. Notice Thank you for future reference. The information in ...

User Manual
Page 3
... to qualified service personnel. Refer servicing to reduce negative consequences for one in electric and electronic products, as well as the waste disposal". GB3 User's Manual No user serviceable parts inside the product that the customer must be supported. Notice Meaning of Symbols To reduce the risk of electric shock or...
... to qualified service personnel. Refer servicing to reduce negative consequences for one in electric and electronic products, as well as the waste disposal". GB3 User's Manual No user serviceable parts inside the product that the customer must be supported. Notice Meaning of Symbols To reduce the risk of electric shock or...
User Manual
Page 4
... on a bed, sofa, rug, or other similar surface. Please read the following safety precautions carefully. CLEANING • Disconnect the product from the TV. GB4 User's Manual LOCATION • Place the product indoors to avoid exposing it to the product. 7. OVERLOADING • Do not overload a wall outlet, extension cord or adapter as...
... on a bed, sofa, rug, or other similar surface. Please read the following safety precautions carefully. CLEANING • Disconnect the product from the TV. GB4 User's Manual LOCATION • Place the product indoors to avoid exposing it to the product. 7. OVERLOADING • Do not overload a wall outlet, extension cord or adapter as...
User Manual
Page 5
..., be caused to use the product when defective, serious damage can be sure the service technician uses replacement parts specified by the user. 2. GB5 User's Manual This will prevent damage to the unit due to prevent the cover vinyl from melting. • The mains plug, as a disconnection device, shall remain readily...
..., be caused to use the product when defective, serious damage can be sure the service technician uses replacement parts specified by the user. 2. GB5 User's Manual This will prevent damage to the unit due to prevent the cover vinyl from melting. • The mains plug, as a disconnection device, shall remain readily...

User Manual
Page 6
... Audio System GB16 2.6 Powering On GB17 3. Menu GB23 4.1 Channel GB23 4.2 Preference GB25 4.3 System GB28 4.4 Pay Per View Services GB31 5. Service and Support GB38 GB6 User's Manual Basic Operation GB18 3.1 Installation Wizard GB18 3.2 Basic Function GB19 4. Specification GB36 8. Software Update GB32 5.1 OTA (Over the Air GB32 6. Before Using the Product GB7 1.1 Package...
... Audio System GB16 2.6 Powering On GB17 3. Menu GB23 4.1 Channel GB23 4.2 Preference GB25 4.3 System GB28 4.4 Pay Per View Services GB31 5. Service and Support GB38 GB6 User's Manual Basic Operation GB18 3.1 Installation Wizard GB18 3.2 Basic Function GB19 4. Specification GB36 8. Software Update GB32 5.1 OTA (Over the Air GB32 6. Before Using the Product GB7 1.1 Package...
User Manual
Page 7
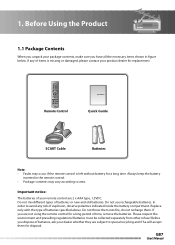
... specified above. Replace only with the type of your dealer whether they are subject to special recycling and if he will accept them . GB7 User's Manual Before Using the Product 1.1 Package Contents When you dispose of batteries or new and old batteries. In order to area. Please respect the environment and...
... specified above. Replace only with the type of your dealer whether they are subject to special recycling and if he will accept them . GB7 User's Manual Before Using the Product 1.1 Package Contents When you dispose of batteries or new and old batteries. In order to area. Please respect the environment and...
User Manual
Page 8
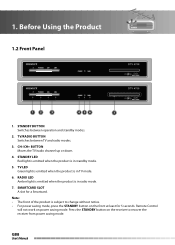
... LED Green light is emitted when the product is in radio mode. 7. Note: • The front of the product is in TV mode. 6. GB8 User's Manual Press the STANDBY button on the front at least for a Smartcard. RADIO LED Amber light is emitted when the product is in standby mode. 5. TV...
... LED Green light is emitted when the product is in radio mode. 7. Note: • The front of the product is in TV mode. 6. GB8 User's Manual Press the STANDBY button on the front at least for a Smartcard. RADIO LED Amber light is emitted when the product is in standby mode. 5. TV...
User Manual
Page 9
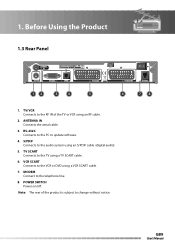
DTT-3600/DTV-4700_ (100119) 1. Before Using the Product ANTENNA 9 90-250V~50/60Hz IN TV/VCR RS-232C SPDIF 1.3 Rear Panel TV SCART VCR SCART MODEM ANTENNA ... MODEM 6 7 8 1. S/PDIF Connects to the TV using an S/PDIF cable. (digital audio) 5. ANTENNA IN Connects the aerial cable. 3. POWER SWITCH Power on/off. GB9 User's Manual Note: The rear of the TV or VCR using a VCR SCART cable. 7. RS-232C Connects to the PC to the telephone line. 8. TV SCART Connects...
DTT-3600/DTV-4700_ (100119) 1. Before Using the Product ANTENNA 9 90-250V~50/60Hz IN TV/VCR RS-232C SPDIF 1.3 Rear Panel TV SCART VCR SCART MODEM ANTENNA ... MODEM 6 7 8 1. S/PDIF Connects to the TV using an S/PDIF cable. (digital audio) 5. ANTENNA IN Connects the aerial cable. 3. POWER SWITCH Power on/off. GB9 User's Manual Note: The rear of the TV or VCR using a VCR SCART cable. 7. RS-232C Connects to the PC to the telephone line. 8. TV SCART Connects...
User Manual
Page 10
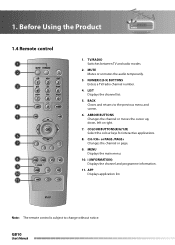
.../radio channel number. 4. ARROW BUTTONS 14 Changes the channel or moves the cursor up, down, left or right. 7. LIST Displays the channel list. 5. GB10 User's Manual COLOUR BUTTONS(R/G/Y/B) Select the colour keys for interactive applications. 15 8. MENU Displays the main menu. 10. returns to change without notice. Before Using the Product...
.../radio channel number. 4. ARROW BUTTONS 14 Changes the channel or moves the cursor up, down, left or right. 7. LIST Displays the channel list. 5. GB10 User's Manual COLOUR BUTTONS(R/G/Y/B) Select the colour keys for interactive applications. 15 8. MENU Displays the main menu. 10. returns to change without notice. Before Using the Product...
User Manual
Page 11
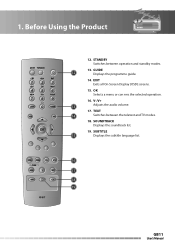
OK Selects a menu or con rms the selected operation. 16. TEXT 14 Switches between operation and standby modes. 13. Before Using the Product 12. STANDBY Switches between the teletext and TV modes. 18. EXIT Exits all On-Screen Display (OSD) screens. 15. SOUNDTRACK Displays the soundtrack list. 19. SUBTITLE 15 Displays the subtitle language list. 16 17 18 19 GB11 User's Manual V-/V+ 13 Adjusts the audio volume. 17. GUIDE 12 Displays the programme guide. 14. 1.
OK Selects a menu or con rms the selected operation. 16. TEXT 14 Switches between operation and standby modes. 13. Before Using the Product 12. STANDBY Switches between the teletext and TV modes. 18. EXIT Exits all On-Screen Display (OSD) screens. 15. SOUNDTRACK Displays the soundtrack list. 19. SUBTITLE 15 Displays the subtitle language list. 16 17 18 19 GB11 User's Manual V-/V+ 13 Adjusts the audio volume. 17. GUIDE 12 Displays the programme guide. 14. 1.

User Manual
Page 12
... particular equipments for gaining optimum signal quality. ANTENNA IN 9 90-250V~50/60Hz TV/VCR RS-232C SPDIF TV SCART VCR SCART MODEM GB12 User's Manual ANTENNA IN 9 90-250V~50/60Hz 2. Note: If you have. Select the most appropriate procedure depending on the equipment you encounter any problems setting up...
... particular equipments for gaining optimum signal quality. ANTENNA IN 9 90-250V~50/60Hz TV/VCR RS-232C SPDIF TV SCART VCR SCART MODEM GB12 User's Manual ANTENNA IN 9 90-250V~50/60Hz 2. Note: If you have. Select the most appropriate procedure depending on the equipment you encounter any problems setting up...

User Manual
Page 13
GB13 User's Manual Setup ANTENNA IN 9 90-250V~50/60Hz 2.2 Connecting the TV TV/VCR RS-232C SPDIF TV SCART Connect the product and the TV using an RF cable to watch analogue channels. VCR SCART MODEM ANTENNA IN 9 90-250V~50/60Hz TV/VCR RS-232C SPDIF TV SCART VCR SCART MODEM RF Cable SCART Cable TV Antenna IN TV SCART Note: Connect the product and the TV using a SCART or an RF cable. 2.
GB13 User's Manual Setup ANTENNA IN 9 90-250V~50/60Hz 2.2 Connecting the TV TV/VCR RS-232C SPDIF TV SCART Connect the product and the TV using an RF cable to watch analogue channels. VCR SCART MODEM ANTENNA IN 9 90-250V~50/60Hz TV/VCR RS-232C SPDIF TV SCART VCR SCART MODEM RF Cable SCART Cable TV Antenna IN TV SCART Note: Connect the product and the TV using a SCART or an RF cable. 2.

User Manual
Page 14
ANTENNA IN 9 90-250V~50/60Hz TV/VCR RS-232C SPDIF TV SCART VCR SCART MODEM GB14 User's Manual RF Cable VCR Antenna IN VCR Antenna OUT SCART Cable VCR SCART RF Cable SCART Cable TV Antenna IN TV SCART Connect the product and the TV/VCR using a SCART cable. 2. 2. Setup 2.3 Connecting the TV and VCR You can either: 1. Connect the product and the TV/VCR using an RF cable.
ANTENNA IN 9 90-250V~50/60Hz TV/VCR RS-232C SPDIF TV SCART VCR SCART MODEM GB14 User's Manual RF Cable VCR Antenna IN VCR Antenna OUT SCART Cable VCR SCART RF Cable SCART Cable TV Antenna IN TV SCART Connect the product and the TV/VCR using a SCART cable. 2. 2. Setup 2.3 Connecting the TV and VCR You can either: 1. Connect the product and the TV/VCR using an RF cable.

User Manual
Page 15
2. Setup 2.4 Connecting the Modem Connect a modem cable to the product. ANTENNA IN 9 90-250V~50/60Hz TV/VCR RS-232C SPDIF TV SCART VCR SCART MODEM Modem Cable LAN GB15 User's Manual
2. Setup 2.4 Connecting the Modem Connect a modem cable to the product. ANTENNA IN 9 90-250V~50/60Hz TV/VCR RS-232C SPDIF TV SCART VCR SCART MODEM Modem Cable LAN GB15 User's Manual
User Manual
Page 16
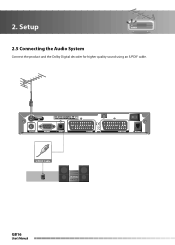
ANTENNA IN 9 90-250V~50/60Hz TV/VCR RS-232C SPDIF TV SCART VCR SCART MODEM S/PDIF Cable S/PDIF GB16 User's Manual Setup 2.5 Connecting the Audio System Connect the product and the Dolby Digital decoder for higher quality sound using an S/PDIF cable. 2.
ANTENNA IN 9 90-250V~50/60Hz TV/VCR RS-232C SPDIF TV SCART VCR SCART MODEM S/PDIF Cable S/PDIF GB16 User's Manual Setup 2.5 Connecting the Audio System Connect the product and the Dolby Digital decoder for higher quality sound using an S/PDIF cable. 2.

User Manual
Page 17
Then, connect a plug of the adapter to a power input jack. 2. Power on by pressing the STANDBY button on the remote control. VCR SCART MODEM GB17 User's Manual Connect an adapter to a wall outlet. 2. Setup 2.6 Powering On 1.
Then, connect a plug of the adapter to a power input jack. 2. Power on by pressing the STANDBY button on the remote control. VCR SCART MODEM GB17 User's Manual Connect an adapter to a wall outlet. 2. Setup 2.6 Powering On 1.

User Manual
Page 18
If you press the RED button, you can select menu, audio, and the subtitle language. GB18 User's Manual Note: The default PIN Code is set whether to 0000. 1. You can set to use the LCN using simple organization and options, and watch the ...
If you press the RED button, you can select menu, audio, and the subtitle language. GB18 User's Manual Note: The default PIN Code is set whether to 0000. 1. You can set to use the LCN using simple organization and options, and watch the ...

User Manual
Page 19
... screen. 1 2 3 4 5 SitcomUNO L'Amore vero non si compra - The information of time whenever you want to apply to hide the Program Banner. Program name GB19 User's Manual You can view the program banner by pressing the i button while watching a program. Puntata ... 09:00 09:45 Subtitle Languages 6 29/08 04:18 OK...
... screen. 1 2 3 4 5 SitcomUNO L'Amore vero non si compra - The information of time whenever you want to apply to hide the Program Banner. Program name GB19 User's Manual You can view the program banner by pressing the i button while watching a program. Puntata ... 09:00 09:45 Subtitle Languages 6 29/08 04:18 OK...

User Manual
Page 20
... time and progress bar: displays program playing time and progress bar. 6. Press the i button again while the program banner is any MHP application. GB20 User's Manual Displayed only when there is displayed to view detailed information. Basic Operation 5. Displayed only when there is not displayed. Current time and date 7. Detailed program...
... time and progress bar: displays program playing time and progress bar. 6. Press the i button again while the program banner is any MHP application. GB20 User's Manual Displayed only when there is displayed to view detailed information. Basic Operation 5. Displayed only when there is not displayed. Current time and date 7. Detailed program...


