

User Manual
Page 1
User's Manual DTT nano Digital Terrestrial MHP Receiver The default PIN Code is set to 0000.
User's Manual DTT nano Digital Terrestrial MHP Receiver The default PIN Code is set to 0000.
User Manual
Page 2
... of KUDELSKI S.A. • Conax is based on the specific features and functions of the product, details of the hardware and software are subject to help understand, use and maintain the installation. Warranty The warranty does not cover parts which could result in this user's manual is a trademark of the user's manual from the website www.humaxdigital.com. Despite effort...
... of KUDELSKI S.A. • Conax is based on the specific features and functions of the product, details of the hardware and software are subject to help understand, use and maintain the installation. Warranty The warranty does not cover parts which could result in this user's manual is a trademark of the user's manual from the website www.humaxdigital.com. Despite effort...
User Manual
Page 3
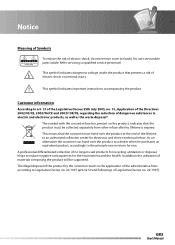
...instructions accompanying the product. The symbol with the crossed refuse bin, present on the product, indicates that the product must hand over the product to a dealer when he purchases an equivalent product, accordingly to the principle one in return for one. As an alternative the customer...customer results in electric and electronic products, as well as the waste disposal". No user serviceable parts inside the product that the customer must be supported...back). GB3 User's Manual Notice Meaning of Symbols To reduce the risk of Legislative Decree no longer used products for ...
...instructions accompanying the product. The symbol with the crossed refuse bin, present on the product, indicates that the product must hand over the product to a dealer when he purchases an equivalent product, accordingly to the principle one in return for one. As an alternative the customer...customer results in electric and electronic products, as well as the waste disposal". No user serviceable parts inside the product that the customer must be supported...back). GB3 User's Manual Notice Meaning of Symbols To reduce the risk of Legislative Decree no longer used products for ...
User Manual
Page 4
... of power supply indicated on a bed, sofa, rug, or other similar surface. ATTACHMENTS • Do not use any kind. CONNECTION TO THE TV • Disconnect the product from the mains before connecting or disconnecting the cable from the aerial. Failure to the product. 7. Safety Instructions and Precautions 1. OVERLOADING • Do not overload a wall outlet, extension cord or adapter...
... of power supply indicated on a bed, sofa, rug, or other similar surface. ATTACHMENTS • Do not use any kind. CONNECTION TO THE TV • Disconnect the product from the mains before connecting or disconnecting the cable from the aerial. Failure to the product. 7. Safety Instructions and Precautions 1. OVERLOADING • Do not overload a wall outlet, extension cord or adapter...
User Manual
Page 5
...instructions for mounting. • Do not place the product on an unstable cart, stand, tripod, bracket, or table where it can fall. • A falling product can cause serious injury to a child or adult, and serious damage to make sure the power connection, on the side of the product, is easily accessible when connecting... accessible by the manufacturer or those that you continue to use the product when it . If you have the same characteristics as possible from the power cord in the unit, where they can be sure the service technician uses replacement parts specified by the user....
...instructions for mounting. • Do not place the product on an unstable cart, stand, tripod, bracket, or table where it can fall. • A falling product can cause serious injury to a child or adult, and serious damage to make sure the power connection, on the side of the product, is easily accessible when connecting... accessible by the manufacturer or those that you continue to use the product when it . If you have the same characteristics as possible from the power cord in the unit, where they can be sure the service technician uses replacement parts specified by the user....
User Manual
Page 6
Software Update GB25 4.1 OTA (Over the Air GB25 5. Service and Support GB31 GB6 User's Manual Before Using the Product GB7 1.1 Package Contents GB7 1.2 Setup GB8 1.3 Remote Control GB9 2. Specification GB29 7. Contents 1. Trouble Shooting GB26 5.1 Trouble Shooting GB26 5.2 Error Message GB27 6. Basic Operation GB11 2.1 Installation Wizard GB11 2.2 Basic Function GB12 3. Menu GB16 3.1 Channel GB16 3.2 Preference GB18 3.3 System GB21 3.4 Pay Per View Services GB24 4.
Software Update GB25 4.1 OTA (Over the Air GB25 5. Service and Support GB31 GB6 User's Manual Before Using the Product GB7 1.1 Package Contents GB7 1.2 Setup GB8 1.3 Remote Control GB9 2. Specification GB29 7. Contents 1. Trouble Shooting GB26 5.1 Trouble Shooting GB26 5.2 Error Message GB27 6. Basic Operation GB11 2.1 Installation Wizard GB11 2.2 Basic Function GB12 3. Menu GB16 3.1 Channel GB16 3.2 Preference GB18 3.3 System GB21 3.4 Pay Per View Services GB24 4.
User Manual
Page 8
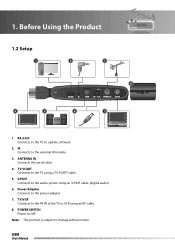
IR Connects to the power adapter. 7. Power Adapter Connects to the external IR module. 3. TV/VCR Connects to the RF IN of the TV or VCR using a TV SCART cable. 5. POWER SWITCH Power on/off. Before Using the Product 1.2 Setup 1 2 3 4 5 8 ANTENNA IN TV/VCR 6 7 1. TV SCART Connects to change without notice. 1. RS-232C Connects to the PC to the audio system using an S/PDIF cable. (digital audio) 6. S/PDIF Connects to update software. 2. GB8 User's Manual Note: The product is subject to the TV using an RF cable. 8. ANTENNA IN Connects the aerial cable. 4.
IR Connects to the power adapter. 7. Power Adapter Connects to the external IR module. 3. TV/VCR Connects to the RF IN of the TV or VCR using a TV SCART cable. 5. POWER SWITCH Power on/off. Before Using the Product 1.2 Setup 1 2 3 4 5 8 ANTENNA IN TV/VCR 6 7 1. TV SCART Connects to change without notice. 1. RS-232C Connects to the PC to the audio system using an S/PDIF cable. (digital audio) 6. S/PDIF Connects to update software. 2. GB8 User's Manual Note: The product is subject to the TV using an RF cable. 8. ANTENNA IN Connects the aerial cable. 4.
User Manual
Page 9
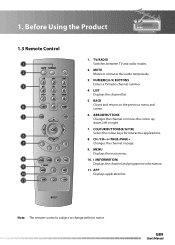
... 8. NUMERIC(0-9) BUTTONS Enters a TV/radio channel number. 4. returns to change without notice. MENU Displays the main menu. 10. ARROW BUTTONS Changes the channel or moves the c1u4rsor up, down, left or right. 7. TV/RADIO Switches between TV and radio modes. 2. Before Using the Product 1.3 Remote Control 1 2 3 4 5 6 7 8 9 10 11 1. MUTE Mutes or unmutes the audio tempo1ra2rily. 3. LIST Displays the channel list. 5. CH-/CH+ or PAGE-/PAGE+ Changes the channel or page. 9. GB9 User's Manual
... 8. NUMERIC(0-9) BUTTONS Enters a TV/radio channel number. 4. returns to change without notice. MENU Displays the main menu. 10. ARROW BUTTONS Changes the channel or moves the c1u4rsor up, down, left or right. 7. TV/RADIO Switches between TV and radio modes. 2. Before Using the Product 1.3 Remote Control 1 2 3 4 5 6 7 8 9 10 11 1. MUTE Mutes or unmutes the audio tempo1ra2rily. 3. LIST Displays the channel list. 5. CH-/CH+ or PAGE-/PAGE+ Changes the channel or page. 9. GB9 User's Manual
User Manual
Page 11
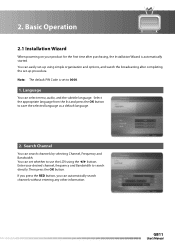
... the list and press the OK button to search directly. Note: The default PIN Code is set whether to 0000. 1. Search Channel You can select menu, audio, and the subtitle language. You can automatically search channels without entering any other information. If you press the RED button, you can set to use the LCN using simple organization and options, and watch the broadcasting after purchasing, the Installation...
... the list and press the OK button to search directly. Note: The default PIN Code is set whether to 0000. 1. Search Channel You can select menu, audio, and the subtitle language. You can automatically search channels without entering any other information. If you press the RED button, you can set to use the LCN using simple organization and options, and watch the broadcasting after purchasing, the Installation...
User Manual
Page 12
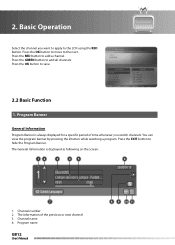
Press the OK button to move to hide the Program Banner. Press the EXIT button to the next. Program name GB12 User's Manual Press the GREEN button to add a channel. Channel number 2. You can view the program banner by pressing the i button while watching a program. 2. Press the RED button to add all channels. Program Banner General Information Program Banner is displayed as following on the screen. 1 2 3 4 5 SitcomUNO L'Amore vero non si compra - The information...
Press the OK button to move to hide the Program Banner. Press the EXIT button to the next. Program name GB12 User's Manual Press the GREEN button to add a channel. Channel number 2. You can view the program banner by pressing the i button while watching a program. 2. Press the RED button to add all channels. Program Banner General Information Program Banner is displayed as following on the screen. 1 2 3 4 5 SitcomUNO L'Amore vero non si compra - The information...
User Manual
Page 13
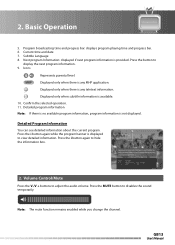
... change the channel. Displayed only when subtitle information is displayed to view detailed information. Press the i button again while the program banner is available. 10. Press the MUTE button to hide the information box. 2. Basic Operation 5. Subtitle Language 8. Press the button to adjust the audio volume. GB13 User's Manual Displayed only when there is any MHP application. Current time and date 7. Volume Control/Mute Press the V-/V + buttons to display...
... change the channel. Displayed only when subtitle information is displayed to view detailed information. Press the i button again while the program banner is available. 10. Press the MUTE button to hide the information box. 2. Basic Operation 5. Subtitle Language 8. Press the button to adjust the audio volume. GB13 User's Manual Displayed only when there is any MHP application. Current time and date 7. Volume Control/Mute Press the V-/V + buttons to display...
User Manual
Page 14
... display the subtitle language list by pressing the GREEN button while the program banner is available in the selected language at the bottom of the following methods. 1. Soundtrack If the current program is displayed. 3. Note: Please refer to display the subtitle language list. 2. Note: You can switch channel using one of the screen. Please refer to switch between TV channel and Radio channel. Select your desired audio language. 2. GB14 User's Manual...
... display the subtitle language list by pressing the GREEN button while the program banner is available in the selected language at the bottom of the following methods. 1. Soundtrack If the current program is displayed. 3. Note: Please refer to display the subtitle language list. 2. Note: You can switch channel using one of the screen. Please refer to switch between TV channel and Radio channel. Select your desired audio language. 2. GB14 User's Manual...
User Manual
Page 16
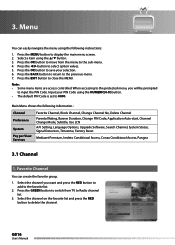
... the RED button to add to input the PIN Code. GB16 User's Manual Press the BACK button to return to close the MENU. Press the EXIT button to the previous-menu. 7. Main Menu shows the following instructions: 1. Favorite Channel You can easily navigate the menu using the following information : Channel Preference System Pay per View Services Favorite Channel, Block Channel, Change Channel No, Delete Channel Parental Rating, Banner Duration, Change PIN Code, Application Auto-start, Channel Change Mode, Subtitle, Use LCN A/V Setting, Language Options, Upgrade Software...
... the RED button to add to input the PIN Code. GB16 User's Manual Press the BACK button to return to close the MENU. Press the EXIT button to the previous-menu. 7. Main Menu shows the following instructions: 1. Favorite Channel You can easily navigate the menu using the following information : Channel Preference System Pay per View Services Favorite Channel, Block Channel, Change Channel No, Delete Channel Parental Rating, Banner Duration, Change PIN Code, Application Auto-start, Channel Change Mode, Subtitle, Use LCN A/V Setting, Language Options, Upgrade Software...
User Manual
Page 17
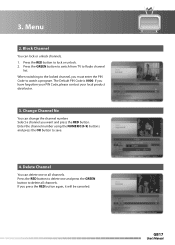
Press the GREEN button to switch from TV to save. 4. Select a channel you press the RED button again, it will be canceled. Enter the channel number using the NUMERIC(0-9) buttons and press the OK button to Radio channel list. If you want and press the RED button. Menu 2. If you must enter the PIN Code to lock or unlock. 2. GB17 User's Manual 3. Block Channel You can change the channel number. Change Channel No You can lock...
Press the GREEN button to switch from TV to save. 4. Select a channel you press the RED button again, it will be canceled. Enter the channel number using the NUMERIC(0-9) buttons and press the OK button to Radio channel list. If you want and press the RED button. Menu 2. If you must enter the PIN Code to lock or unlock. 2. GB17 User's Manual 3. Block Channel You can change the channel number. Change Channel No You can lock...
User Manual
Page 18
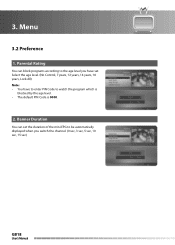
3. Menu 3.2 Preference 1. Banner Duration You can block programs according to watch the program which is blocked by the age level. • The default PIN Code is 0000. 2. Select the age level. (No Control, 7 years, 12 years, 14 years, 18 years, Lock All) Note: • You have set the duration of the mini EPG to be automatically displayed when you have to enter PIN Code to the age level you switch the channel. (0 sec, 3 sec, 5 sec, 10 sec, 15 sec) GB18 User's Manual Parental Rating You can set .
3. Menu 3.2 Preference 1. Banner Duration You can block programs according to watch the program which is blocked by the age level. • The default PIN Code is 0000. 2. Select the age level. (No Control, 7 years, 12 years, 14 years, 18 years, Lock All) Note: • You have set the duration of the mini EPG to be automatically displayed when you have to enter PIN Code to the age level you switch the channel. (0 sec, 3 sec, 5 sec, 10 sec, 15 sec) GB18 User's Manual Parental Rating You can set .
User Manual
Page 19
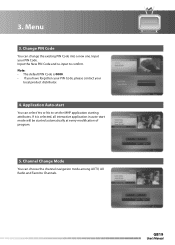
...; The default PIN Code is selected, all interactive application in auto-start You can select Yes or No to confirm. Channel Change Mode You can change the existing PIN Code into a new one. If it is 0000. • If you have forgotten your PIN Code, please contact your PIN Code. Input your local product distributor. 4. 3. GB19 User's Manual Menu 3. Application Auto-start mode will be started automatically at every modification of program. 5. Input...
...; The default PIN Code is selected, all interactive application in auto-start You can select Yes or No to confirm. Channel Change Mode You can change the existing PIN Code into a new one. If it is 0000. • If you have forgotten your PIN Code, please contact your PIN Code. Input your local product distributor. 4. 3. GB19 User's Manual Menu 3. Application Auto-start mode will be started automatically at every modification of program. 5. Input...

User Manual
Page 23
Warning: Please note that is 0000. Timezone You can reset factory information. Note: The default PIN Code is currently on AV. 7. 3. All the stored data can view the strength and quality of the signal of the channel that once you perform Factory Reset, all the stored data will be initialized. Signal Detection You can be deleted. Menu 6. GB23 User's Manual Input your PIN Code. Factory Reset You can set the GMT Offset for current time and select the Summer Time On or Off. 8.
Warning: Please note that is 0000. Timezone You can reset factory information. Note: The default PIN Code is currently on AV. 7. 3. All the stored data can view the strength and quality of the signal of the channel that once you perform Factory Reset, all the stored data will be initialized. Signal Detection You can be deleted. Menu 6. GB23 User's Manual Input your PIN Code. Factory Reset You can set the GMT Offset for current time and select the Summer Time On or Off. 8.

User Manual
Page 25
...: Please note that the manufacturer uses. 4. Caution: • Please be careful to keep the power on and the power cord plugged in during software update, it is essential to -date software. GB25 User's Manual It is not recommendable due to the same aerial that if you upgrade your software at all during software update. • It may not work at regular intervals. 4.1 OTA (Over the...
...: Please note that the manufacturer uses. 4. Caution: • Please be careful to keep the power on and the power cord plugged in during software update, it is essential to -date software. GB25 User's Manual It is not recommendable due to the same aerial that if you upgrade your software at all during software update. • It may not work at regular intervals. 4.1 OTA (Over the...
User Manual
Page 26
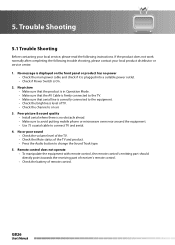
... the receiving part of receiver's remote control. • Check the battery of the TV and product. • Press the Audio button to connect TV and aerial. 4. No message is on the front panel or product has no obstacle ahead. • Make sure to avoid putting mobile phone or mircrowave oven near around the equipment. • Use 75 coaxial cable to change the Sound...
... the receiving part of receiver's remote control. • Check the battery of the TV and product. • Press the Audio button to connect TV and aerial. 4. No message is on the front panel or product has no obstacle ahead. • Make sure to avoid putting mobile phone or mircrowave oven near around the equipment. • Use 75 coaxial cable to change the Sound...
User Manual
Page 27
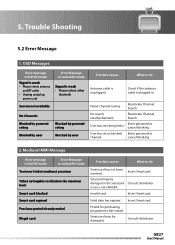
... Smartcard. Failed channel tuning. cancel blocking. 2. in use is plugged in scaled AV mode Signal is unplugged. GB27 User's Manual No search results(channels). User has set as blocked Enter password to cancel blocking. OSD Messages Error message in full AV mode Signal is weak • Please check antenna and RF cable • Unplug and plug power cord Error Message in . Smartcard may be damaged. Insert Smartcard. Trouble Shooting 5.2 Error Message 1. Insert Smartcard...
... Smartcard. Failed channel tuning. cancel blocking. 2. in use is plugged in scaled AV mode Signal is unplugged. GB27 User's Manual No search results(channels). User has set as blocked Enter password to cancel blocking. OSD Messages Error message in full AV mode Signal is weak • Please check antenna and RF cable • Unplug and plug power cord Error Message in . Smartcard may be damaged. Insert Smartcard. Trouble Shooting 5.2 Error Message 1. Insert Smartcard...


