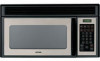
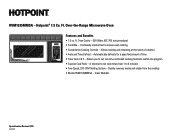
Installation Instructions
Page 7
Your Owner's Manual contains the kit number for your model. • This microwave oven is greater than 30″, a Filler Panel Kit may be 30″ or More from the Floor to the Top of ...
Installation Instructions
Page 11
...'s Manual for the kit number.) Installation Instructions 2 INSTALLATION TYPES (Choose A, B or C) This microwave oven is shipped assembled for Outside Top Exhaust (except for non-vented models). Outside Back Exhaust (Horizontal Duct) C. Outside Top Exhaust (Vertical Duct) B. Select the type of ventilation: A.
Quick Specs
Page 2
... Quickly removes smoke and steam from 1 to 6 minutes • Two-Speed, 200-CFM Venting System - Over-the-Range Microwave Oven RVM1535MMSA Clock Time Cook AM/PM scroll speed Defrost AUTO/TIME Reminder Popcorn Timer ON/OFF Reheat 1 23 4 56 7 89 0 display on ...hi - Allows you to set cook times from the cooktop • Model RVM1535MMSA - ft. lo - A shortcut to ensure even cooking • Convenience Cooking Controls - Oven Cavity - 950 Watts (IEC-705 test procedure) • Turntable - Hotpoint® 1.5 Cu. off START Pause CLEAR OFF Features and Benefits •...
Use and Care Manual / Warranty
Page 1
...Microwave Terms 29 Care and Cleaning 30 If Something Goes Wrong 35 Before You Call For Service 35 Hotpoint Service Numbers 37 Warranty Back Cover Write the model and serial numbers here: Model Serial Find these numbers on a label inside the oven. Para consultar una versión en ...español de este manual de instrucciones, visite nuestro sitio de internet Hotpoint.com. RVM1535 Over the Range Microwave Oven...
Use and Care Manual / Warranty
Page 10
Turntable and support must be removed for the microwave to operate. 2 Door Latches. 3 Window with Metal Shield. The turntable may vary from your model.) Features 23 1 4 5687 1 Door Handle. Screen allows cooking to open the door. NOTE: The rating plate and oven vent are located on the top of ...
Use and Care Manual / Warranty
Page 11
Enter Amount of defrosting time. Starts immediately! 11 Quick Start The Controls on Your Microwave Oven (Throughout this manual, features and appearance may vary from your model.) You can microwave by time, temperature or with the convenience features. 1 Time Features Time Cooking Press TIME COOK I & II (Press once or twice) TIME DEFROST MINUTE COOK (Press 1-6) POWER LEVEL ADD 30 SEC. Starts immediately! Amount of cooking time. Power level 1-10.
Use and Care Manual / Warranty
Page 24
Clock Press to enter the time of day or to check the time of day while microwaving. 1 Press CLOCK. 2 Enter time of day. 3 Press START or CLOCK. 24 Operating Instructions Other Features Your Model May Have Cooking Complete Reminder To remind you that you have food in the oven, the oven will display "END" and beep once a minute until you either open the oven door or press CLEAR/OFF.
Use and Care Manual / Warranty
Page 26
... TIMER ON/OFF. 2 Enter the time you want to count down. 3 Press START/PAUSE to start counting down . 3 Wait 5 seconds. Operating Instructions Other Features Your Model May Have Timer On/Off Timer On/Off operates as a minute timer when the oven is not operating: 1 Press TIMER ON/OFF. 2 Enter the time...
Use and Care Manual / Warranty
Page 28
.... When the microwave is on, the vent fan will automatically turn on at low fan speed, stay on or off. Operating Instructions Other Features Your Model May Have Surface Light Press to turn the fan off. Vent Fan The vent fan removes steam and other vapors from surface cooking and cools...
Use and Care Manual / Warranty
Page 31
... products containing any chemical agent on Stainless Steel finishes. Door Panel Before cleaning the front door panel, make sure you know what type of the model number. Apply stainless cleaner carefully to the eighth digit of panel you choose to use appliance wax, polish, bleach or products containing chlorine on the...
Use and Care Manual / Warranty
Page 33
.... Reusable Grease Filter Reusable Grease Filter The metal filter traps grease released by foods on some models) The vent fan has a metal reusable grease filter. Pull the filter down and out. Don't use a charcoal filter. Models that recirculate air back into the left side. The grease filter should be used . Removing and...
Use and Care Manual / Warranty
Page 34
If the model is noticeably dirty or discolored (usually after 6-12 months, depending on hood usage). Slide the filter toward the front of the right rear tab. It ... Charcoal Filter To install a new filter, remove plastic and other outer wrapping from your GE supplier. Helpful Information The Exhaust Feature Charcoal Filter (on some models) The charcoal filter cannot be recirculated through a disposable charcoal filter that helps remove smoke and odors. See "Optional Kits," page 9, for more information. It must...
Use and Care Manual / Warranty
Page 40
... is product repair as provided in materials or workmanship. EXCLUSION OF IMPLIED WARRANTIES-Your sole and exclusive remedy is not available, you have serial and model numbers available when calling for other connecting facilities. • Product not accessible to provide required service. • Replacement of house fuses or resetting of circuit...