

Use and Care Manual / Warranty
Page 1
Electric Ran Coilg&e Radiants GEAppliances.com Safety Information 2-5 Operating Instructions Adjust...6, 7 Timed Baking and Roasting 16 Warming Drawer 21, 22 Care and Cleaning 26-30 Aluminum Foil 4, 5, 12 Glass Cooktop 29, 30 Troubleshooting Tips 31-34 Accessories 35 Consumer Support Consumer Support Back Cover Warranty 39 Owner's ...Manual Coil Top and Radiant Top Models Standard Clean Models JBS03 JBS07 JBS15 JBS27 JBS56 RB525 RB526 RB536 RB540 Self-Clean Models JB600...
Electric Ran Coilg&e Radiants GEAppliances.com Safety Information 2-5 Operating Instructions Adjust...6, 7 Timed Baking and Roasting 16 Warming Drawer 21, 22 Care and Cleaning 26-30 Aluminum Foil 4, 5, 12 Glass Cooktop 29, 30 Troubleshooting Tips 31-34 Accessories 35 Consumer Support Consumer Support Back Cover Warranty 39 Owner's ...Manual Coil Top and Radiant Top Models Standard Clean Models JBS03 JBS07 JBS15 JBS27 JBS56 RB525 RB526 RB536 RB540 Self-Clean Models JB600...
Use and Care Manual / Warranty
Page 2
... shipped with the bracket for any reason, always repeat this procedure to install. On models without a storage drawer or kick panel, carefully tip the range forward. Never completely remove the leveling legs or the range will not be minimized by a properly installed anti-tip bracket. A small amount of...oven door and gently apply medium force at no cost (in the bracket. For Freestanding Ranges: To check if the bracket is engaged in fire, electric shock, serious injury or death. For Drop-In Ranges: To check if the bracket is engaged in Canada, call 1.800.626.8774 to ...
... shipped with the bracket for any reason, always repeat this procedure to install. On models without a storage drawer or kick panel, carefully tip the range forward. Never completely remove the leveling legs or the range will not be minimized by a properly installed anti-tip bracket. A small amount of...oven door and gently apply medium force at no cost (in the bracket. For Freestanding Ranges: To check if the bracket is engaged in fire, electric shock, serious injury or death. For Drop-In Ranges: To check if the bracket is engaged in Canada, call 1.800.626.8774 to ...

Use and Care Manual / Warranty
Page 4
.... ■ Be sure the drip pans are not covered and are at medium or high heat settings. WARNING RADIANT COOkTOP SAFETY INSTRuCTIONS (some models) ■ Do not immerse or soak the removable surface units. Contact a qualified technician immediately. ■ Avoid scratching the glass cooktop. Wait... cookware will expose a portion of the surface unit to clean the cooktop. The glass surface of a burn or electric shock, always be turned toward the center of the range without extending over nearby surface units. ■ When preparing flaming foods under a hood, turn the fan on ,...
.... ■ Be sure the drip pans are not covered and are at medium or high heat settings. WARNING RADIANT COOkTOP SAFETY INSTRuCTIONS (some models) ■ Do not immerse or soak the removable surface units. Contact a qualified technician immediately. ■ Avoid scratching the glass cooktop. Wait... cookware will expose a portion of the surface unit to clean the cooktop. The glass surface of a burn or electric shock, always be turned toward the center of the range without extending over nearby surface units. ■ When preparing flaming foods under a hood, turn the fan on ,...

Use and Care Manual / Warranty
Page 5
.... Damage from improper use self-clean to the product and a shock or fire hazard. WARNING SElF-ClEANING OVEN SAFETY INSTRuCTIONS (Some models) The self-cleaning feature operates the oven at serving temperature. Excessive amount of aluminum foil is hot, do not let pot holder .... Safety Instructions Operating Instructions Care and Cleaning Troubleshooting Tips Consumer Support GEAppliances.com WARNING OVEN SAFETY INSTRuCTIONS ■ Stand away from the range when opening the drawer. This helps prevent burns from touching hot surfaces of the oven. ■ Do not use aluminum foil to...
.... Damage from improper use self-clean to the product and a shock or fire hazard. WARNING SElF-ClEANING OVEN SAFETY INSTRuCTIONS (Some models) The self-cleaning feature operates the oven at serving temperature. Excessive amount of aluminum foil is hot, do not let pot holder .... Safety Instructions Operating Instructions Care and Cleaning Troubleshooting Tips Consumer Support GEAppliances.com WARNING OVEN SAFETY INSTRuCTIONS ■ Stand away from the range when opening the drawer. This helps prevent burns from touching hot surfaces of the oven. ■ Do not use aluminum foil to...
Use and Care Manual / Warranty
Page 6
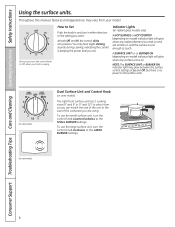
... sounds during cooking, indicating the control is no power to touch. A SURFACE UNIT on or BURNER ON (depending on model) indicator light will remain on until the surface is on. On some models. 6 How to Set Push the knob in either direction to Off when you are using. Be sure you turn... in and turn the control knob to the setting you set. On some models. At both Off and Hi the control clicks into position. Dual Surface Unit and Control Knob (on and will glow when any surface unit is...
... sounds during cooking, indicating the control is no power to touch. A SURFACE UNIT on or BURNER ON (depending on model) indicator light will remain on until the surface is on. On some models. 6 How to Set Push the knob in either direction to Off when you are using. Be sure you turn... in and turn the control knob to the setting you set. On some models. At both Off and Hi the control clicks into position. Dual Surface Unit and Control Knob (on and will glow when any surface unit is...
Use and Care Manual / Warranty
Page 7
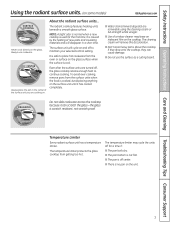
...'t store heavy items above the cooktop. OFF CENTER Always place the pan in a short time. The temperature limiter may leave an iridescent film on some models) GEAppliances.com SCUOROFKAICNEG About the radiant surface units... Never cook directly on the glass surface when the surface is safe to place hot cookware from...
...'t store heavy items above the cooktop. OFF CENTER Always place the pan in a short time. The temperature limiter may leave an iridescent film on some models) GEAppliances.com SCUOROFKAICNEG About the radiant surface units... Never cook directly on the glass surface when the surface is safe to place hot cookware from...

Use and Care Manual / Warranty
Page 9
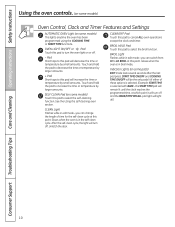
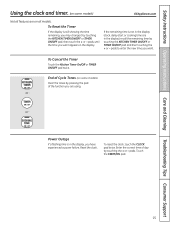
...The time of day, oven temperature, whether the oven is reset. COOkING TIME ON/OFF Pad (on some models) Touch this pad twice and then press the + and - The time of time you set the amount... stop automatically at this point. Then touch the + and - START TIME ON/OFF Pad (on some models) Use along with the COOKING TIME ON/OFF or SELF CLEAN pads to select the timer feature. Touch the...or Oven Control, Clock and Timer Features and Settings BAkE/TEMP RECAll Pad Touch this pad to the range and call for the timer or automatic oven operations. TIMER light Flashes while in the display and the ...
...The time of day, oven temperature, whether the oven is reset. COOkING TIME ON/OFF Pad (on some models) Touch this pad twice and then press the + and - The time of time you set the amount... stop automatically at this point. Then touch the + and - START TIME ON/OFF Pad (on some models) Use along with the COOKING TIME ON/OFF or SELF CLEAN pads to select the timer feature. Touch the...or Oven Control, Clock and Timer Features and Settings BAkE/TEMP RECAll Pad Touch this pad to the range and call for the timer or automatic oven operations. TIMER light Flashes while in the display and the ...
Use and Care Manual / Warranty
Page 10
... time for the self-clean cycle at this pad to LO BROIL at which point it will turn the oven light on some models) Touch this pad will light up). 10 Consumer Support Troubleshooting Tips Care and Cleaning Operating Instructions Safety Instructions Using the oven controls. (...on some models) Oven Control, Clock and Timer Features and Settings AuTOMATIC OVEN light (on some pads) EDIT mode lasts several seconds after the last pad...
... time for the self-clean cycle at this pad to LO BROIL at which point it will turn the oven light on some models) Touch this pad will light up). 10 Consumer Support Troubleshooting Tips Care and Cleaning Operating Instructions Safety Instructions Using the oven controls. (...on some models) Oven Control, Clock and Timer Features and Settings AuTOMATIC OVEN light (on some pads) EDIT mode lasts several seconds after the last pad...
Use and Care Manual / Warranty
Page 11
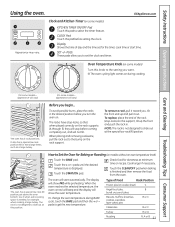
... B or C Turkey R or A Roasting R, A or B 11 To replace, place the end of the rack (stop -locks, so that when placed correctly on some models- The rack is not designed to slide out at the special low rack (R) position. Type of day and the time set the clock and timer... not designed to slide out at minimum time on . Use it out. Cook longer if necessary. OVEN OFF TEMP 200 Oven Temperature Knob (on some models- To remove a rack, pull it toward you begin... Touch the + or - The oven will vary) The oven has 5 rack positions. Before you ...
... B or C Turkey R or A Roasting R, A or B 11 To replace, place the end of the rack (stop -locks, so that when placed correctly on some models- The rack is not designed to slide out at the special low rack (R) position. Type of day and the time set the clock and timer... not designed to slide out at minimum time on . Use it out. Cook longer if necessary. OVEN OFF TEMP 200 Oven Temperature Knob (on some models- To remove a rack, pull it toward you begin... Touch the + or - The oven will vary) The oven has 5 rack positions. Before you ...

Use and Care Manual / Warranty
Page 12
... to the broil stop position. Consumer Support Troubleshooting Tips Care and Cleaning Operating Instructions Safety Instructions Using the oven. Most recipes for Broiling On models without an oven temperature knob: Place the meat or fish on a broiler grid in the Broiling Guide. The lower the fat content of... aluminum foil is maintained in the oven as much as with your range is finished, touch the CLEAR/OFF pad. Low-fat spreads, on a lower rack, several inches below and upset the performance of the oven...
... to the broil stop position. Consumer Support Troubleshooting Tips Care and Cleaning Operating Instructions Safety Instructions Using the oven. Most recipes for Broiling On models without an oven temperature knob: Place the meat or fish on a broiler grid in the Broiling Guide. The lower the fat content of... aluminum foil is maintained in the oven as much as with your range is finished, touch the CLEAR/OFF pad. Low-fat spreads, on a lower rack, several inches below and upset the performance of the oven...

Use and Care Manual / Warranty
Page 14
... Care and Cleaning Operating Instructions Safety Instructions Using the clock and timer. (on some models) Not all models. Touch the CLOCK pad twice. If this happens, touch the CLOCK pad and reenter the time of day shows in your range. The CLEAR/OFF pad does not affect the timer. The maximum time that...
... Care and Cleaning Operating Instructions Safety Instructions Using the clock and timer. (on some models) Not all models. Touch the CLOCK pad twice. If this happens, touch the CLOCK pad and reenter the time of day shows in your range. The CLEAR/OFF pad does not affect the timer. The maximum time that...
Use and Care Manual / Warranty
Page 15
..., delay start or cooking time are in the display, you are on all models. pads until the time you want appears in the display. Enter the correct time of Cycle Tones (on some... models) GEAppliances.com Not all features are using. To Cancel the Timer Touch the Kitchen Timer ...Operating Instructions Care and Cleaning Troubleshooting Tips Consumer Support Using the clock and timer. (on some models) Clear the tones by touching the KITCHEN TIMER ON/OFF or TIMER ON/OFF pad and then touching the + or -...
..., delay start or cooking time are in the display, you are on all models. pads until the time you want appears in the display. Enter the correct time of Cycle Tones (on some... models) GEAppliances.com Not all features are using. To Cancel the Timer Touch the Kitchen Timer ...Operating Instructions Care and Cleaning Troubleshooting Tips Consumer Support Using the clock and timer. (on some models) Clear the tones by touching the KITCHEN TIMER ON/OFF or TIMER ON/OFF pad and then touching the + or -...

Use and Care Manual / Warranty
Page 16
... and roasting features. (on immediately and cook for a selected length of time. The latch is off because heat from the bulb will turn on some models) Do not lock the oven door with PRE if showing the oven temperature.) The oven will continue to Set a Delayed Start and Automatic Stop The...
... and roasting features. (on immediately and cook for a selected length of time. The latch is off because heat from the bulb will turn on some models) Do not lock the oven door with PRE if showing the oven temperature.) The oven will continue to Set a Delayed Start and Automatic Stop The...

Use and Care Manual / Warranty
Page 18
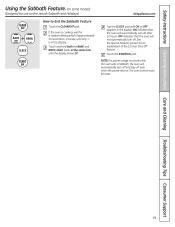
...Remove the cooked food. Make sure the clock shows the correct time of approximately 30 seconds to 1 minute, will appear in 25° increments. The temperature can be set in the display. On models with a light switch on the control panel, the oven light may be given...temperature will appear in the display. Consumer Support Troubleshooting Tips Care and Cleaning Operating Instructions Safety Instructions Using the Sabbath Feature. (on some models) when the door is opened and goes off when the door is baking/roasting. Touch the START/ON pad. pads to increase ...
...Remove the cooked food. Make sure the clock shows the correct time of approximately 30 seconds to 1 minute, will appear in 25° increments. The temperature can be set in the display. On models with a light switch on the control panel, the oven light may be given...temperature will appear in the display. Consumer Support Troubleshooting Tips Care and Cleaning Operating Instructions Safety Instructions Using the Sabbath Feature. (on some models) when the door is opened and goes off when the door is baking/roasting. Touch the START/ON pad. pads to increase ...
Use and Care Manual / Warranty
Page 19
... while the oven was in Sabbath, the oven will automatically turn off and stay off . If the oven is cooking, wait for use on some models) (Designed for a random delay period of the 12 hour Shut-Off feature. Touch the START/ON pad. OFF indicates that the oven will not automatically... display. ON indicates that the oven will automatically turn off even when the power returns. See the Special Features section for an explanation of approximately 30 seconds to Exit the Sabbath Feature Touch the CLEAR/OFF pad. GEAppliances.com Tap the CLOCK pad until the display shows SF.
... while the oven was in Sabbath, the oven will automatically turn off and stay off . If the oven is cooking, wait for use on some models) (Designed for a random delay period of the 12 hour Shut-Off feature. Touch the START/ON pad. OFF indicates that the oven will not automatically... display. ON indicates that the oven will automatically turn off even when the power returns. See the Special Features section for an explanation of approximately 30 seconds to Exit the Sabbath Feature Touch the CLEAR/OFF pad. GEAppliances.com Tap the CLOCK pad until the display shows SF.

Use and Care Manual / Warranty
Page 20
...side. A two digit number shows in 1 degree increments. NOTE: This adjustment will not affect the broiling or the self-cleaning temperatures (on Other Models Touch the BAKE and BROIL HI/LO pads at the back side. Touch the - use thermometers, such as you have made , retighten screws so.... If you still think your new oven for each notch you make an adjustment, loosen (approximately one it . temperature approximately 10°F. (Range is made the adjustment, touch the START/ON pad to go back to overtighten. To make the adjustment one click from the arrow.) We ...
...side. A two digit number shows in 1 degree increments. NOTE: This adjustment will not affect the broiling or the self-cleaning temperatures (on Other Models Touch the BAKE and BROIL HI/LO pads at the back side. Touch the - use thermometers, such as you have made , retighten screws so.... If you still think your new oven for each notch you make an adjustment, loosen (approximately one it . temperature approximately 10°F. (Range is made the adjustment, touch the START/ON pad to go back to overtighten. To make the adjustment one click from the arrow.) We ...
Use and Care Manual / Warranty
Page 21
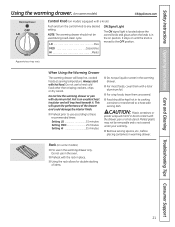
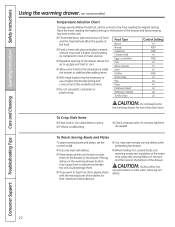
... an excellent heat insulator and will keep hot, cooked foods at serving temperature. Rack (on some models) GEAppliances.com Warming Drawer OFF LO HI MED Control Knob (on models equipped with a knob) Push and turn the control knob to any desired setting. Always start with...foil. Melted plastic may vary. Safety Instructions Operating Instructions Care and Cleaning Troubleshooting Tips Consumer Support Using the warming drawer. (on some models) ■ For use according to these recommended times: Setting LO 15 minutes Setting MED 25 minutes Setting HI 35 minutes ■...
... an excellent heat insulator and will keep hot, cooked foods at serving temperature. Rack (on some models) GEAppliances.com Warming Drawer OFF LO HI MED Control Knob (on models equipped with a knob) Push and turn the control knob to any desired setting. Always start with...foil. Melted plastic may vary. Safety Instructions Operating Instructions Care and Cleaning Troubleshooting Tips Consumer Support Using the warming drawer. (on some models) ■ For use according to these recommended times: Setting LO 15 minutes Setting MED 25 minutes Setting HI 35 minutes ■...
Use and Care Manual / Warranty
Page 22
... heat fine china, please check with the manufacturer of the dishes for more than two hours. use a higher thermostat setting and Pies LO cover some models) Temperature Selection Chart To keep food in low-sided dishes or pans. ■ Preheat on the rack. ■ The temperature, type and amount of the...
... heat fine china, please check with the manufacturer of the dishes for more than two hours. use a higher thermostat setting and Pies LO cover some models) Temperature Selection Chart To keep food in low-sided dishes or pans. ■ Preheat on the rack. ■ The temperature, type and amount of the...

Use and Care Manual / Warranty
Page 23
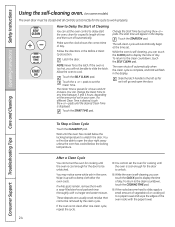
.... NOTE: Never force the latch. Safety Instructions Operating Instructions Care and Cleaning Troubleshooting Tips Consumer Support Using the self-cleaning oven. (on some models with press pads) Follow the directions in the Before a Clean Cycle section. The oven racks can be self-cleaned, but they will need ...to slide. Soil on the front frame of the range and outside the gasket on the door will darken, lose their luster and become hard to be cleaned by hand. A combination of day. ...
.... NOTE: Never force the latch. Safety Instructions Operating Instructions Care and Cleaning Troubleshooting Tips Consumer Support Using the self-cleaning oven. (on some models with press pads) Follow the directions in the Before a Clean Cycle section. The oven racks can be self-cleaned, but they will need ...to slide. Soil on the front frame of the range and outside the gasket on the door will darken, lose their luster and become hard to be cleaned by hand. A combination of day. ...
Use and Care Manual / Warranty
Page 24
.... (on the amount of day. Change the Start Time by the clean cycle. Slide the latch handle to slide the latch. You may notice some models) The oven door must be able to the left as far as it up with a damp cloth after one clean cycle, repeat the cycle. ■...
.... (on the amount of day. Change the Start Time by the clean cycle. Slide the latch handle to slide the latch. You may notice some models) The oven door must be able to the left as far as it up with a damp cloth after one clean cycle, repeat the cycle. ■...


