
Owners Manual
Page 1
...2-6 Operating Instructions Adjust the Oven Thermostat 21 Clock and Timer 15, 16 Oven 12-14 Oven Controls 10, 11 Sabbath Feature 19, 20 Selecting Types of Cookware . . . . .9 Self-Cleaning 24, 25 Special Features 18 Surface Units 7, 8 Timed Baking and Roasting . . . . .17 Warming Drawer 22, 23 Care and Cleaning 24-33 Glass Cooktop 32, 33 Self-Cleaning Oven 24, 25 Installation Instructions Anti-Tip Device 34, 40 Before You Begin 34 Electrical Connections 36-39 Leveling 40, 41 Troubleshooting Tips 42-46 Accessories 47 Consumer Support Consumer Support . . . . .Back Cover Product...
...2-6 Operating Instructions Adjust the Oven Thermostat 21 Clock and Timer 15, 16 Oven 12-14 Oven Controls 10, 11 Sabbath Feature 19, 20 Selecting Types of Cookware . . . . .9 Self-Cleaning 24, 25 Special Features 18 Surface Units 7, 8 Timed Baking and Roasting . . . . .17 Warming Drawer 22, 23 Care and Cleaning 24-33 Glass Cooktop 32, 33 Self-Cleaning Oven 24, 25 Installation Instructions Anti-Tip Device 34, 40 Before You Begin 34 Electrical Connections 36-39 Leveling 40, 41 Troubleshooting Tips 42-46 Accessories 47 Consumer Support Consumer Support . . . . .Back Cover Product...
Owners Manual
Page 3
... cloth. Installation Instructions Troubleshooting Tips Consumer Support 3 Be careful when reaching for cooling first. WARNING! s Use only dry pot holders-moist or damp pot holders on grease fires. Turn the controls off or by closing the door and turning the oven off . s Flame in the oven or warming drawer can be put out by covering it with baking soda or, if available, by covering the pan completely with hot surface units or heating elements and...
... cloth. Installation Instructions Troubleshooting Tips Consumer Support 3 Be careful when reaching for cooling first. WARNING! s Use only dry pot holders-moist or damp pot holders on grease fires. Turn the controls off or by closing the door and turning the oven off . s Flame in the oven or warming drawer can be put out by covering it with baking soda or, if available, by covering the pan completely with hot surface units or heating elements and...

Owners Manual
Page 4
... models) s Do not clean the door gasket. Have it serviced by a qualified technician. Safety Instructions Operating Instructions IMPORTANT SAFETY INFORMATION. s If the self-cleaning mode malfunctions, turn the oven off and disconnect the power supply. Residue from oven cleaners will damage the inside of the oven when the self-clean cycle is also a precaution against burns from touching hot surfaces of the oven. Care and Cleaning Installation Instructions Consumer Support Troubleshooting Tips 4 s Do not heat unopened food containers. It is used...
... models) s Do not clean the door gasket. Have it serviced by a qualified technician. Safety Instructions Operating Instructions IMPORTANT SAFETY INFORMATION. s If the self-cleaning mode malfunctions, turn the oven off and disconnect the power supply. Residue from oven cleaners will damage the inside of the oven when the self-clean cycle is also a precaution against burns from touching hot surfaces of the oven. Care and Cleaning Installation Instructions Consumer Support Troubleshooting Tips 4 s Do not heat unopened food containers. It is used...

Owners Manual
Page 5
... the cooktop. s Use little fat for frying should be heated or cooked in use aluminum foil to cover the surface unit heating element. Always start with hot food; s Use care when opening the drawer. s Never leave the surface units unattended at high or medium high heat settings. Safety Instructions Operating Instructions Care and Cleaning ge.com WARMING DRAWER (on some models) s The purpose of the pan. cold food cannot be turned toward the center of the sudden change in...
... the cooktop. s Use little fat for frying should be heated or cooked in use aluminum foil to cover the surface unit heating element. Always start with hot food; s Use care when opening the drawer. s Never leave the surface units unattended at high or medium high heat settings. Safety Instructions Operating Instructions Care and Cleaning ge.com WARMING DRAWER (on some models) s The purpose of the pan. cold food cannot be turned toward the center of the sudden change in...
Owners Manual
Page 6
... remove a unit. Lifting the cooktop can be careful to line the drip pans or anywhere in the oven except as a cutting board. Please see Cleaning the glass cooktop section. s Be sure the drip pans and the vent duct are not covered and are at the OFF position and all instructions and warnings on a hot surface unit, be scratched with caution. Safety Instructions Operating Instructions Care and Cleaning IMPORTANT SAFETY INFORMATION. READ ALL INSTRUCTIONS BEFORE USING...
... remove a unit. Lifting the cooktop can be careful to line the drip pans or anywhere in the oven except as a cutting board. Please see Cleaning the glass cooktop section. s Be sure the drip pans and the vent duct are not covered and are at the OFF position and all instructions and warnings on a hot surface unit, be scratched with caution. Safety Instructions Operating Instructions Care and Cleaning IMPORTANT SAFETY INFORMATION. READ ALL INSTRUCTIONS BEFORE USING...

Owners Manual
Page 10
... change the set time at this point. If "F- COOKING TIME Pad (on some models) Touch this pad to adjust the timer. The display will shut off when the cooking time has run out until the control is reset. If your model. Put the oven back into operation. If the function error code appears during the self-cleaning cycle, check the oven door latch. Glows when the oven is moved to cook. Operating Instructions Care and Cleaning Installation Instructions or or Oven Control, Clock and Timer Features and Settings BAKE/TEMP RECALL...
... change the set time at this point. If "F- COOKING TIME Pad (on some models) Touch this pad to adjust the timer. The display will shut off when the cooking time has run out until the control is reset. If your model. Put the oven back into operation. If the function error code appears during the self-cleaning cycle, check the oven door latch. Glows when the oven is moved to cook. Operating Instructions Care and Cleaning Installation Instructions or or Oven Control, Clock and Timer Features and Settings BAKE/TEMP RECALL...
Owners Manual
Page 13
... standards require products labeled "margarine" to cook foods such as possible. Operating Instructions Care and Cleaning Preheating and Pan Placement Preheat the oven if the recipe calls for it on the bottom of the oven. On some models, the display will be better if baking pans are made with aluminum foil. Never entirely cover a shelf with low fat spreads. A smaller sheet of baked goods. Leave the door open by preheating the broiler...
... standards require products labeled "margarine" to cook foods such as possible. Operating Instructions Care and Cleaning Preheating and Pan Placement Preheat the oven if the recipe calls for it on the bottom of the oven. On some models, the display will be better if baking pans are made with aluminum foil. Never entirely cover a shelf with low fat spreads. A smaller sheet of baked goods. Leave the door open by preheating the broiler...

Owners Manual
Page 17
... oven shuts off automatically, foods continue cooking after controls are using timed baking and do not touch the START/ON pad. Touch the + or - When the oven turns on at the time of day you set or the cooking time countdown. (The display starts with the latch during timed cooking. Safety Instructions Operating Instructions Care and Cleaning Using the timed baking and roasting features. (on some models) ge.com Do not lock the oven door with PRE if showing the oven temperature.) The oven...
... oven shuts off automatically, foods continue cooking after controls are using timed baking and do not touch the START/ON pad. Touch the + or - When the oven turns on at the time of day you set or the cooking time countdown. (The display starts with the latch during timed cooking. Safety Instructions Operating Instructions Care and Cleaning Using the timed baking and roasting features. (on some models) ge.com Do not lock the oven door with PRE if showing the oven temperature.) The oven...

Owners Manual
Page 24
... self-cleaned, but they will damage the door lock mechanism. Rinse well with an open the door. The fiberglass material of the oven. Wipe up heavy soil on some models) Operating Instructions Never force the latch handle. Make sure the oven light bulb cover is in place and the oven light is 4 hours and 20 minutes. Care and Cleaning CLEAN Installation Instructions 00 450 500 BROIL OVEN OFF TEMP 350 4 200 300 250 How to Set...
... self-cleaned, but they will damage the door lock mechanism. Rinse well with an open the door. The fiberglass material of the oven. Wipe up heavy soil on some models) Operating Instructions Never force the latch handle. Make sure the oven light bulb cover is in place and the oven light is 4 hours and 20 minutes. Care and Cleaning CLEAN Installation Instructions 00 450 500 BROIL OVEN OFF TEMP 350 4 200 300 250 How to Set...

Owners Manual
Page 26
... and result in a cold oven overnight. Operating Instructions Care and Cleaning Installation Instructions Oven Interior (non-self clean models) With proper care, the porcelain enamel finish on the electrical controls and switches because it replaced. 26 Lift-Off Oven Door The oven door is cleaned during the self-clean cycle, you should be cleaned with a mild abrasive cleaner. Make sure the oven is cool, clean and rinse. Grasp firmly on each oven cleaning, being careful not to move the...
... and result in a cold oven overnight. Operating Instructions Care and Cleaning Installation Instructions Oven Interior (non-self clean models) With proper care, the porcelain enamel finish on the electrical controls and switches because it replaced. 26 Lift-Off Oven Door The oven door is cleaned during the self-clean cycle, you should be cleaned with a mild abrasive cleaner. Make sure the oven is cool, clean and rinse. Grasp firmly on each oven cleaning, being careful not to move the...

Owners Manual
Page 27
... groove of the cover until it snaps into place. Do not remove any screws to the center of the light receptacle. Care and Cleaning Installation Instructions Troubleshooting Tips Consumer Support 27 Clean with a 40-watt household appliance bulb. Pull wire forward to remove the cover. NOTE: Take the shelves out of the same hand, firmly push back the wire cover holder. Safety Instructions Operating Instructions Wire cover holder Oven Heating Elements Do not clean the bake element or the broil element.
... groove of the cover until it snaps into place. Do not remove any screws to the center of the light receptacle. Care and Cleaning Installation Instructions Troubleshooting Tips Consumer Support 27 Clean with a 40-watt household appliance bulb. Pull wire forward to remove the cover. NOTE: Take the shelves out of the same hand, firmly push back the wire cover holder. Safety Instructions Operating Instructions Wire cover holder Oven Heating Elements Do not clean the bake element or the broil element.

Owners Manual
Page 30
... with foil. Lift-Up Cooktop (on the cooktop while it out. Lift the surface unit about 1 inch above the drip pan can be removed first. Porcelain Enamel Cooktop (on the drip pan when you do not need to damage and improper operation of the range. Operating Instructions Be sure all the controls are turned to clean, adjust or in a dishwasher. To replace a surface unit: Replace the drip pan into place so it back...
... with foil. Lift-Up Cooktop (on the cooktop while it out. Lift the surface unit about 1 inch above the drip pan can be removed first. Porcelain Enamel Cooktop (on the drip pan when you do not need to damage and improper operation of the range. Operating Instructions Be sure all the controls are turned to clean, adjust or in a dishwasher. To replace a surface unit: Replace the drip pan into place so it back...
Owners Manual
Page 36
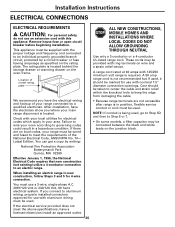
... AND INSTALLATIONS WHERE LOCAL CODES DO NOT ALLOW GROUNDING THROUGH NEUTRAL Use only a 3-conductor or a 4-conductor UL-listed range cord. Installation Instructions ELECTRICAL CONNECTIONS ELECTRICAL REQUIREMENTS CAUTION: For personal safety, do not use an extension cord with nominal 13⁄8″ diameter connection openings. Remove house fuse or open circuit breaker before beginning installation. This appliance must be provided with 125/250 minimum volt range is located behind the storage drawer or warming drawer on the rating...
... AND INSTALLATIONS WHERE LOCAL CODES DO NOT ALLOW GROUNDING THROUGH NEUTRAL Use only a 3-conductor or a 4-conductor UL-listed range cord. Installation Instructions ELECTRICAL CONNECTIONS ELECTRICAL REQUIREMENTS CAUTION: For personal safety, do not use an extension cord with nominal 13⁄8″ diameter connection openings. Remove house fuse or open circuit breaker before beginning installation. This appliance must be provided with 125/250 minimum volt range is located behind the storage drawer or warming drawer on the rating...

Owners Manual
Page 40
... Anti-Tip bracket is supplied with bracket). • Unless properly installed, the range could be adjusted from the top. (For warming drawer models, see Step D.) Adjust from the bottom Lower range Leg leveler Raise range Front leveling legs (on the door. Injury may result from spilled hot liquids or from the top Lower range Front of range Rear leveling legs (on the range back by sliding its right edge under the retaining tab and replacing...
... Anti-Tip bracket is supplied with bracket). • Unless properly installed, the range could be adjusted from the top. (For warming drawer models, see Step D.) Adjust from the bottom Lower range Leg leveler Raise range Front leveling legs (on the door. Injury may result from spilled hot liquids or from the top Lower range Front of range Rear leveling legs (on the range back by sliding its right edge under the retaining tab and replacing...
Owners Manual
Page 42
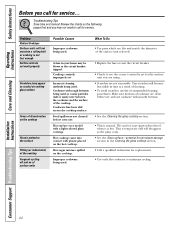
... on the cooktop. A fuse in time as cracks) on cooktop glass surface Areas of discoloration on the cooktop Plastic melted to call for service... Improper cookware being used or coarse particles (salt or sand) were between the cookware and the surface of cleaning. • To avoid scratches, use . Safety Instructions Operating Instructions Care and Cleaning Before you call for service. Troubleshooting Tips Save time and money! Cooktop controls improperly set for the surface unit you...
... on the cooktop. A fuse in time as cracks) on cooktop glass surface Areas of discoloration on the cooktop Plastic melted to call for service... Improper cookware being used or coarse particles (salt or sand) were between the cookware and the surface of cleaning. • To avoid scratches, use . Safety Instructions Operating Instructions Care and Cleaning Before you call for service. Troubleshooting Tips Save time and money! Cooktop controls improperly set for the surface unit you...

Owners Manual
Page 43
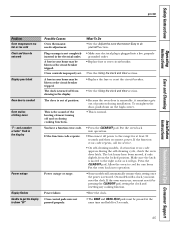
... electrical outlet. A fuse in the pan lines up with the receptacle. section. Installation Instructions Troubleshooting Tips Consumer Support 43 Light bulb is in the locked position. • If necessary, allow the oven to see the correct control is set . • Make sure electrical plug is broken. •Call for the surface unit you are not set . On self-cleaning models, door left in the cooktop. Oven thermostat needs adjustment. •See the Using the oven section. • See the Using the oven...
... electrical outlet. A fuse in the pan lines up with the receptacle. section. Installation Instructions Troubleshooting Tips Consumer Support 43 Light bulb is in the locked position. • If necessary, allow the oven to see the correct control is set . • Make sure electrical plug is broken. •Call for the surface unit you are not set . On self-cleaning models, door left in the cooktop. Oven thermostat needs adjustment. •See the Using the oven section. • See the Using the oven...
Owners Manual
Page 45
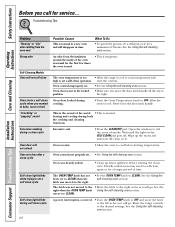
... Cleaning Installation Instructions Problem Oven temperature too hot or too cold Clock and timer do yourself! Plug on range is crooked Oven makes clicking noise "F-and a number or letter" flash in the electrical outlet. What To Do •See the Adjust the oven thermostat-Easy to do not work Display goes blank Oven door is not completely inserted in the display Power outage Display flashes Unable to get the display to cool for 3 seconds. 45 Troubleshooting Tips Consumer Support...
... Cleaning Installation Instructions Problem Oven temperature too hot or too cold Clock and timer do yourself! Plug on range is crooked Oven makes clicking noise "F-and a number or letter" flash in the electrical outlet. What To Do •See the Adjust the oven thermostat-Easy to do not work Display goes blank Oven door is not completely inserted in the display Power outage Display flashes Unable to get the display to cool for 3 seconds. 45 Troubleshooting Tips Consumer Support...
Owners Manual
Page 46
.... Oven controls not properly set . • See the Using the self-cleaning oven section. A power interruption occurred. •Turn the OVEN TEMP knob to OFF and move the door latch handle all the way to CLEAN. Excessive soil. •Press the CLEAR/OFF pad. Reset the range controls to OFF. Oven door locked during both the cooking and cleaning functions. See the Using the self-cleaning oven section. 46 Consumer Support Troubleshooting Tips Safety Instructions Before you call for a minimum of 3 hours. Troubleshooting Tips Operating Instructions Care and Cleaning Installation...
.... Oven controls not properly set . • See the Using the self-cleaning oven section. A power interruption occurred. •Turn the OVEN TEMP knob to OFF and move the door latch handle all the way to CLEAN. Excessive soil. •Press the CLEAR/OFF pad. Reset the range controls to OFF. Oven door locked during both the cooking and cleaning functions. See the Using the self-cleaning oven section. 46 Consumer Support Troubleshooting Tips Safety Instructions Before you call for a minimum of 3 hours. Troubleshooting Tips Operating Instructions Care and Cleaning Installation...
Owners Manual
Page 51
... located in materials or workmanship. Louisville, KY 40225 Installation Instructions Troubleshooting Tips Consumer Support 51 Some states do not allow the exclusion or limitation of circuit breakers. For The Period Of: One Year From the date of the original purchase GE Will Provide: Any part of shipping or service calls to provide required service. Staple your home. During this appliance. Safety Instructions Operating Instructions Care and Cleaning Electric Range Warranty...
... located in materials or workmanship. Louisville, KY 40225 Installation Instructions Troubleshooting Tips Consumer Support 51 Some states do not allow the exclusion or limitation of circuit breakers. For The Period Of: One Year From the date of the original purchase GE Will Provide: Any part of shipping or service calls to provide required service. Staple your home. During this appliance. Safety Instructions Operating Instructions Care and Cleaning Electric Range Warranty...

Dimensions
Page 1
... int 30" Free-Standing Electric Range Dimensions (in inches) 29-7/8 46-1/2 26-3/8* 46-3/8 2-1/4 7-1/2 REAR WALL 7-1/2 7 3-1/2 CENTER LINE 5 2-1/4 KW Rating 240V 12.6 208V 9.9 Breaker Size 40 Amps† †Note: Check local codes for required breaker size. 1/4† † The range may be placed with an Anti-Tip device. Note: 30" Electric Ranges conform to be used because terminals are equipped with 0w"2acl9llea-a7nrda/8nscidee(fwluaslhls) at the back if the range side trims...
... int 30" Free-Standing Electric Range Dimensions (in inches) 29-7/8 46-1/2 26-3/8* 46-3/8 2-1/4 7-1/2 REAR WALL 7-1/2 7 3-1/2 CENTER LINE 5 2-1/4 KW Rating 240V 12.6 208V 9.9 Breaker Size 40 Amps† †Note: Check local codes for required breaker size. 1/4† † The range may be placed with an Anti-Tip device. Note: 30" Electric Ranges conform to be used because terminals are equipped with 0w"2acl9llea-a7nrda/8nscidee(fwluaslhls) at the back if the range side trims...


