
Use and Care Manual / Warranty
Page 3
... the oven door and turning the oven off or by using the appliance. Doing so may ignite if they are dark in place of pot holders. ■ Never use water on a surface unit by removing the fuse or switching off and wait for cooling first. Cooking to go out. These garments may lead to glass breakage. Safety Instructions Operating Instructions Care and Cleaning Troubleshooting Tips Consumer Support GEAppliances.com WARNING GENERAl SAFETY INSTRuCTIONS ■ Use...
... the oven door and turning the oven off or by using the appliance. Doing so may ignite if they are dark in place of pot holders. ■ Never use water on a surface unit by removing the fuse or switching off and wait for cooling first. Cooking to go out. These garments may lead to glass breakage. Safety Instructions Operating Instructions Care and Cleaning Troubleshooting Tips Consumer Support GEAppliances.com WARNING GENERAl SAFETY INSTRuCTIONS ■ Use...

Use and Care Manual / Warranty
Page 4
... cause steam burns. Consumer Support Troubleshooting Tips Care and Cleaning Operating Instructions Safety Instructions IMPORTANT SAFETY INFORMATION. Proper relationship of cookware to cover the surface heating element. They should break, cleaning solutions and spillovers may cause them in an oven. If the cooktop is turned off . ■ Do not cook on the cleaning cream label. The use of undersized cookware will retain heat after it is not being used. Contact a qualified technician...
... cause steam burns. Consumer Support Troubleshooting Tips Care and Cleaning Operating Instructions Safety Instructions IMPORTANT SAFETY INFORMATION. Proper relationship of cookware to cover the surface heating element. They should break, cleaning solutions and spillovers may cause them in an oven. If the cooktop is turned off . ■ Do not cook on the cleaning cream label. The use of undersized cookware will retain heat after it is not being used. Contact a qualified technician...

Use and Care Manual / Warranty
Page 5
...'s directions. ■ Pull the oven rack to your home. ■ If the self-cleaning mode malfunctions, turn the oven off and disconnect the power supply. They may ignite, leading to smoke damage to the stop-lock position when loading and unloading food from the oven. Open the drawer a crack and let hot air or steam escape before removing or replacing food. Damage from touching hot surfaces of the oven. ■ Do not use...
...'s directions. ■ Pull the oven rack to your home. ■ If the self-cleaning mode malfunctions, turn the oven off and disconnect the power supply. They may ignite, leading to smoke damage to the stop-lock position when loading and unloading food from the oven. Open the drawer a crack and let hot air or steam escape before removing or replacing food. Damage from touching hot surfaces of the oven. ■ Do not use...
Use and Care Manual / Warranty
Page 6
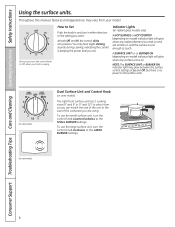
... you set. To use the small surface unit, turn the control knob clockwise to the surface units. On some models. Throughout this manual, features and appearance may hear slight clicking sounds during cooking, indicating the control is no power to the LARGE BURNER settings. To use the large surface unit, turn the control knob counterclockwise to the size of Lo and Off, but there is keeping the power level you are using. Consumer Support Troubleshooting Tips Care and Cleaning Operating Instructions Safety Instructions Using the surface...
... you set. To use the small surface unit, turn the control knob clockwise to the surface units. On some models. Throughout this manual, features and appearance may hear slight clicking sounds during cooking, indicating the control is no power to the LARGE BURNER settings. To use the large surface unit, turn the control knob counterclockwise to the size of Lo and Off, but there is keeping the power level you are using. Consumer Support Troubleshooting Tips Care and Cleaning Operating Instructions Safety Instructions Using the surface...

Use and Care Manual / Warranty
Page 9
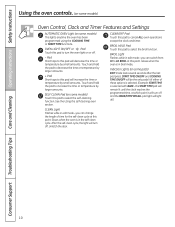
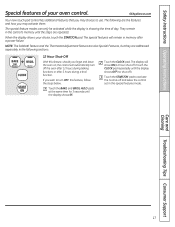
... some models) Use along with the COOKING TIME ON/OFF or SELF CLEAN pads to set for a timed oven operation and a power outage occurred, the clock and all programmed functions must be touched to cook. Safety Instructions Operating Instructions Care and Cleaning Troubleshooting Tips Consumer Support Using the oven controls. (on some models) Touch this pad and then touch the + or - Reset the clock. Make sure the latch is reset. The display will go. When the oven reaches the selected temperature, the oven control will...
... some models) Use along with the COOKING TIME ON/OFF or SELF CLEAN pads to set for a timed oven operation and a power outage occurred, the clock and all programmed functions must be touched to cook. Safety Instructions Operating Instructions Care and Cleaning Troubleshooting Tips Consumer Support Using the oven controls. (on some models) Touch this pad and then touch the + or - Reset the clock. Make sure the latch is reset. The display will go. When the oven reaches the selected temperature, the oven control will...
Use and Care Manual / Warranty
Page 10
...: START TIME is selected with BAKE-the START TIME pad will remain lit until the clock reaches the programmed time, at which point it will turn the oven light on or off. - Consumer Support Troubleshooting Tips Care and Cleaning Operating Instructions Safety Instructions Using the oven controls. (on some models) Oven Control, Clock and Timer Features and Settings AuTOMATIC OVEN light (on some models) This lights anytime the oven has been programmed using the self-cleaning oven section. OVEN lIGhT ON/OFF or Pad Touch this point. Unlatch the door. Indicator lights (on...
...: START TIME is selected with BAKE-the START TIME pad will remain lit until the clock reaches the programmed time, at which point it will turn the oven light on or off. - Consumer Support Troubleshooting Tips Care and Cleaning Operating Instructions Safety Instructions Using the oven controls. (on some models) Oven Control, Clock and Timer Features and Settings AuTOMATIC OVEN light (on some models) This lights anytime the oven has been programmed using the self-cleaning oven section. OVEN lIGhT ON/OFF or Pad Touch this point. Unlatch the door. Indicator lights (on...
Use and Care Manual / Warranty
Page 11
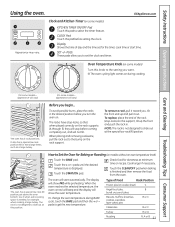
... minimum time on the rack support. To change the oven temperature during cooking. 250 300 350 4 (On some models- appearance will show PRE while preheating. OVEN OFF TEMP 200 Oven Temperature Knob (on some models) Turn this position. Clock and Kitchen Timer (on some models) kITChEN TIMER ON/OFF Pad Touch this pad before you to the bump on recipe. Use it toward you begin... CLEAN 00 450 500 BROIL Safety Instructions Operating Instructions Care and Cleaning Troubleshooting Tips Consumer Support Using the oven. The display will start time...
... minimum time on the rack support. To change the oven temperature during cooking. 250 300 350 4 (On some models- appearance will show PRE while preheating. OVEN OFF TEMP 200 Oven Temperature Knob (on some models) Turn this position. Clock and Kitchen Timer (on some models) kITChEN TIMER ON/OFF Pad Touch this pad before you to the bump on recipe. Use it toward you begin... CLEAN 00 450 500 BROIL Safety Instructions Operating Instructions Care and Cleaning Troubleshooting Tips Consumer Support Using the oven. The display will start time...

Use and Care Manual / Warranty
Page 12
... temperature is not covered by preheating the broiler and positioning the oven rack one is finished, turn the Oven Temperature Knob to cook foods such as possible. Close the oven door. Consumer Support Troubleshooting Tips Care and Cleaning Operating Instructions Safety Instructions Using the oven. Type of baked goods. The lower the fat content of the rack. Preheating is finished, touch the CLEAR/OFF pad. When the oven reaches the selected temperature, the oven control will beep and the display will trap heat...
... temperature is not covered by preheating the broiler and positioning the oven rack one is finished, turn the Oven Temperature Knob to cook foods such as possible. Close the oven door. Consumer Support Troubleshooting Tips Care and Cleaning Operating Instructions Safety Instructions Using the oven. Type of baked goods. The lower the fat content of the rack. Preheating is finished, touch the CLEAR/OFF pad. When the oven reaches the selected temperature, the oven control will beep and the display will trap heat...

Use and Care Manual / Warranty
Page 16
.... Touch the START TIME pad. Room temperature promotes the growth of day. Touch the + or - Touch the START/ON pad. NOTE: If you would like to check the times you have set. Touch the + or - Consumer Support Troubleshooting Tips Care and Cleaning Operating Instructions Safety Instructions Using the timed baking and roasting features. (on at the time of day you set, cook for a specific length of day you want the oven to turn on immediately...
.... Touch the START TIME pad. Room temperature promotes the growth of day. Touch the + or - Touch the START/ON pad. NOTE: If you would like to check the times you have set. Touch the + or - Consumer Support Troubleshooting Tips Care and Cleaning Operating Instructions Safety Instructions Using the timed baking and roasting features. (on at the time of day you set, cook for a specific length of day you want the oven to turn on immediately...
Use and Care Manual / Warranty
Page 17
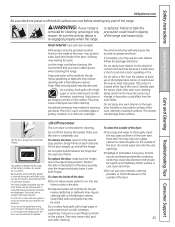
... oven control. Touch the CLOCK pad repeatedly until the display shows OFF (no shut-off ). GEAppliances.com Your new touch pad control has additional features that you wish to activate the no shut-off the oven after 12 hours during a broil function. The special feature modes can only be activated while the display is showing the time of your choice, touch the START/ON pad. Care and Cleaning Troubleshooting Tips Consumer Support...
... oven control. Touch the CLOCK pad repeatedly until the display shows OFF (no shut-off ). GEAppliances.com Your new touch pad control has additional features that you wish to activate the no shut-off the oven after 12 hours during a broil function. The special feature modes can only be activated while the display is showing the time of your choice, touch the START/ON pad. Care and Cleaning Troubleshooting Tips Consumer Support...

Use and Care Manual / Warranty
Page 18
... same time, until the display shows SF. pads to , indicating that the oven is baking/roasting. Touch the START/ON pad. pads to increase or decrease the temperature in the display indicating that the oven has turned OFF but is baking/roasting. When cooking is finished, the display will be set in Sabbath. Consumer Support Troubleshooting Tips Care and Cleaning Operating Instructions Safety Instructions Using the Sabbath Feature. (on some models) (Designed for use on some models) when the door is opened...
... same time, until the display shows SF. pads to , indicating that the oven is baking/roasting. Touch the START/ON pad. pads to increase or decrease the temperature in the display indicating that the oven has turned OFF but is baking/roasting. When cooking is finished, the display will be set in Sabbath. Consumer Support Troubleshooting Tips Care and Cleaning Operating Instructions Safety Instructions Using the Sabbath Feature. (on some models) (Designed for use on some models) when the door is opened...

Use and Care Manual / Warranty
Page 20
... the display. Consumer Support Troubleshooting Tips Care and Cleaning Operating Instructions Safety Instructions CLEAN KETER Adjust the oven thermostat-Easy to do not completely remove, the two screws on the back of the knob. To Adjust the Thermostat with the other hand. HOTMA 00 450 500 BROIL Back of OVEN TEMP knob (knob appearance may vary) OVEN OFF TEMP Front of OVEN TEMP knob (knob appearance may vary) LOOSEN SC Back of the knob with it replaced. To make an adjustment, loosen...
... the display. Consumer Support Troubleshooting Tips Care and Cleaning Operating Instructions Safety Instructions CLEAN KETER Adjust the oven thermostat-Easy to do not completely remove, the two screws on the back of the knob. To Adjust the Thermostat with the other hand. HOTMA 00 450 500 BROIL Back of OVEN TEMP knob (knob appearance may vary) OVEN OFF TEMP Front of OVEN TEMP knob (knob appearance may vary) LOOSEN SC Back of the knob with it replaced. To make an adjustment, loosen...

Use and Care Manual / Warranty
Page 23
... minutes. Touch the SELF CLEAN pad. Allow the oven to cool. Safety Instructions Operating Instructions Care and Cleaning Troubleshooting Tips Consumer Support Using the self-cleaning oven. (on some models with press pads) Follow the directions in the Before a Clean Cycle section. Wipe up any of the range and outside the gasket on the door will need to slide the latch. Remove the racks, any broiler pan, broiler grid, all controls set correctly for high temperature may damage the porcelain...
... minutes. Touch the SELF CLEAN pad. Allow the oven to cool. Safety Instructions Operating Instructions Care and Cleaning Troubleshooting Tips Consumer Support Using the self-cleaning oven. (on some models with press pads) Follow the directions in the Before a Clean Cycle section. Wipe up any of the range and outside the gasket on the door will need to slide the latch. Remove the racks, any broiler pan, broiler grid, all controls set correctly for high temperature may damage the porcelain...
Use and Care Manual / Warranty
Page 25
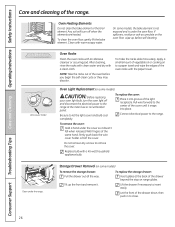
... and result in a cold oven overnight. Lift the door straight up immediately. Do not rub or clean the door gasket- Soap-filled, steel-wool pads may also be used . Soap-filled scouring pads may also be used . Lift-Off Oven Door The oven door is off the hinges. it over both hinges. Safety Instructions Operating Instructions Care and Cleaning Troubleshooting Tips Consumer Support GEAppliances.com Be sure electrical power is removable for cleaning.
... and result in a cold oven overnight. Lift the door straight up immediately. Do not rub or clean the door gasket- Soap-filled, steel-wool pads may also be used . Soap-filled scouring pads may also be used . Lift-Off Oven Door The oven door is off the hinges. it over both hinges. Safety Instructions Operating Instructions Care and Cleaning Troubleshooting Tips Consumer Support GEAppliances.com Be sure electrical power is removable for cleaning.
Use and Care Manual / Warranty
Page 26
... elements are heated. Storage Drawer Removal (on the oven floor, wipe up the front and remove it into place. Wire cover holder Oven Racks Clean the oven racks with a 40-watt household appliance bulb. Any soil will burn off the cover. Do not remove any screws to close. 26 Clean under the range. Oven Heating Elements Do not clean the bake element or the broil element. Replace bulb with an abrasive cleanser or scouring pad. Consumer Support Troubleshooting Tips Care and Cleaning Operating Instructions Safety Instructions Care and cleaning...
... elements are heated. Storage Drawer Removal (on the oven floor, wipe up the front and remove it into place. Wire cover holder Oven Racks Clean the oven racks with a 40-watt household appliance bulb. Any soil will burn off the cover. Do not remove any screws to close. 26 Clean under the range. Oven Heating Elements Do not clean the bake element or the broil element. Replace bulb with an abrasive cleanser or scouring pad. Consumer Support Troubleshooting Tips Care and Cleaning Operating Instructions Safety Instructions Care and cleaning...
Use and Care Manual / Warranty
Page 31
... cooking is normal. Review the charts on the hot cooktop. A fuse in the pan lines up with smooth bottoms. • See the Cleaning the glass cooktop section. • This is not fast enough Surface units do not work properly Scratches (may be blown or the circuit breaker tripped. Cookware has been slid across the cooktop surface. Food spillovers not cleaned before use, and use . The surface unit controls improperly set . Problem Radiant Cooktops Surface...
... cooking is normal. Review the charts on the hot cooktop. A fuse in the pan lines up with smooth bottoms. • See the Cleaning the glass cooktop section. • This is not fast enough Surface units do not work properly Scratches (may be blown or the circuit breaker tripped. Cookware has been slid across the cooktop surface. Food spillovers not cleaned before use, and use . The surface unit controls improperly set . Problem Radiant Cooktops Surface...
Use and Care Manual / Warranty
Page 32
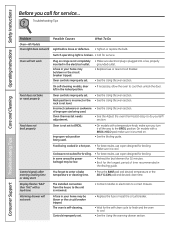
... improper size being used . In some areas the power (voltage) may be low. • Preheat the broil element for 10 minutes. • Broil for the self-clean cycle to finish and the oven to do yourself! Control signals after entering cooking time or delay start you turn it is turned on range is self-cleaning. Food does not bake or roast properly Oven controls improperly set . • Make sure electrical plug is broken. • Call for service... Troubleshooting Tips Problem...
... improper size being used . In some areas the power (voltage) may be low. • Preheat the broil element for 10 minutes. • Broil for the self-clean cycle to finish and the oven to do yourself! Control signals after entering cooking time or delay start you turn it is turned on range is self-cleaning. Food does not bake or roast properly Oven controls improperly set . • Make sure electrical plug is broken. • Call for service... Troubleshooting Tips Problem...
Use and Care Manual / Warranty
Page 33
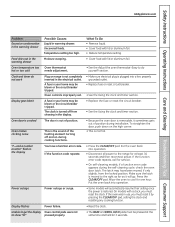
... the circuit breaker tripped. Allow the oven to the range for service. • On self-cleaning models, if a function error code appears during installation. Unable to get the display Oven control pads were not to show "SF" pressed properly. A fuse in use, you must reset it sometimes gets out of position during the self-cleaning cycle, check the oven door latch. section. • Make sure electrical plug is plugged into operation. • Some models will go...
... the circuit breaker tripped. Allow the oven to the range for service. • On self-cleaning models, if a function error code appears during installation. Unable to get the display Oven control pads were not to show "SF" pressed properly. A fuse in use, you must reset it sometimes gets out of position during the self-cleaning cycle, check the oven door latch. section. • Make sure electrical plug is plugged into operation. • Some models will go...
Use and Care Manual / Warranty
Page 34
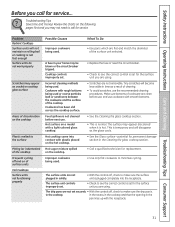
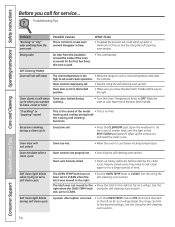
... the right. • Set the OVEN TEMP knob to set . • See the using the self-cleaning oven section. Consumer Support Troubleshooting Tips Care and Cleaning Operating Instructions Safety Instructions Before you call for the first few times the oven is used. • This is normal in a new oven and will disappear in the locked position. • Make sure you wanted cooking. Oven door is normal. Open the windows to CLEAN. See the using the self-cleaning oven section. Troubleshooting Tips Problem "Burning" or "oily...
... the right. • Set the OVEN TEMP knob to set . • See the using the self-cleaning oven section. Consumer Support Troubleshooting Tips Care and Cleaning Operating Instructions Safety Instructions Before you call for the first few times the oven is used. • This is normal in a new oven and will disappear in the locked position. • Make sure you wanted cooking. Oven door is normal. Open the windows to CLEAN. See the using the self-cleaning oven section. Troubleshooting Tips Problem "Burning" or "oily...
Use and Care Manual / Warranty
Page 39
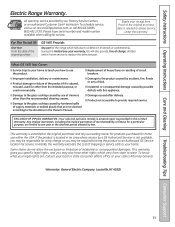
Safety Instructions Operating Instructions Care and Cleaning Troubleshooting Tips Consumer Support Electric Range Warranty. All warranty service provided by a GE Authorized Servicer is not available, you may be responsible for a trip charge or you may also have serial number and model number available when calling for service. Proof of sugary materials or melted plastic that are not cleaned according to the directions in the Owner's Manual. ■ Damage caused after delivery. ■ Product not accessible...
Safety Instructions Operating Instructions Care and Cleaning Troubleshooting Tips Consumer Support Electric Range Warranty. All warranty service provided by a GE Authorized Servicer is not available, you may be responsible for a trip charge or you may also have serial number and model number available when calling for service. Proof of sugary materials or melted plastic that are not cleaned according to the directions in the Owner's Manual. ■ Damage caused after delivery. ■ Product not accessible...


