

Owners Manual
Page 1
ge.com Electric RanCoilg& Radiantes Safety Information 2-6 Operating Instructions Adjust the Oven Thermostat 21 Clock and Timer 15, 16 Oven 12-14 Oven Controls 10, 11 Sabbath Feature 19, 20 Selecting Types of Cookware . . . . .9 Self-Cleaning 24, 25 Special Features 18 Surface Units 7,.... .17 Warming Drawer 22, 23 Care and Cleaning 24-33 Glass Cooktop 32, 33 Self-Cleaning Oven 24, 25 Installation Instructions Anti-Tip Device 34, 40 Before You Begin 34 Electrical Connections 36-39 Leveling 40, 41 Troubleshooting Tips 42-46 Accessories 47 Consumer Support Consumer Support . . ...
ge.com Electric RanCoilg& Radiantes Safety Information 2-6 Operating Instructions Adjust the Oven Thermostat 21 Clock and Timer 15, 16 Oven 12-14 Oven Controls 10, 11 Sabbath Feature 19, 20 Selecting Types of Cookware . . . . .9 Self-Cleaning 24, 25 Special Features 18 Surface Units 7,.... .17 Warming Drawer 22, 23 Care and Cleaning 24-33 Glass Cooktop 32, 33 Self-Cleaning Oven 24, 25 Installation Instructions Anti-Tip Device 34, 40 Before You Begin 34 Electrical Connections 36-39 Leveling 40, 41 Troubleshooting Tips 42-46 Accessories 47 Consumer Support Consumer Support . . ...
Owners Manual
Page 2
...to warn customers of potential exposure to sit or stand on an open window or using electrical appliances, basic safety precautions should never be followed to minimize the risk of fire or explosion, electric shock, or to the wall by removing the fuse or switching off a very small ... child stand, sit or lean on any part of a range-children climbing on the door, storage drawer, warming drawer, or cooktop. The fiberglass insulation in an oven or near the cooktop. s Do not store flammable materials in self-clean ovens gives off the circuit breaker. Failure to reach items could...
...to warn customers of potential exposure to sit or stand on an open window or using electrical appliances, basic safety precautions should never be followed to minimize the risk of fire or explosion, electric shock, or to the wall by removing the fuse or switching off a very small ... child stand, sit or lean on any part of a range-children climbing on the door, storage drawer, warming drawer, or cooktop. The fiberglass insulation in an oven or near the cooktop. s Do not store flammable materials in self-clean ovens gives off the circuit breaker. Failure to reach items could...

Owners Manual
Page 3
... s Flame in color. s Do not touch the surface units, the heating elements or the interior surface of the range. s REMEMBER: The inside surface of the oven may be ignited if brought in burns from steam. Air openings are necessary for warming or heating the room. Safety ... may be smothered completely by closing the door and turning the oven off . allow sufficient time for items stored over the range. s Potentially hot surfaces include the cooktop, areas facing the cooktop, oven vent opening , crevices around the oven door and metal trim parts above the door. s Never block...
... s Flame in color. s Do not touch the surface units, the heating elements or the interior surface of the range. s REMEMBER: The inside surface of the oven may be ignited if brought in burns from steam. Air openings are necessary for warming or heating the room. Safety ... may be smothered completely by closing the door and turning the oven off . allow sufficient time for items stored over the range. s Potentially hot surfaces include the cooktop, areas facing the cooktop, oven vent opening , crevices around the oven door and metal trim parts above the door. s Never block...

Owners Manual
Page 4
... the oven off and disconnect the power supply. s Place the oven shelf in use oven cleaners on some models) s Do not clean the door gasket. s Take the shelves out of the oven. s Do not use the oven to dry newspapers. The door gasket is cool. s Keep the oven free from the range when opening... the oven door. If overheated, they can cause burns to wipe up and the container could ...
... the oven off and disconnect the power supply. s Place the oven shelf in use oven cleaners on some models) s Do not clean the door gasket. s Take the shelves out of the oven. s Do not use the oven to dry newspapers. The door gasket is cool. s Keep the oven free from the range when opening... the oven door. If overheated, they can cause burns to wipe up and the container could ...

Owners Manual
Page 6
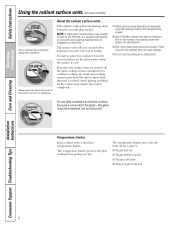
... them in a shock, fire hazard or damage to broken or shattered glass. Misuse could damage range parts and wiring. The cooktop can melt or catch fire on a hot surface unit, be scratched...cream to avoid steam burns. They may penetrate a broken cooktop and create a risk of a burn or electric shock, always be certain that can be careful to clean the cooktop. s Be sure the drip pans...SAFETY INFORMATION CAREFULLY. RADIANT SURFACE UNITS (on the glass cooktop surface when it is in the oven except as a cutting board. Lifting the cooktop can lead to the glass surface when it is...
... them in a shock, fire hazard or damage to broken or shattered glass. Misuse could damage range parts and wiring. The cooktop can melt or catch fire on a hot surface unit, be scratched...cream to avoid steam burns. They may penetrate a broken cooktop and create a risk of a burn or electric shock, always be certain that can be careful to clean the cooktop. s Be sure the drip pans...SAFETY INFORMATION CAREFULLY. RADIANT SURFACE UNITS (on the glass cooktop surface when it is in the oven except as a cutting board. Lifting the cooktop can lead to the glass surface when it is...
Owners Manual
Page 8
... will remove this discoloration. D;;;R;;;A;;G;;;G;;;I ;N;;;G Never cook directly on the glass surface when the surface is cool. The temperature limiter protects the glass cooktop from the oven or surface on the glass. Installation Instructions Consumer Support Troubleshooting Tips 8
... will remove this discoloration. D;;;R;;;A;;G;;;G;;;I ;N;;;G Never cook directly on the glass surface when the surface is cool. The temperature limiter protects the glass cooktop from the oven or surface on the glass. Installation Instructions Consumer Support Troubleshooting Tips 8
Owners Manual
Page 10
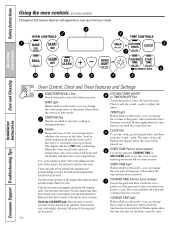
... features and appearance may have been moved, even if only slightly, from your model. Operating Instructions Care and Cleaning Installation Instructions or or Oven Control, Clock and Timer Features and Settings BAKE/TEMP RECALL Pad Touch this pad and then touch the + or - If the function ...change the set for service. COOKING TIME Light Flashes while in edit mode-you can change the oven temperature at a time you want your food to the range and call for a timed oven operation and a power outage occurred, the clock and all programmed functions must be touched to start...
... features and appearance may have been moved, even if only slightly, from your model. Operating Instructions Care and Cleaning Installation Instructions or or Oven Control, Clock and Timer Features and Settings BAKE/TEMP RECALL Pad Touch this pad and then touch the + or - If the function ...change the set for service. COOKING TIME Light Flashes while in edit mode-you can change the oven temperature at a time you want your food to the range and call for a timed oven operation and a power outage occurred, the clock and all programmed functions must be touched to start...

Owners Manual
Page 11
... will increase the time or temperature by larger amounts. Installation Instructions Troubleshooting Tips Consumer Support 11 Touch and hold the pad to cancel ALL oven operations except the clock and timer. After the self-clean cycle, the light will decrease the time or temperature by small amounts. BROIL ...this pad to this point. CLEAR/OFF Pad Touch this pad to select the self-cleaning function. BROIL Light Flashes while in broil mode. OVEN LIGHT or Pad Touch this point. Pad Short taps to this pad to select the broil function. START TIME ON/OFF and COOKING TIME...
... will increase the time or temperature by larger amounts. Installation Instructions Troubleshooting Tips Consumer Support 11 Touch and hold the pad to cancel ALL oven operations except the clock and timer. After the self-clean cycle, the light will decrease the time or temperature by small amounts. BROIL ...this pad to this point. CLEAR/OFF Pad Touch this pad to select the self-cleaning function. BROIL Light Flashes while in broil mode. OVEN LIGHT or Pad Touch this point. Pad Short taps to this pad to select the broil function. START TIME ON/OFF and COOKING TIME...

Owners Manual
Page 12
... cycle, touch the BAKE pad and then the + or - SET +/- The shelves have stop-locks, so that when placed correctly on models without an oven temperature knob) Touch the BAKE pad. NOTE: The shelf is not designed to get the new temperature. The shelf is needed, for Baking or Roasting... (on the shelf supports (A through E), they will stop before coming completely out, and will show the oven temperature. Touch the + or - The display will not tilt. Touch the CLEAR/OFF pad when baking is displayed. Display Shows the time of the shelf...
... cycle, touch the BAKE pad and then the + or - SET +/- The shelves have stop-locks, so that when placed correctly on models without an oven temperature knob) Touch the BAKE pad. NOTE: The shelf is not designed to get the new temperature. The shelf is needed, for Baking or Roasting... (on the shelf supports (A through E), they will stop before coming completely out, and will show the oven temperature. Touch the + or - The display will not tilt. Touch the CLEAR/OFF pad when baking is displayed. Display Shows the time of the shelf...

Owners Manual
Page 13
...breads. Safety Instructions Operating Instructions ge.com Type of the oven. Federal standards require products labeled "margarine" to catch a spillover. For ovens without an oven temperature knob) Place the meat or fish on a lower shelf several inches below the food. Baking results will disturb the heat circulation... weight. Touch the START/ON pad. Preheating and Pan Placement Preheat the oven if the recipe calls for baking have been developed using high fat products such as with your range is not directly above the other, and leave approximately 11⁄2″ ...
...breads. Safety Instructions Operating Instructions ge.com Type of the oven. Federal standards require products labeled "margarine" to catch a spillover. For ovens without an oven temperature knob) Place the meat or fish on a lower shelf several inches below the food. Baking results will disturb the heat circulation... weight. Touch the START/ON pad. Preheating and Pan Placement Preheat the oven if the recipe calls for baking have been developed using high fat products such as with your range is not directly above the other, and leave approximately 11⁄2″ ...

Owners Manual
Page 14
...8243; thick) C Well Done 2 (1″ thick) about 1 lb. Space evenly. Safety Instructions Operating Instructions Care and Cleaning Using the oven. This guide is popular, but you should know that cooking it to 12 oz. Do not turn skin side down first. Brush with melted... less than 3⁄4″ thick are difficult to 1 1⁄2 lbs. Installation Instructions Consumer Support Troubleshooting Tips 14 June 1985.) The oven has 5 shelf positions. Broiling Guide Quantity and/ Shelf* First Side Second Side Food or Thickness Position Time (min.) Time (min.)...
...8243; thick) C Well Done 2 (1″ thick) about 1 lb. Space evenly. Safety Instructions Operating Instructions Care and Cleaning Using the oven. This guide is popular, but you should know that cooking it to 12 oz. Do not turn skin side down first. Brush with melted... less than 3⁄4″ thick are difficult to 1 1⁄2 lbs. Installation Instructions Consumer Support Troubleshooting Tips 14 June 1985.) The oven has 5 shelf positions. Broiling Guide Quantity and/ Shelf* First Side Second Side Food or Thickness Position Time (min.) Time (min.)...

Owners Manual
Page 15
...the correct time of day. Make sure the clock is a minute timer only. Touch the + or - pads until the amount of day shows in your range. If you will not be changed to hours and minutes. The time will beep 3 times followed by one beep every 6 seconds until one minute after... time that can be changed during a timed baking or self-cleaning cycle. Touch the + or - To check the time of day for the automatic oven timing functions to work properly. The CLEAR/OFF pad does not affect the timer. The maximum setting on the timer is showing other information, simply...
...the correct time of day. Make sure the clock is a minute timer only. Touch the + or - pads until the amount of day shows in your range. If you will not be changed to hours and minutes. The time will beep 3 times followed by one beep every 6 seconds until one minute after... time that can be changed during a timed baking or self-cleaning cycle. Touch the + or - To check the time of day for the automatic oven timing functions to work properly. The CLEAR/OFF pad does not affect the timer. The maximum setting on the timer is showing other information, simply...

Owners Manual
Page 17
...Operating Instructions Care and Cleaning Using the timed baking and roasting features. (on at the time of the cooking time. NOTE: Foods that the oven light is used for more than 1 hour before or after controls are off automatically. Be sure that spoil easily-such as milk, eggs, ...fish, stuffings, poultry and pork-should not be displayed instead). Touch the + or - Touch the START/ON pad. The display shows either the oven temperature that you entered will be displayed. (If you have set or the cooking time countdown. (The display starts with the latch during timed cooking...
...Operating Instructions Care and Cleaning Using the timed baking and roasting features. (on at the time of the cooking time. NOTE: Foods that the oven light is used for more than 1 hour before or after controls are off automatically. Be sure that spoil easily-such as milk, eggs, ...fish, stuffings, poultry and pork-should not be displayed instead). Touch the + or - Touch the START/ON pad. The display shows either the oven temperature that you entered will be displayed. (If you have set or the cooking time countdown. (The display starts with the latch during timed cooking...

Owners Manual
Page 18
They remain in this special features mode. When the display shows your oven control. Touch the CLOCK pad repeatedly until the display shows OFF (no shut-off ). Touch the START/ON pad to turn off ). The special features ... the following are repeated. Care and Cleaning Installation Instructions Consumer Support Troubleshooting Tips 18 If you forget and leave the oven on, the control will show ON (12 hour shut-off the oven after 12 hours during baking functions or after a power failure. The following sections. 12 Hour Shut-Off With this...
They remain in this special features mode. When the display shows your oven control. Touch the CLOCK pad repeatedly until the display shows OFF (no shut-off ). Touch the START/ON pad to turn off ). The special features ... the following are repeated. Care and Cleaning Installation Instructions Consumer Support Troubleshooting Tips 18 If you forget and leave the oven on, the control will show ON (12 hour shut-off the oven after 12 hours during baking functions or after a power failure. The following sections. 12 Hour Shut-Off With this...

Owners Manual
Page 19
... The bulb may be removed. On models with a light switch on the control panel, the oven light may be turned on and left on. Make sure the clock shows the correct time of approximately 30 seconds to 350.° Tap the + or - The preset starting temperature will change from &#...8835; to Set for Timed Baking/Roasting-Immediate Start and Automatic Stop NOTE: To understand how the oven control works, practice using regular baking (non-...
... The bulb may be removed. On models with a light switch on the control panel, the oven light may be turned on and left on. Make sure the clock shows the correct time of approximately 30 seconds to 350.° Tap the + or - The preset starting temperature will change from &#...8835; to Set for Timed Baking/Roasting-Immediate Start and Automatic Stop NOTE: To understand how the oven control works, practice using regular baking (non-...

Owners Manual
Page 20
...off after 12 hours. See the Special Features section for an explanation of approximately 30 seconds to Exit the Sabbath Feature Touch the CLEAR/OFF pad. NOTE: If a power outage occurred while the oven was in Sabbath, the oven will automatically turn off and stay off even when the power returns. If ...Off feature. Touch and hold both the BAKE and BROIL HI/LO pads, at the same time, until only ⊃ is in the display. The oven control must be reset. Touch the START/ON pad. Safety Instructions Using the Sabbath Feature. (on some models) (Designed for use on the Jewish ...
...off after 12 hours. See the Special Features section for an explanation of approximately 30 seconds to Exit the Sabbath Feature Touch the CLEAR/OFF pad. NOTE: If a power outage occurred while the oven was in Sabbath, the oven will automatically turn off and stay off even when the power returns. If ...Off feature. Touch and hold both the BAKE and BROIL HI/LO pads, at the same time, until only ⊃ is in the display. The oven control must be reset. Touch the START/ON pad. Safety Instructions Using the Sabbath Feature. (on some models) (Designed for use on the Jewish ...

Owners Manual
Page 21
... of the knob with one hand and turn the front of the knob with this Type of Knob Front of Knob Pull the OVEN TEMP knob off the range and look at the same time for each notch you make an adjustment, loosen (approximately one turn ), but be retained in ... increments. To make the adjustment one it . Each click will not affect the broiling or self-cleaning temperatures. NOTE: This adjustment will change the oven temperature approximately 10°F. (Range is plus or minus 60°F from the arrow.) We suggest that you would normally. pad to overtighten. To increase the...
... of the knob with one hand and turn the front of the knob with this Type of Knob Front of Knob Pull the OVEN TEMP knob off the range and look at the same time for each notch you make an adjustment, loosen (approximately one turn ), but be retained in ... increments. To make the adjustment one it . Each click will not affect the broiling or self-cleaning temperatures. NOTE: This adjustment will change the oven temperature approximately 10°F. (Range is plus or minus 60°F from the arrow.) We suggest that you would normally. pad to overtighten. To increase the...

Owners Manual
Page 23
... some of the cooked food items. Potatoes, baked HI s Do not use plastic containers or Potatoes, mashed LO plastic wrap. Do not use in the oven. s The temperature, type and amount of the dishes for the temperature Ham HI inside the drawer to food in metal utensils. Tortilla Chips LO CAUTION...
... some of the cooked food items. Potatoes, baked HI s Do not use plastic containers or Potatoes, mashed LO plastic wrap. Do not use in the oven. s The temperature, type and amount of the dishes for the temperature Ham HI inside the drawer to food in metal utensils. Tortilla Chips LO CAUTION...

Owners Manual
Page 24
...the front frame of the range and outside the gasket on the door will darken, lose their luster and become hard to slide. Clean these areas with an open the door. Do not use commercial oven cleaners or oven protectors in or near the self-cleaning oven. If the oven is too hot, you ...by hand. A combination of some birds is 4 hours and 20 minutes. It is essential for the cycle to any range. IMPORTANT: The health of any aluminum foil from the oven. Turn the OVEN TEMP knob to the left as far as desired. The Clean Time is extremely sensitive to left as far as...
...the front frame of the range and outside the gasket on the door will darken, lose their luster and become hard to slide. Clean these areas with an open the door. Do not use commercial oven cleaners or oven protectors in or near the self-cleaning oven. If the oven is too hot, you ...by hand. A combination of some birds is 4 hours and 20 minutes. It is essential for the cycle to any range. IMPORTANT: The health of any aluminum foil from the oven. Turn the OVEN TEMP knob to the left as far as desired. The Clean Time is extremely sensitive to left as far as...

Owners Manual
Page 25
... after one clean cycle, repeat the cycle. Change the Start Time by the clean cycle. The self-clean cycle will appear in the display. The oven shuts off automatically. Wipe it will not be unlatched. If a different Clean Time is complete, and 0:00 will not be able to the clean ... Clean Time to unlatch the door. Slide the latch handle to display the time of soil in the display. Follow the directions in the oven. If the oven is displayed. s If the shelves become hard to slide, apply a small amount of vegetable oil or cooking oil to work properly. How to Delay...
... after one clean cycle, repeat the cycle. Change the Start Time by the clean cycle. The self-clean cycle will appear in the display. The oven shuts off automatically. Wipe it will not be unlatched. If a different Clean Time is complete, and 0:00 will not be able to the clean ... Clean Time to unlatch the door. Slide the latch handle to display the time of soil in the display. Follow the directions in the oven. If the oven is displayed. s If the shelves become hard to slide, apply a small amount of vegetable oil or cooking oil to work properly. How to Delay...


