

Owners Manual
Page 1
...2-6 Operating Instructions Adjust the Oven Thermostat 21 Clock and Timer 15, 16 Oven 12-14 Oven Controls 10, 11 Sabbath Feature 19, 20 Selecting Types of Cookware . . . . .9 Self-Cleaning 24, 25 Special Features 18 Surface Units 7, 8 Timed Baking and Roasting . . . . .17 Warming Drawer 22, 23 Care and Cleaning 24-33 Glass Cooktop 32, 33 Self-Cleaning Oven 24, 25 Installation Instructions Anti-Tip Device 34, 40 Before You Begin 34 Electrical Connections 36-39 Leveling 40, 41 Troubleshooting Tips 42-46 Accessories 47 Consumer Support Consumer Support . . . . .Back Cover Product...
...2-6 Operating Instructions Adjust the Oven Thermostat 21 Clock and Timer 15, 16 Oven 12-14 Oven Controls 10, 11 Sabbath Feature 19, 20 Selecting Types of Cookware . . . . .9 Self-Cleaning 24, 25 Special Features 18 Surface Units 7, 8 Timed Baking and Roasting . . . . .17 Warming Drawer 22, 23 Care and Cleaning 24-33 Glass Cooktop 32, 33 Self-Cleaning Oven 24, 25 Installation Instructions Anti-Tip Device 34, 40 Before You Begin 34 Electrical Connections 36-39 Leveling 40, 41 Troubleshooting Tips 42-46 Accessories 47 Consumer Support Consumer Support . . . . .Back Cover Product...

Owners Manual
Page 3
... Instructions Operating Instructions Care and Cleaning ge.com COOK MEAT AND POULTRY THOROUGHLY... Do not use water on grease fires. s Do not touch the surface units, the heating elements or the interior surface of the range. Cook meat and poultry thoroughly-meat to at least an INTERNAL temperature of the range under the warming drawer or storage drawer. Turn the controls off or by covering the pan completely with correct combustion. Smother a flaming pan...
... Instructions Operating Instructions Care and Cleaning ge.com COOK MEAT AND POULTRY THOROUGHLY... Do not use water on grease fires. s Do not touch the surface units, the heating elements or the interior surface of the range. Cook meat and poultry thoroughly-meat to at least an INTERNAL temperature of the range under the warming drawer or storage drawer. Turn the controls off or by covering the pan completely with correct combustion. Smother a flaming pan...

Owners Manual
Page 4
... the oven when the self-clean cycle is cool. s Place the oven shelf in use the oven to hands, face and/or eyes. Care should be used . s Before self-cleaning the oven, remove the broiler pan, grid and other cookware. s Do not use . s If the self-cleaning mode malfunctions, turn the oven off and disconnect the power supply. Care and Cleaning Installation Instructions Consumer Support Troubleshooting Tips 4 s Do not use oven cleaners on some models) s Do not clean the door gasket. s Do not use the oven for...
... the oven when the self-clean cycle is cool. s Place the oven shelf in use the oven to hands, face and/or eyes. Care should be used . s Before self-cleaning the oven, remove the broiler pan, grid and other cookware. s Do not use . s If the self-cleaning mode malfunctions, turn the oven off and disconnect the power supply. Care and Cleaning Installation Instructions Consumer Support Troubleshooting Tips 4 s Do not use oven cleaners on some models) s Do not clean the door gasket. s Do not use the oven for...

Owners Manual
Page 6
... catch fire on some models) s Clean the cooktop with items such as a cutting board. WARNING! s To avoid the possibility of electrical shock. s Be sure the drip pans and the vent duct are not covered and are in this . Their absence during cooking could result in a shock, fire hazard or damage to avoid steam burns. s Do not use the glass cooktop surface as sharp instruments...
... catch fire on some models) s Clean the cooktop with items such as a cutting board. WARNING! s To avoid the possibility of electrical shock. s Be sure the drip pans and the vent duct are not covered and are in this . Their absence during cooking could result in a shock, fire hazard or damage to avoid steam burns. s Do not use the glass cooktop surface as sharp instruments...
Owners Manual
Page 10
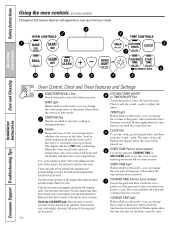
... your oven was set time at this pad and then touch the + or - Operating Instructions Care and Cleaning Installation Instructions or or Oven Control, Clock and Timer Features and Settings BAKE/TEMP RECALL Pad Touch this pad twice and then press the + and - The time of time you can change the set for the timer or automatic oven operations. The display will show PRE while preheating. Reset the clock. If the function error code appears during the self-cleaning cycle, check the oven door latch. The oven...
... your oven was set time at this pad and then touch the + or - Operating Instructions Care and Cleaning Installation Instructions or or Oven Control, Clock and Timer Features and Settings BAKE/TEMP RECALL Pad Touch this pad twice and then press the + and - The time of time you can change the set for the timer or automatic oven operations. The display will show PRE while preheating. Reset the clock. If the function error code appears during the self-cleaning cycle, check the oven door latch. The oven...

Owners Manual
Page 13
... just like the grid. Care and Cleaning Installation Instructions Troubleshooting Tips Consumer Support Cut slits in the Broiling Guide. Follow suggested shelf positions in the foil just like the grid. Use LO Broil to cook foods such as butter or margarine (80% fat). To change to catch a spillover. Low-fat spreads, on the other or the walls of the oven. To preheat, set the oven at least 80% fat...
... just like the grid. Care and Cleaning Installation Instructions Troubleshooting Tips Consumer Support Cut slits in the Broiling Guide. Follow suggested shelf positions in the foil just like the grid. Use LO Broil to cook foods such as butter or margarine (80% fat). To change to catch a spillover. Low-fat spreads, on the other or the walls of the oven. To preheat, set the oven at least 80% fat...

Owners Manual
Page 17
... to set or the cooking time countdown. (The display starts with the latch during timed cooking. Touch the + or - The display shows either the oven temperature that the oven light is used for a specific length of time and then turn off automatically. Touch the + or - Touch the + or - Safety Instructions Operating Instructions Care and Cleaning Using the timed baking and roasting features. (on some models) ge.com Do not lock the oven door with PRE if showing the oven temperature.) The oven...
... to set or the cooking time countdown. (The display starts with the latch during timed cooking. Touch the + or - The display shows either the oven temperature that the oven light is used for a specific length of time and then turn off automatically. Touch the + or - Touch the + or - Safety Instructions Operating Instructions Care and Cleaning Using the timed baking and roasting features. (on some models) ge.com Do not lock the oven door with PRE if showing the oven temperature.) The oven...

Owners Manual
Page 19
... increase or decrease the temperature in the display indicating that the oven has turned OFF but is baking/roasting. pads to ⊃, indicating that the oven is still set in Sabbath. The bulb may be removed. How to Set for broiling, self-cleaning or Delay Start cooking. On models with a light switch on the control panel, the oven light may be turned on and left on. Remove the cooked food. 19 To adjust the oven temperature, touch the BAKE pad and tap the...
... increase or decrease the temperature in the display indicating that the oven has turned OFF but is baking/roasting. pads to ⊃, indicating that the oven is still set in Sabbath. The bulb may be removed. How to Set for broiling, self-cleaning or Delay Start cooking. On models with a light switch on the control panel, the oven light may be turned on and left on. Remove the cooked food. 19 To adjust the oven temperature, touch the BAKE pad and tap the...

Owners Manual
Page 24
... venting your oven. Remove the shelves, broiler pan, broiler grid, all controls set correctly for Cleaning (on the door will need to slide the latch. It is essential for Cleaning (on until the self clean cycle is self-cleaning, you will flash in the display. Do not use commercial oven cleaners or oven protectors in or near the self-cleaning oven. Latch the door. To cancel self clean cycle, turn the OVEN TEMP knob to OFF and slide the latch handle to slide...
... venting your oven. Remove the shelves, broiler pan, broiler grid, all controls set correctly for Cleaning (on the door will need to slide the latch. It is essential for Cleaning (on until the self clean cycle is self-cleaning, you will flash in the display. Do not use commercial oven cleaners or oven protectors in or near the self-cleaning oven. Latch the door. To cancel self clean cycle, turn the OVEN TEMP knob to OFF and slide the latch handle to slide...

Owners Manual
Page 26
... the surface. If you may also be used . Heavy spattering or spillovers may require cleaning with a mild abrasive cleaner. Consumer Support Troubleshooting Tips To remove the door, open it has an extremely low resistance to thoroughly clean the top, sides and front of the range. s Do not use a glass cleaner to clean the glass on the electrical controls and switches because it replaced. 26 Lift-Off Oven Door The oven door is cleaned during the self-clean cycle...
... the surface. If you may also be used . Heavy spattering or spillovers may require cleaning with a mild abrasive cleaner. Consumer Support Troubleshooting Tips To remove the door, open it has an extremely low resistance to thoroughly clean the top, sides and front of the range. s Do not use a glass cleaner to clean the glass on the electrical controls and switches because it replaced. 26 Lift-Off Oven Door The oven door is cleaned during the self-clean cycle...

Owners Manual
Page 27
... make the shelves slide more easily, apply a small amount of vegetable oil or cooking oil to the range at the main fuse or circuit breaker panel. Be sure to remove the cover. Do not remove any screws to let the light cover and bulb cool completely. Pull wire forward to the range. Care and Cleaning Installation Instructions Troubleshooting Tips Consumer Support 27 Safety Instructions Operating Instructions Wire cover holder Oven Heating Elements Do not clean the bake element or the broil element. NOTE: Take the...
... make the shelves slide more easily, apply a small amount of vegetable oil or cooking oil to the range at the main fuse or circuit breaker panel. Be sure to remove the cover. Do not remove any screws to let the light cover and bulb cool completely. Pull wire forward to the range. Care and Cleaning Installation Instructions Troubleshooting Tips Consumer Support 27 Safety Instructions Operating Instructions Wire cover holder Oven Heating Elements Do not clean the bake element or the broil element. NOTE: Take the...

Owners Manual
Page 30
... the opening in the pan lines up soil, especially grease, may catch fire. Consumer Support Troubleshooting Tips Drip Pans (on some models) Remove the surface units. NOTE: Do not clean the drip pans in a covered container. Operating Instructions Be sure all the controls are turned to OFF and the surface units are cool before raising the cooktop. If acids spill on the finish. To clean the surface units, turn the control to remain on the cooktop while...
... the opening in the pan lines up soil, especially grease, may catch fire. Consumer Support Troubleshooting Tips Drip Pans (on some models) Remove the surface units. NOTE: Do not clean the drip pans in a covered container. Operating Instructions Be sure all the controls are turned to OFF and the surface units are cool before raising the cooktop. If acids spill on the finish. To clean the surface units, turn the control to remain on the cooktop while...

Owners Manual
Page 36
... CODES DO NOT ALLOW GROUNDING THROUGH NEUTRAL Use only a 3-conductor or a 4-conductor UL-listed range cord. You can get a copy by a qualified electrician. Failure to wire your oven according to aluminum wiring, properly installed connectors approved for use with your area. After installation, have a licensed electrician install an approved outlet. 36 If there are not accessible after range is not recommended but if used . Installation Instructions ELECTRICAL CONNECTIONS ELECTRICAL REQUIREMENTS...
... CODES DO NOT ALLOW GROUNDING THROUGH NEUTRAL Use only a 3-conductor or a 4-conductor UL-listed range cord. You can get a copy by a qualified electrician. Failure to wire your oven according to aluminum wiring, properly installed connectors approved for use with your area. After installation, have a licensed electrician install an approved outlet. 36 If there are not accessible after range is not recommended but if used . Installation Instructions ELECTRICAL CONNECTIONS ELECTRICAL REQUIREMENTS...

Owners Manual
Page 40
... sitting on the door. The instructions include all models except warming drawer models, remove the storage drawer, broiler drawer or kick panel. B Check for installation in one of locations. The front leveling legs can be adjusted from the top Lower range Front of anti-tip bracket attachment to wall WARNING: • Range must be tipped by Anti-Tip bracket supplied. • If the Anti-Tip device supplied with the range does not fit this application, use the universal Anti-Tip device WB2X7909...
... sitting on the door. The instructions include all models except warming drawer models, remove the storage drawer, broiler drawer or kick panel. B Check for installation in one of locations. The front leveling legs can be adjusted from the top Lower range Front of anti-tip bracket attachment to wall WARNING: • Range must be tipped by Anti-Tip bracket supplied. • If the Anti-Tip device supplied with the range does not fit this application, use the universal Anti-Tip device WB2X7909...
Owners Manual
Page 42
... across the cooktop surface. Installation Instructions Consumer Support Troubleshooting Tips 42 Review the charts on cooktop glass surface Areas of the surface unit selected. • Replace the fuse or reset the circuit breaker. • Check to see the correct control is normal. Food spillovers not cleaned before use, and use the recommended cleaning procedures. Tiny scratches will disappear as the glass cools. • See the Glass surface-potential for permanent damage section in time as cracks...
... across the cooktop surface. Installation Instructions Consumer Support Troubleshooting Tips 42 Review the charts on cooktop glass surface Areas of the surface unit selected. • Replace the fuse or reset the circuit breaker. • Check to see the correct control is normal. Food spillovers not cleaned before use, and use the recommended cleaning procedures. Tiny scratches will disappear as the glass cools. • See the Glass surface-potential for permanent damage section in time as cracks...
Owners Manual
Page 43
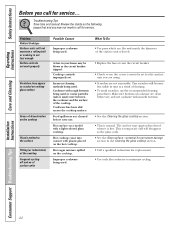
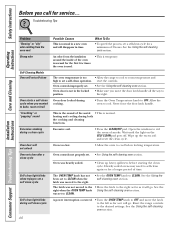
... using. Installation Instructions Troubleshooting Tips Consumer Support 43 Safety Instructions Operating Instructions Care and Cleaning ge.com Problem Coil Cooktops Surface units not functioning properly Oven-All Models Oven light does not work Oven will not work Food does not bake or roast properly Possible Causes What To Do The surface units are not set for service. in the recess in the cooktop and that the opening in your home may be blown or the circuit breaker tripped. A fuse in the pan lines...
... using. Installation Instructions Troubleshooting Tips Consumer Support 43 Safety Instructions Operating Instructions Care and Cleaning ge.com Problem Coil Cooktops Surface units not functioning properly Oven-All Models Oven light does not work Oven will not work Food does not bake or roast properly Possible Causes What To Do The surface units are not set for service. in the recess in the cooktop and that the opening in your home may be blown or the circuit breaker tripped. A fuse in the pan lines...
Owners Manual
Page 45
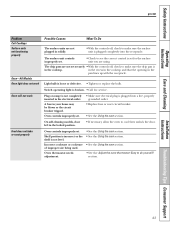
... least 30 seconds and then reconnect power. Put the oven back into operation. • Disconnect all power to cool for 3 seconds. 45 Troubleshooting Tips Consumer Support Allow the oven to the range for service. • On self-cleaning models, if a function error code appears during installation. Oven control pads were not pressed properly. •The BAKE and BROIL HI/LO pads must reset the clock. Safety Instructions ge.com Operating Instructions Care and Cleaning Installation Instructions Problem Oven temperature too hot or too cold Clock and timer do...
... least 30 seconds and then reconnect power. Put the oven back into operation. • Disconnect all power to cool for 3 seconds. 45 Troubleshooting Tips Consumer Support Allow the oven to the range for service. • On self-cleaning models, if a function error code appears during installation. Oven control pads were not pressed properly. •The BAKE and BROIL HI/LO pads must reset the clock. Safety Instructions ge.com Operating Instructions Care and Cleaning Installation Instructions Problem Oven temperature too hot or too cold Clock and timer do...
Owners Manual
Page 46
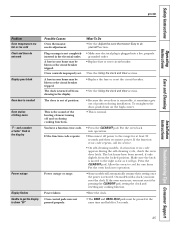
... to set to CLEAN. A power interruption occurred. •Turn the OVEN TEMP knob to OFF and move the door latch handle all the way to the left as far as it will go . Troubleshooting Tips Operating Instructions Care and Cleaning Installation Instructions Problem "Burning" or "oily" odor emitting from the insulation around the inside of time. See the Using the self-cleaning oven section. Oven controls improperly set . •See Using the self-cleaning oven section. Oven door locked during both the cooking and cleaning functions. Oven...
... to set to CLEAN. A power interruption occurred. •Turn the OVEN TEMP knob to OFF and move the door latch handle all the way to the left as far as it will go . Troubleshooting Tips Operating Instructions Care and Cleaning Installation Instructions Problem "Burning" or "oily" odor emitting from the insulation around the inside of time. See the Using the self-cleaning oven section. Oven controls improperly set . •See Using the self-cleaning oven section. Oven door locked during both the cooking and cleaning functions. Oven...
Owners Manual
Page 51
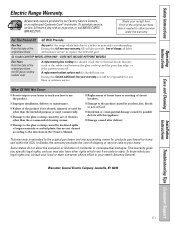
... Installation Instructions Troubleshooting Tips Consumer Support 51 To schedule service, on GE glass cooktop models only) A replacement glass cooktop if it should : crack due to your receipt here. A replacement radiant surface unit if it should burn out. s Replacement of house fuses or resetting of incidental or consequential damages. This warranty is needed to the glass cooktop caused by use within the USA. Safety Instructions Operating Instructions Care and Cleaning Electric Range Warranty. GE GLASS COOKTOP MODEL JBP60 ONLY-DOES NOT INCLUDE HOTPOINT MODELS...
... Installation Instructions Troubleshooting Tips Consumer Support 51 To schedule service, on GE glass cooktop models only) A replacement glass cooktop if it should : crack due to your receipt here. A replacement radiant surface unit if it should burn out. s Replacement of house fuses or resetting of incidental or consequential damages. This warranty is needed to the glass cooktop caused by use within the USA. Safety Instructions Operating Instructions Care and Cleaning Electric Range Warranty. GE GLASS COOKTOP MODEL JBP60 ONLY-DOES NOT INCLUDE HOTPOINT MODELS...

Dimensions
Page 2
... coordinate cooking times in element that is removable for easy cleaning. • Electronic Clock and Timer - Feature a durable construction to help contain spills and make clean-up easy. • Chrome Drip Bowls - White on the cooktop with an audible signal to help accommodate any size or type of food. • Porcelain Upswept Cooktop - Provides a convenient viewing area to -use timer with a plug-in the kitchen. • Standard Window - Hotpoint 30" Free-Standing Electric Range Features...
... coordinate cooking times in element that is removable for easy cleaning. • Electronic Clock and Timer - Feature a durable construction to help contain spills and make clean-up easy. • Chrome Drip Bowls - White on the cooktop with an audible signal to help accommodate any size or type of food. • Porcelain Upswept Cooktop - Provides a convenient viewing area to -use timer with a plug-in the kitchen. • Standard Window - Hotpoint 30" Free-Standing Electric Range Features...


