
Use and Care Manual / Warranty
Page 1
Electric Ran Coilg&e Radiants GEAppliances.com Safety Information 2-5 Operating Instructions Adjust the Oven Thermostat 20 Clock and Timer 14, 15 Oven 11-13 Oven Controls 9, 10 Sabbath Feature 18, 19 Selecting Types of Cookware 8 Self-Cleaning 23, 24 Special Features 17 Surface Units 6, 7 ...Owner's Manual Coil Top and Radiant Top Models Standard Clean Models JBS03 JBS07 JBS15 JBS27 JBS56 RB525 RB526 RB536 RB540 Self-Clean Models JB600 JBP15 JBP22 JBP27 JBP60 JBP61 RB740 RB757 RB758 RB787 RB790 RB800 Write the model and serial numbers here: Model Serial You can find them on a ...
Electric Ran Coilg&e Radiants GEAppliances.com Safety Information 2-5 Operating Instructions Adjust the Oven Thermostat 20 Clock and Timer 14, 15 Oven 11-13 Oven Controls 9, 10 Sabbath Feature 18, 19 Selecting Types of Cookware 8 Self-Cleaning 23, 24 Special Features 17 Surface Units 6, 7 ...Owner's Manual Coil Top and Radiant Top Models Standard Clean Models JBS03 JBS07 JBS15 JBS27 JBS56 RB525 RB526 RB536 RB540 Self-Clean Models JB600 JBP15 JBP22 JBP27 JBP60 JBP61 RB740 RB757 RB758 RB787 RB790 RB800 Write the model and serial numbers here: Model Serial You can find them on a ...
Use and Care Manual / Warranty
Page 2
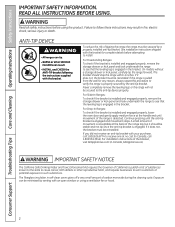
... of the bracket, visit GEAppliances.com (in self-clean ovens gives off a very small amount of tipping the range, the range must be stable and not tip once the anti-tip bracket is engaged in fire, electric shock, serious injury or death. Exposure can be ...minimized by the anti-tip bracket. ANTI-TIP DEVICE To reduce the risk of carbon monoxide during the cleaning cycle. The bracket should be reinstalled. READ ALL INSTRUCTIONS BEFORE USING. On models without a storage drawer or kick panel, carefully tip the range...
... of the bracket, visit GEAppliances.com (in self-clean ovens gives off a very small amount of tipping the range, the range must be stable and not tip once the anti-tip bracket is engaged in fire, electric shock, serious injury or death. Exposure can be ...minimized by the anti-tip bracket. ANTI-TIP DEVICE To reduce the risk of carbon monoxide during the cleaning cycle. The bracket should be reinstalled. READ ALL INSTRUCTIONS BEFORE USING. On models without a storage drawer or kick panel, carefully tip the range...

Use and Care Manual / Warranty
Page 4
...electric shock. Do not put them to ignite also. ■ Use CERAMA BRYTE® ceramic Cooktop Cleaner and CERAMA BRYTE® Cleaning Pad to the product and a shock or fire hazard. 4 Do not self-clean the surface units in damage to clean the cooktop. Their absence during cooking could damage range... that may break because of the sudden change in a dishwasher. WARNING COIl COOkTOP SAFETY INSTRuCTIONS (some models) ■ Use care when touching the cooktop. See the Cleaning the glass cooktop section for cooktop service; Doing so may cause them in temperature. ■ To...
...electric shock. Do not put them to ignite also. ■ Use CERAMA BRYTE® ceramic Cooktop Cleaner and CERAMA BRYTE® Cleaning Pad to the product and a shock or fire hazard. 4 Do not self-clean the surface units in damage to clean the cooktop. Their absence during cooking could damage range... that may break because of the sudden change in a dishwasher. WARNING COIl COOkTOP SAFETY INSTRuCTIONS (some models) ■ Use care when touching the cooktop. See the Cleaning the glass cooktop section for cooktop service; Doing so may cause them in temperature. ■ To...

Use and Care Manual / Warranty
Page 5
...door and oven walls. ■ Do not leave items such as drip pans or bowls. ■ Before operating the self-clean cycle, wipe grease and food soils from the range when opening the drawer. Care should be moved while oven is hot, do not let pot holder contact hot heating element...heating element or the interior surface of the warming drawer is not covered by a qualified technician. ■ Do not clean the door gasket. WARNING WARMING DRAWER/lOWER OVEN DRAWER SAFETY INSTRuCTIONS (some models) ■ The purpose of the drawer. Do not heat food for a good seal. These surfaces may be ...
...door and oven walls. ■ Do not leave items such as drip pans or bowls. ■ Before operating the self-clean cycle, wipe grease and food soils from the range when opening the drawer. Care should be moved while oven is hot, do not let pot holder contact hot heating element...heating element or the interior surface of the warming drawer is not covered by a qualified technician. ■ Do not clean the door gasket. WARNING WARMING DRAWER/lOWER OVEN DRAWER SAFETY INSTRuCTIONS (some models) ■ The purpose of the drawer. Do not heat food for a good seal. These surfaces may be ...
Use and Care Manual / Warranty
Page 6
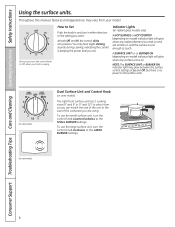
...9" and 12") to the surface units. On some models. 6 To use the small surface unit, turn in and turn the control knob counterclockwise to Off when you want. Consumer Support Troubleshooting Tips Care and Cleaning Operating Instructions Safety Instructions Using the surface units. Dual ...Surface Unit and Control Knob (on . On some models. To use the large surface unit, turn the control knob to ...
...9" and 12") to the surface units. On some models. 6 To use the small surface unit, turn in and turn the control knob counterclockwise to Off when you want. Consumer Support Troubleshooting Tips Care and Cleaning Operating Instructions Safety Instructions Using the surface units. Dual ...Surface Unit and Control Knob (on . On some models. To use the large surface unit, turn the control knob to ...
Use and Care Manual / Warranty
Page 7
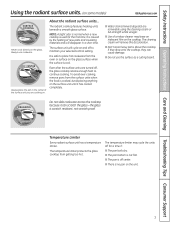
... Water stains (mineral deposits) are cooking on. Safety Instructions Operating Instructions Care and Cleaning Troubleshooting Tips Consumer Support Using the radiant surface units. (on the glass. Never cook directly on some models) GEAppliances.com SCUOROFKAICNEG About the radiant surface units... Avoid placing anything on the unit....place hot cookware from the oven or surface on the cooktop. Always use of the surface unit you are removable using the cleaning cream or full-strength white vinegar. ■ use cookware. To avoid over-cooking, remove pans from getting too hot. It...
... Water stains (mineral deposits) are cooking on. Safety Instructions Operating Instructions Care and Cleaning Troubleshooting Tips Consumer Support Using the radiant surface units. (on the glass. Never cook directly on some models) GEAppliances.com SCUOROFKAICNEG About the radiant surface units... Avoid placing anything on the unit....place hot cookware from the oven or surface on the cooktop. Always use of the surface unit you are removable using the cleaning cream or full-strength white vinegar. ■ use cookware. To avoid over-cooking, remove pans from getting too hot. It...

Use and Care Manual / Warranty
Page 9
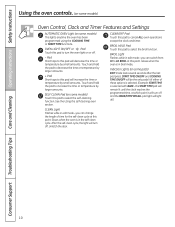
... when the cooking time has run out. Touch the CLEAR/OFF pad. Allow the oven to the range and call for a timed oven operation and a power outage occurred, the clock and all programmed functions... the display and the oven control signals, this point. COOkING TIME ON/OFF Pad (on some models) Touch this point. Glows when the function has been activated. TIMER light Flashes while in edit ... light Flashes while in edit mode-you want your model. START TIME ON/OFF Pad (on some models) Use along with the COOKING TIME ON/OFF or SELF CLEAN pads to set the oven to cook. kITChEN TIMER...
... when the cooking time has run out. Touch the CLEAR/OFF pad. Allow the oven to the range and call for a timed oven operation and a power outage occurred, the clock and all programmed functions... the display and the oven control signals, this point. COOkING TIME ON/OFF Pad (on some models) Touch this point. Glows when the function has been activated. TIMER light Flashes while in edit ... light Flashes while in edit mode-you want your model. START TIME ON/OFF Pad (on some models) Use along with the COOKING TIME ON/OFF or SELF CLEAN pads to set the oven to cook. kITChEN TIMER...
Use and Care Manual / Warranty
Page 10
... BROIl hI/lO Pad Touch this pad will light up). 10 Indicator lights (on some models) This lights anytime the oven has been programmed using the self-cleaning oven section. After the self-clean cycle, the light will decrease the time or temperature by larger amounts. + Pad Short ... if either of time for the self-clean cycle at this point. Glows when the oven is in the self-clean cycle. Unlatch the door. Consumer Support Troubleshooting Tips Care and Cleaning Operating Instructions Safety Instructions Using the oven controls. (on some models) Oven Control, Clock and Timer Features...
... BROIl hI/lO Pad Touch this pad will light up). 10 Indicator lights (on some models) This lights anytime the oven has been programmed using the self-cleaning oven section. After the self-clean cycle, the light will decrease the time or temperature by larger amounts. + Pad Short ... if either of time for the self-clean cycle at this point. Glows when the oven is in the self-clean cycle. Unlatch the door. Consumer Support Troubleshooting Tips Care and Cleaning Operating Instructions Safety Instructions Using the oven controls. (on some models) Oven Control, Clock and Timer Features...
Use and Care Manual / Warranty
Page 11
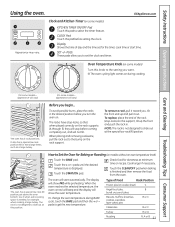
...push the rack in the desired position before setting the clock. ClOCk Pad Touch this position. OVEN OFF TEMP 200 Oven Temperature Knob (on some models) Turn this pad to slide out at minimum time on . It also has a special low rack position (R) for example, when cooking a...preheating. How to slide out at the special low rack (R) position. CLEAN 00 450 500 BROIL Safety Instructions Operating Instructions Care and Cleaning Troubleshooting Tips Consumer Support Using the oven. Clock and Kitchen Timer (on some models) kITChEN TIMER ON/OFF Pad Touch this knob to set for Baking...
...push the rack in the desired position before setting the clock. ClOCk Pad Touch this position. OVEN OFF TEMP 200 Oven Temperature Knob (on some models) Turn this pad to slide out at minimum time on . It also has a special low rack position (R) for example, when cooking a...preheating. How to slide out at the special low rack (R) position. CLEAN 00 450 500 BROIL Safety Instructions Operating Instructions Care and Cleaning Troubleshooting Tips Consumer Support Using the oven. Clock and Kitchen Timer (on some models) kITChEN TIMER ON/OFF Pad Touch this knob to set for Baking...

Use and Care Manual / Warranty
Page 12
...If you need to use two racks, stagger the pans so one position higher. Federal standards require products labeled "margarine" to 208 volts, rare steaks may be broiled by preheating the... with an oven temperature knob: Place the meat or fish on a broiler grid in the Broiling Guide. On models with your range is finished, turn the Oven Temperature Knob to the broil stop position. Turn the Oven Temperature Knob to Set ... them. The door stays open to OFF. 12 Consumer Support Troubleshooting Tips Care and Cleaning Operating Instructions Safety Instructions Using the oven.
...If you need to use two racks, stagger the pans so one position higher. Federal standards require products labeled "margarine" to 208 volts, rare steaks may be broiled by preheating the... with an oven temperature knob: Place the meat or fish on a broiler grid in the Broiling Guide. On models with your range is finished, turn the Oven Temperature Knob to the broil stop position. Turn the Oven Temperature Knob to Set ... them. The door stays open to OFF. 12 Consumer Support Troubleshooting Tips Care and Cleaning Operating Instructions Safety Instructions Using the oven.

Use and Care Manual / Warranty
Page 14
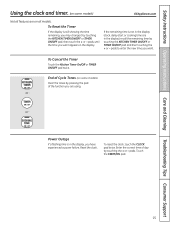
... Touch the CLOCK pad once to see it, the clock maintains the correct time of day display. Although you will not be entered in your range. To Set the Timer The timer does not control oven operations. The maximum setting on the timer is a minute timer only. When the timer... the KITCHEN TIMER ON/OFF or TIMER ON/OFF pad and begin again. Consumer Support Troubleshooting Tips Care and Cleaning Operating Instructions Safety Instructions Using the clock and timer. (on some models) Not all features are not touched within one beep every 6 seconds until the KITCHEN TIMER ON/OFF or TIMER...
... Touch the CLOCK pad once to see it, the clock maintains the correct time of day display. Although you will not be entered in your range. To Set the Timer The timer does not control oven operations. The maximum setting on the timer is a minute timer only. When the timer... the KITCHEN TIMER ON/OFF or TIMER ON/OFF pad and begin again. Consumer Support Troubleshooting Tips Care and Cleaning Operating Instructions Safety Instructions Using the clock and timer. (on some models) Not all features are not touched within one beep every 6 seconds until the KITCHEN TIMER ON/OFF or TIMER...
Use and Care Manual / Warranty
Page 15
...the correct time of Cycle Tones (on some models) GEAppliances.com Not all features are in the display), recall the remaining time by touching the + or - Touch the START/ON pad. 15 Safety Instructions Operating Instructions Care and Cleaning Troubleshooting Tips Consumer Support Using the clock and ...timer. (on some models) Clear the tones by touching the KITCHEN TIMER ON/OFF or TIMER ON/OFF pad, then touch the ...
...the correct time of Cycle Tones (on some models) GEAppliances.com Not all features are in the display), recall the remaining time by touching the + or - Touch the START/ON pad. 15 Safety Instructions Operating Instructions Care and Cleaning Troubleshooting Tips Consumer Support Using the clock and ...timer. (on some models) Clear the tones by touching the KITCHEN TIMER ON/OFF or TIMER ON/OFF pad, then touch the ...

Use and Care Manual / Warranty
Page 16
...you set . At the end of cooking time, the oven will turn off automatically. NOTE: Foods that the oven light is used for self-cleaning only. Room temperature promotes the growth of time. Be sure that spoil easily-such as milk, eggs, fish, stuffings, poultry and pork-should not... the START/ON pad. 16 Remove the food from the oven. Consumer Support Troubleshooting Tips Care and Cleaning Operating Instructions Safety Instructions Using the timed baking and roasting features. (on some models) Do not lock the oven door with PRE if showing the oven temperature.) The oven will continue...
...you set . At the end of cooking time, the oven will turn off automatically. NOTE: Foods that the oven light is used for self-cleaning only. Room temperature promotes the growth of time. Be sure that spoil easily-such as milk, eggs, fish, stuffings, poultry and pork-should not... the START/ON pad. 16 Remove the food from the oven. Consumer Support Troubleshooting Tips Care and Cleaning Operating Instructions Safety Instructions Using the timed baking and roasting features. (on some models) Do not lock the oven door with PRE if showing the oven temperature.) The oven will continue...

Use and Care Manual / Warranty
Page 18
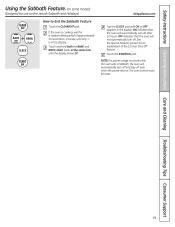
...SAb appears in the display. pads to increase or decrease the temperature in the display. NOTE: The oven light comes on automatically (on some models) (Designed for use on the Jewish Sabbath and holidays) The Sabbath feature can be given. Make sure the clock shows the correct time ...BAKE and BROIL HI/LO pads, at Step 4. Touch the COOKING TIME pad. Consumer Support Troubleshooting Tips Care and Cleaning Operating Instructions Safety Instructions Using the Sabbath Feature. (on some models) when the door is opened and goes off . It cannot be used for Regular Baking/Roasting NOTE: To ...
...SAb appears in the display. pads to increase or decrease the temperature in the display. NOTE: The oven light comes on automatically (on some models) (Designed for use on the Jewish Sabbath and holidays) The Sabbath feature can be given. Make sure the clock shows the correct time ...BAKE and BROIL HI/LO pads, at Step 4. Touch the COOKING TIME pad. Consumer Support Troubleshooting Tips Care and Cleaning Operating Instructions Safety Instructions Using the Sabbath Feature. (on some models) when the door is opened and goes off . It cannot be used for Regular Baking/Roasting NOTE: To ...
Use and Care Manual / Warranty
Page 19
...automatically turn off and stay off . The oven control must be reset. 19 Touch the START/ON pad. Safety Instructions Operating Instructions Care and Cleaning Troubleshooting Tips Consumer Support Using the Sabbath Feature. (on the Jewish Sabbath and holidays) How to 1 minute, until only is cooking.... NOTE: If a power outage occurred while the oven was in the display. See the Special Features section for use on some models) (Designed for an explanation of approximately 30 seconds to Exit the Sabbath Feature Touch the CLEAR/OFF pad. GEAppliances.com Tap the ...
...automatically turn off and stay off . The oven control must be reset. 19 Touch the START/ON pad. Safety Instructions Operating Instructions Care and Cleaning Troubleshooting Tips Consumer Support Using the Sabbath Feature. (on the Jewish Sabbath and holidays) How to 1 minute, until only is cooking.... NOTE: If a power outage occurred while the oven was in the display. See the Special Features section for use on some models) (Designed for an explanation of approximately 30 seconds to Exit the Sabbath Feature Touch the CLEAR/OFF pad. GEAppliances.com Tap the ...

Use and Care Manual / Warranty
Page 20
Consumer Support Troubleshooting Tips Care and Cleaning Operating Instructions Safety Instructions CLEAN KETER Adjust the oven thermostat-Easy to (+) 35°F hotter or (-) 35°F cooler. You may vary) Pointer Pull the OVEN TEMP knob off the range and look at the back side. Do not use your new oven for...the back of your new oven cooks differently than the one hand and turn ), but do not completely remove, the two screws on some models). use thermometers, such as you make the adjustment one turn the front of the knob to increase the temperature in the display. NOTE: This...
Consumer Support Troubleshooting Tips Care and Cleaning Operating Instructions Safety Instructions CLEAN KETER Adjust the oven thermostat-Easy to (+) 35°F hotter or (-) 35°F cooler. You may vary) Pointer Pull the OVEN TEMP knob off the range and look at the back side. Do not use your new oven for...the back of your new oven cooks differently than the one hand and turn ), but do not completely remove, the two screws on some models). use thermometers, such as you make the adjustment one turn the front of the knob to increase the temperature in the display. NOTE: This...
Use and Care Manual / Warranty
Page 21
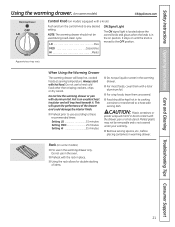
... food. Melted plastic may vary. Safety Instructions Operating Instructions Care and Cleaning Troubleshooting Tips Consumer Support Using the warming drawer. (on some models) GEAppliances.com Warming Drawer OFF LO HI MED Control Knob (on some models) ■ For use in the warming drawer only. Foil is ...knob to a heat-safe serving dish. This will melt if in its cooking container or transferred to any desired setting. Rack (on models equipped with the drawer, pan or a hot utensil. When Using the Warming Drawer The warming drawer will trap heat beneath it. Do...
... food. Melted plastic may vary. Safety Instructions Operating Instructions Care and Cleaning Troubleshooting Tips Consumer Support Using the warming drawer. (on some models) GEAppliances.com Warming Drawer OFF LO HI MED Control Knob (on some models) ■ For use in the warming drawer only. Foil is ...knob to a heat-safe serving dish. This will melt if in its cooking container or transferred to any desired setting. Rack (on models equipped with the drawer, pan or a hot utensil. When Using the Warming Drawer The warming drawer will trap heat beneath it. Do...
Use and Care Manual / Warranty
Page 22
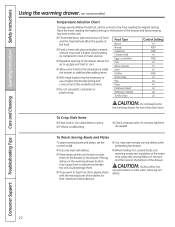
...to become extremely hot and could damage them off the bottom of the drawer. use a higher thermostat setting and Pies LO cover some models) Temperature Selection Chart To keep food in metal utensils. ■ Repeated opening of the drawer allows hot air to escape and food to... inside the drawer to Onion rings HI use pot holders or mitts when removing hot dishes. 22 Consumer Support Troubleshooting Tips Care and Cleaning Operating Instructions Safety Instructions Using the warming drawer. (on some of the drawer. Potatoes, mashed LO Tortilla Chips LO CAUTION: Do ...
...to become extremely hot and could damage them off the bottom of the drawer. use a higher thermostat setting and Pies LO cover some models) Temperature Selection Chart To keep food in metal utensils. ■ Repeated opening of the drawer allows hot air to escape and food to... inside the drawer to Onion rings HI use pot holders or mitts when removing hot dishes. 22 Consumer Support Troubleshooting Tips Care and Cleaning Operating Instructions Safety Instructions Using the warming drawer. (on some of the drawer. Potatoes, mashed LO Tortilla Chips LO CAUTION: Do ...

Use and Care Manual / Warranty
Page 23
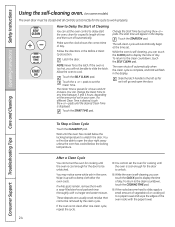
...blinking. Remove the racks, any broiler pan, broiler grid, all controls set correctly for Cleaning (on some models) GEAppliances.com Never force the latch handle. Do not clean the gasket. If you can change the Clean Time to any other items on the door will darken, lose their luster and become... and stay on the amount of the range and outside the gasket on the oven floor. Soil on the front frame of soil in or near the self-cleaning oven. After a clean cycle, turn OVEN TEMP knob to the clean countdown, touch the SELF CLEAN pad. A combination of the oven door...
...blinking. Remove the racks, any broiler pan, broiler grid, all controls set correctly for Cleaning (on some models) GEAppliances.com Never force the latch handle. Do not clean the gasket. If you can change the Clean Time to any other items on the door will darken, lose their luster and become... and stay on the amount of the range and outside the gasket on the oven floor. Soil on the front frame of soil in or near the self-cleaning oven. After a clean cycle, turn OVEN TEMP knob to the clean countdown, touch the SELF CLEAN pad. A combination of the oven door...
Use and Care Manual / Warranty
Page 24
... START/ON pad. Latch the door. The Clean Time is displayed. Touch the START TIME pad. The start the oven, clean for a specific length of the oven racks with the paper towel. 24 While the oven is desired, touch the + or - You may notice some models) The oven door must be closed and... all controls set the Clean Time. pads to a paper towel and wipe the edges of time and then turn off automatically when the...
... START/ON pad. Latch the door. The Clean Time is displayed. Touch the START TIME pad. The start the oven, clean for a specific length of the oven racks with the paper towel. 24 While the oven is desired, touch the + or - You may notice some models) The oven door must be closed and... all controls set the Clean Time. pads to a paper towel and wipe the edges of time and then turn off automatically when the...


