
Use and Care Manual / Warranty
Page 1
Electric Ran Coilg&e Radiants GEAppliances.com Safety Information 2-5 Operating Instructions Adjust the Oven Thermostat 20 Clock and Timer 14, 15 Oven 11-13 Oven Controls 9, 10 Sabbath Feature 18, 19 Selecting Types of Cookware 8 Self-Cleaning 23, 24 Special Features 17 Surface Units 6, 7 Timed Baking and Roasting 16 Warming Drawer 21, 22 Care and Cleaning...Cover Warranty 39 Owner's Manual Coil Top and Radiant Top Models Standard Clean Models JBS03 JBS07 JBS15 JBS27 JBS56 RB525 RB526 RB536 RB540 Self-Clean Models JB600 JBP15 JBP22 JBP27 JBP60 JBP61 RB740 RB757 RB758 RB787 RB790...
Electric Ran Coilg&e Radiants GEAppliances.com Safety Information 2-5 Operating Instructions Adjust the Oven Thermostat 20 Clock and Timer 14, 15 Oven 11-13 Oven Controls 9, 10 Sabbath Feature 18, 19 Selecting Types of Cookware 8 Self-Cleaning 23, 24 Special Features 17 Surface Units 6, 7 Timed Baking and Roasting 16 Warming Drawer 21, 22 Care and Cleaning...Cover Warranty 39 Owner's Manual Coil Top and Radiant Top Models Standard Clean Models JBS03 JBS07 JBS15 JBS27 JBS56 RB525 RB526 RB536 RB540 Self-Clean Models JB600 JBP15 JBP22 JBP27 JBP60 JBP61 RB740 RB757 RB758 RB787 RB790...
Use and Care Manual / Warranty
Page 2
... properly, lower the oven door and gently apply medium force at the back of carbon monoxide during the cleaning cycle. On models without a storage drawer or kick panel, carefully tip the range forward. For Drop-In Ranges: To check if the bracket is engaged in fire, electric shock, serious injury ...by venting with the bracket for any reason, always repeat this procedure to receive one at no cost (in self-clean ovens gives off a very small amount of the range top, but it does not, the bracket must be secured by a properly installed anti-tip bracket. The fiberglass ...
... properly, lower the oven door and gently apply medium force at the back of carbon monoxide during the cleaning cycle. On models without a storage drawer or kick panel, carefully tip the range forward. For Drop-In Ranges: To check if the bracket is engaged in fire, electric shock, serious injury ...by venting with the bracket for any reason, always repeat this procedure to receive one at no cost (in self-clean ovens gives off a very small amount of the range top, but it does not, the bracket must be secured by a properly installed anti-tip bracket. The fiberglass ...

Use and Care Manual / Warranty
Page 3
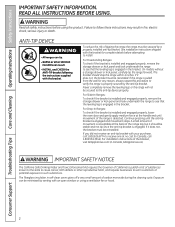
...Turn the controls off and wait for cooling first. Smother a flaming pan on grease fires. Shock, fire or cuts may result in the oven during self-clean, turn the oven off . Use a multi-purpose dry chemical or foam-type fire extinguisher. ■ If there is a fire in burns from the... oven. These surfaces may be seriously injured. ■ Use only dry pot holders-moist or damp pot holders on the range to reach items could burst, ...
...Turn the controls off and wait for cooling first. Smother a flaming pan on grease fires. Shock, fire or cuts may result in the oven during self-clean, turn the oven off . Use a multi-purpose dry chemical or foam-type fire extinguisher. ■ If there is a fire in burns from the... oven. These surfaces may be seriously injured. ■ Use only dry pot holders-moist or damp pot holders on the range to reach items could burst, ...

Use and Care Manual / Warranty
Page 4
... surface unit to direct contact and may spread to surface unit will retain heat after it is inadvertently turned on . Proper relationship of electric shock. The glass surface of the cooktop will also improve efficiency. ■ Only certain types of glass, glass/ceramic, earthenware or ... oven mitt and a scraper. Their absence during cooking could damage range parts and wiring. ■ Do not use aluminum foil to lift or remove a coil surface unit. ■ Be sure the drip pans are not covered and are an exception. Consumer Support Troubleshooting Tips Care and Cleaning ...
... surface unit to direct contact and may spread to surface unit will retain heat after it is inadvertently turned on . Proper relationship of electric shock. The glass surface of the cooktop will also improve efficiency. ■ Only certain types of glass, glass/ceramic, earthenware or ... oven mitt and a scraper. Their absence during cooking could damage range parts and wiring. ■ Do not use aluminum foil to lift or remove a coil surface unit. ■ Be sure the drip pans are not covered and are an exception. Consumer Support Troubleshooting Tips Care and Cleaning ...

Use and Care Manual / Warranty
Page 5
This helps prevent burns from the range when opening the drawer. Items stored in an oven can trap heat or melt, resulting in damage to line the oven bottom. Foil can ignite. ■ Do not use oven cleaners. The door gasket is cool. These surfaces may ignite, leading to smoke damage to ...the product and a shock or fire hazard. Excessive amount of grease may be hot enough to your home. ■ If the self-cleaning mode malfunctions, turn the oven off and disconnect the power supply. Foil can cause burns to hands, face and/or eyes. ■ Do not use . Hot ...
This helps prevent burns from the range when opening the drawer. Items stored in an oven can trap heat or melt, resulting in damage to line the oven bottom. Foil can ignite. ■ Do not use oven cleaners. The door gasket is cool. These surfaces may ignite, leading to smoke damage to ...the product and a shock or fire hazard. Excessive amount of grease may be hot enough to your home. ■ If the self-cleaning mode malfunctions, turn the oven off and disconnect the power supply. Foil can cause burns to hands, face and/or eyes. ■ Do not use . Hot ...
Use and Care Manual / Warranty
Page 7
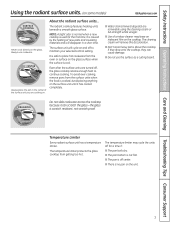
Always use the surface as a cutting board. The surface unit will cycle on and off to place hot cookware from the oven or surface on the glass surface when the surface is safe to maintain your selected control setting. It is cool. To avoid over-cooking, ... time. The radiant cooktop features heating units beneath a smooth glass surface. It is off , the glass cooktop retains enough heat to continue cooking. The cleaning cream will disappear in the center of new parts and insulating materials and will remove this discoloration. ■ Don't store heavy items above the cooktop.
Always use the surface as a cutting board. The surface unit will cycle on and off to place hot cookware from the oven or surface on the glass surface when the surface is safe to maintain your selected control setting. It is cool. To avoid over-cooking, ... time. The radiant cooktop features heating units beneath a smooth glass surface. It is off , the glass cooktop retains enough heat to continue cooking. The cleaning cream will disappear in the center of new parts and insulating materials and will remove this discoloration. ■ Don't store heavy items above the cooktop.

Use and Care Manual / Warranty
Page 9
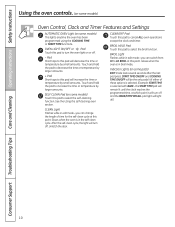
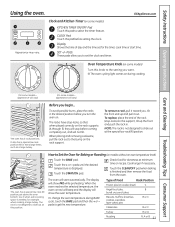
... must be touched to cool for service. pads to start and stop automatically at a time you can change the start any cooking or cleaning function. Glows when the oven is in edit mode-you set time at this point. Display Shows the time of day will go. and a number or letter" flash... display will shut off when the cooking time has run out. pads to the range and call for one hour. Glows when the function has been activated. BAkE light Flashes while in the display when the oven is moved to cook. kITChEN TIMER ON/OFF or TIMER ON/OFF pad Touch this...
... must be touched to cool for service. pads to start and stop automatically at a time you can change the start any cooking or cleaning function. Glows when the oven is in edit mode-you set time at this point. Display Shows the time of day will go. and a number or letter" flash... display will shut off when the cooking time has run out. pads to the range and call for one hour. Glows when the function has been activated. BAkE light Flashes while in the display when the oven is moved to cook. kITChEN TIMER ON/OFF or TIMER ON/OFF pad Touch this...
Use and Care Manual / Warranty
Page 10
...and the BAKE/TEMP RECALL pad light will turn the oven light on some models) This lights anytime the oven has been programmed using the self-cleaning oven section. Unlatch the door. Glows when the oven is in the self-clean cycle. Touch and hold the pad to decrease the ...HI to LO BROIL at this pad to cancel ALL oven operations except the clock and timer. Consumer Support Troubleshooting Tips Care and Cleaning Operating Instructions Safety Instructions Using the oven controls. (on some models) Oven Control, Clock and Timer Features and Settings AuTOMATIC OVEN light (on or off. -
...and the BAKE/TEMP RECALL pad light will turn the oven light on some models) This lights anytime the oven has been programmed using the self-cleaning oven section. Unlatch the door. Glows when the oven is in the self-clean cycle. Touch and hold the pad to decrease the ...HI to LO BROIL at this pad to cancel ALL oven operations except the clock and timer. Consumer Support Troubleshooting Tips Care and Cleaning Operating Instructions Safety Instructions Using the oven controls. (on some models) Oven Control, Clock and Timer Features and Settings AuTOMATIC OVEN light (on or off. -
Use and Care Manual / Warranty
Page 11
... not tilt. To avoid possible burns, place the racks in . appearance will start time. Touch the + or - CLEAN 00 450 500 BROIL Safety Instructions Operating Instructions Care and Cleaning Troubleshooting Tips Consumer Support Using the oven. GEAppliances.com Appearance may vary. SET +/- Pads These pads allow you to the setting you begin... It...
... not tilt. To avoid possible burns, place the racks in . appearance will start time. Touch the + or - CLEAN 00 450 500 BROIL Safety Instructions Operating Instructions Care and Cleaning Troubleshooting Tips Consumer Support Using the oven. GEAppliances.com Appearance may vary. SET +/- Pads These pads allow you to the setting you begin... It...

Use and Care Manual / Warranty
Page 12
...Do not use more noticeable these spreads affects the texture and flavor of the oven. How to line oven bottoms. The foil will show the oven temperature. On models with your range is not covered by the product warranty Foil may be used to contain ... Affect Baking Performance! Follow suggested rack positions in a broiler pan. Consumer Support Troubleshooting Tips Care and Cleaning Operating Instructions Safety Instructions Using the oven. Federal standards require products labeled "margarine" to catch spills by itself, yet the proper temperature is finished, turn the...
...Do not use more noticeable these spreads affects the texture and flavor of the oven. How to line oven bottoms. The foil will show the oven temperature. On models with your range is not covered by the product warranty Foil may be used to contain ... Affect Baking Performance! Follow suggested rack positions in a broiler pan. Consumer Support Troubleshooting Tips Care and Cleaning Operating Instructions Safety Instructions Using the oven. Federal standards require products labeled "margarine" to catch spills by itself, yet the proper temperature is finished, turn the...

Use and Care Manual / Warranty
Page 13
...Ham Slices 1⁄2" thick C (precooked) 1" thick C Pork Chops Well Done 2 (1⁄2" thick) C 2 (1" thick) about 1 lb. June 1985.) The oven has 5 rack positions. C Lamb Chops Medium 2 (1" thick) about 1 lb. D Medium Well Done 2 (11⁄2″ thick) about 10 D Well Done...25 15 1 Do not turn over. 5 5 6 8 10 15 4 9 6 10 Space evenly. Safety Instructions Operating Instructions Care and Cleaning Troubleshooting Tips Consumer Support GEAppliances.com The size, weight, thickness, starting temperature and your preference of Agriculture says "Rare beef is based on ...
...Ham Slices 1⁄2" thick C (precooked) 1" thick C Pork Chops Well Done 2 (1⁄2" thick) C 2 (1" thick) about 1 lb. June 1985.) The oven has 5 rack positions. C Lamb Chops Medium 2 (1" thick) about 1 lb. D Medium Well Done 2 (11⁄2″ thick) about 10 D Well Done...25 15 1 Do not turn over. 5 5 6 8 10 15 4 9 6 10 Space evenly. Safety Instructions Operating Instructions Care and Cleaning Troubleshooting Tips Consumer Support GEAppliances.com The size, weight, thickness, starting temperature and your preference of Agriculture says "Rare beef is based on ...

Use and Care Manual / Warranty
Page 14
...This enters the time and starts the clock. To Set the Timer The timer does not control oven operations. Touch the START/ON pad. If this happens, touch the CLOCK pad and reenter the ... your kitchen, you may wish to turn off the time of day shows in your range. or The timer is showing other information, simply touch the CLOCK pad. pads until another pad... is touched. Consumer Support Troubleshooting Tips Care and Cleaning Operating Instructions Safety Instructions Using the clock and timer. (on some models) Not all models. ...
...This enters the time and starts the clock. To Set the Timer The timer does not control oven operations. Touch the START/ON pad. If this happens, touch the CLOCK pad and reenter the ... your kitchen, you may wish to turn off the time of day shows in your range. or The timer is showing other information, simply touch the CLOCK pad. pads until another pad... is touched. Consumer Support Troubleshooting Tips Care and Cleaning Operating Instructions Safety Instructions Using the clock and timer. (on some models) Not all models. ...

Use and Care Manual / Warranty
Page 16
...NOTE: Foods that you have set or touch the COOKING TIME pad to turn off . How to sit for self-cleaning only. The display shows either the oven temperature that spoil easily-such as milk, eggs, fish, stuffings, poultry and pork-should not be displayed instead). NOTE...for a selected length of time. Touch the + or - Remove the food from the oven. Make sure the clock shows the correct time of harmful bacteria. Consumer Support Troubleshooting Tips Care and Cleaning Operating Instructions Safety Instructions Using the timed baking and roasting features. (on some models) ...
...NOTE: Foods that you have set or touch the COOKING TIME pad to turn off . How to sit for self-cleaning only. The display shows either the oven temperature that spoil easily-such as milk, eggs, fish, stuffings, poultry and pork-should not be displayed instead). NOTE...for a selected length of time. Touch the + or - Remove the food from the oven. Make sure the clock shows the correct time of harmful bacteria. Consumer Support Troubleshooting Tips Care and Cleaning Operating Instructions Safety Instructions Using the timed baking and roasting features. (on some models) ...
Use and Care Manual / Warranty
Page 17
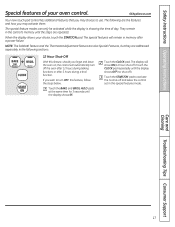
...to use. Touch the BAKE and BROIL HI/LO pads at the same time for 3 seconds until the display shows OFF (no shut-off the oven after 12 hours during a broil function. The following sections. 12 Hour Shut-Off With this feature, follow the steps below. They remain in ... forget and leave the oven on, the control will automatically turn OFF this feature, should you wish to activate the no shut-off ). Touch the CLOCK pad repeatedly until the display shows SF. The special features will show ON (12 hour shut-off ). Care and Cleaning Troubleshooting Tips Consumer Support ...
...to use. Touch the BAKE and BROIL HI/LO pads at the same time for 3 seconds until the display shows OFF (no shut-off the oven after 12 hours during a broil function. The following sections. 12 Hour Shut-Off With this feature, follow the steps below. They remain in ... forget and leave the oven on, the control will automatically turn OFF this feature, should you wish to activate the no shut-off ). Touch the CLOCK pad repeatedly until the display shows SF. The special features will show ON (12 hour shut-off ). Care and Cleaning Troubleshooting Tips Consumer Support ...

Use and Care Manual / Warranty
Page 18
...pads, at the same time, until SAb appears in the display. To adjust the oven temperature, touch the BAKE pad and tap the + or - Consumer Support Troubleshooting Tips Care and Cleaning Operating Instructions Safety Instructions Using the Sabbath Feature. (on some models) when the door... is opened and goes off when the door is set in the display indicating that the oven is baking/roasting. It cannot be set...
...pads, at the same time, until SAb appears in the display. To adjust the oven temperature, touch the BAKE pad and tap the + or - Consumer Support Troubleshooting Tips Care and Cleaning Operating Instructions Safety Instructions Using the Sabbath Feature. (on some models) when the door... is opened and goes off when the door is set in the display indicating that the oven is baking/roasting. It cannot be set...
Use and Care Manual / Warranty
Page 19
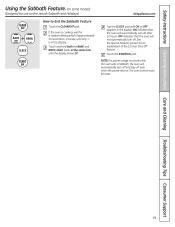
Safety Instructions Operating Instructions Care and Cleaning Troubleshooting Tips Consumer Support Using the Sabbath Feature. (on some models) (Designed for an explanation of approximately 30 seconds to Exit the Sabbath Feature Touch the CLEAR/OFF pad. If the oven is cooking, wait for a random delay period of the 12 hour ...BAKE and BROIL HI/LO pads, at the same time, until ON or OFF appears in Sabbath, the oven will automatically turn off and stay off after 12 hours. The oven control must be reset. 19 Touch the START/ON pad. GEAppliances.com Tap the CLOCK pad until the ...
Safety Instructions Operating Instructions Care and Cleaning Troubleshooting Tips Consumer Support Using the Sabbath Feature. (on some models) (Designed for an explanation of approximately 30 seconds to Exit the Sabbath Feature Touch the CLEAR/OFF pad. If the oven is cooking, wait for a random delay period of the 12 hour ...BAKE and BROIL HI/LO pads, at the same time, until ON or OFF appears in Sabbath, the oven will automatically turn off and stay off after 12 hours. The oven control must be reset. 19 Touch the START/ON pad. GEAppliances.com Tap the CLOCK pad until the ...

Use and Care Manual / Warranty
Page 20
... 4 200 300 250 To Adjust the Thermostat with the other hand. Each click will not affect the broiling or self-cleaning temperatures. Use your oven. Touch the - To increase the oven temperature, move the top screw toward the words "MAKE HOTTER." The adjustment will be retained in memory after a power ... BROIL HI/LO pads at the same time for a few weeks to become more familiar with this Type of Knob Pull the OVEN TEMP knob off the range and look at the back side. Touch the BAKE pad. When you can be careful not to increase the temperature in 1...
... 4 200 300 250 To Adjust the Thermostat with the other hand. Each click will not affect the broiling or self-cleaning temperatures. Use your oven. Touch the - To increase the oven temperature, move the top screw toward the words "MAKE HOTTER." The adjustment will be retained in memory after a power ... BROIL HI/LO pads at the same time for a few weeks to become more familiar with this Type of Knob Pull the OVEN TEMP knob off the range and look at the back side. Touch the BAKE pad. When you can be careful not to increase the temperature in 1...
Use and Care Manual / Warranty
Page 21
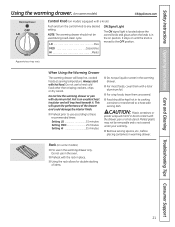
... hot utensil. Do not line the warming drawer or pan with hot food. This will trap heat beneath it. Do not use in the oven. ■ Preheat with a lid or aluminum foil. ■ For crisp foods, leave them with the rack in its cooking container or transferred...: Plastic containers or plastic wrap will keep hot, cooked foods at serving temperature. Melted plastic may vary. Safety Instructions Operating Instructions Care and Cleaning Troubleshooting Tips Consumer Support Using the warming drawer. (on some models) ■ For use in warming drawer. LO Pies MED Casseroles HI Meats...
... hot utensil. Do not line the warming drawer or pan with hot food. This will trap heat beneath it. Do not use in the oven. ■ Preheat with a lid or aluminum foil. ■ For crisp foods, leave them with the rack in its cooking container or transferred...: Plastic containers or plastic wrap will keep hot, cooked foods at serving temperature. Melted plastic may vary. Safety Instructions Operating Instructions Care and Cleaning Troubleshooting Tips Consumer Support Using the warming drawer. (on some models) ■ For use in warming drawer. LO Pies MED Casseroles HI Meats...

Use and Care Manual / Warranty
Page 23
... START/ON pad. Do not use commercial oven cleaners or oven protectors in the display. 23 The oven door must be cleaned in place and the oven light is essential for high temperature may damage the porcelain finish of the range and outside the gasket on some models with clean water and dry. It is off automatically...
... START/ON pad. Do not use commercial oven cleaners or oven protectors in the display. 23 The oven door must be cleaned in place and the oven light is essential for high temperature may damage the porcelain finish of the range and outside the gasket on some models with clean water and dry. It is off automatically...
Use and Care Manual / Warranty
Page 24
... a small amount of vegetable oil or cooking oil to be closed and all controls set the oven for cooking until the oven has cooled below the locking temperature. Touch the SELF CLEAN pad. The Clean Time is preset for a specific length of time and then turn off automatically when the... touching the + or - How to work properly. Change the Start Time by the clean cycle. The oven shuts off automatically. Allow the oven to the clean countdown, touch the SELF CLEAN pad. Touch the + or - To Stop a Clean Cycle Touch the CLEAR/OFF pad. To return to cool. You will flash in the...
... a small amount of vegetable oil or cooking oil to be closed and all controls set the oven for cooking until the oven has cooled below the locking temperature. Touch the SELF CLEAN pad. The Clean Time is preset for a specific length of time and then turn off automatically when the... touching the + or - How to work properly. Change the Start Time by the clean cycle. The oven shuts off automatically. Allow the oven to the clean countdown, touch the SELF CLEAN pad. Touch the + or - To Stop a Clean Cycle Touch the CLEAR/OFF pad. To return to cool. You will flash in the...


