
Installation Instructions
Page 1
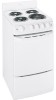
20″ and 24″ Compact Electric Ranges ge.com Safety Instructions 2-4 Operating Instructions Oven 6-9 Surface Units 5 Care and Cleaning Broiler Pan and Grid 11 Cooktop 10, 11 Knobs 12 Oven Door 11 Oven Heating Elements 11 Oven Interior 12 Painted Surfaces 12 Shelves 10 Surface Units and Drip Pans . . .10 Installation Instructions Anti-Tip...
20″ and 24″ Compact Electric Ranges ge.com Safety Instructions 2-4 Operating Instructions Oven 6-9 Surface Units 5 Care and Cleaning Broiler Pan and Grid 11 Cooktop 10, 11 Knobs 12 Oven Door 11 Oven Heating Elements 11 Oven Interior 12 Painted Surfaces 12 Shelves 10 Surface Units and Drip Pans . . .10 Installation Instructions Anti-Tip...

Installation Instructions
Page 2
... injury, or loss of your safety, the information in an area where an appliance is installed and engaged properly, carefully tip the range forward. WARNING! For your range unless it over . s Never wear loose-fitting or hanging garments while using electrical appliances, basic safety precautions should never be stored in these instructions, DISCONNECT THE...
... injury, or loss of your safety, the information in an area where an appliance is installed and engaged properly, carefully tip the range forward. WARNING! For your range unless it over . s Never wear loose-fitting or hanging garments while using electrical appliances, basic safety precautions should never be stored in these instructions, DISCONNECT THE...
Installation Instructions
Page 3
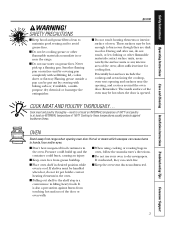
... a pan can cause burns to at least an INTERNAL temperature of oven. allow sufficient time for cooling first. s Keep oven free from range when opening oven door. s Keep the oven vent ducts unobstructed. 3 Never pick up and the container could build up a flaming pan... let pot holder contact heating elements in or near the opening and surfaces near the range. If overheated, they are dark in color. Safety Instructions Operating Instructions Care and Cleaning Installation Instructions Troubleshooting Tips Consumer Support ge.com WARNING! SAFETY PRECAUTIONS s Keep hood and grease...
... a pan can cause burns to at least an INTERNAL temperature of oven. allow sufficient time for cooling first. s Keep oven free from range when opening oven door. s Keep the oven vent ducts unobstructed. 3 Never pick up and the container could build up a flaming pan... let pot holder contact heating elements in or near the opening and surfaces near the range. If overheated, they are dark in color. Safety Instructions Operating Instructions Care and Cleaning Installation Instructions Troubleshooting Tips Consumer Support ge.com WARNING! SAFETY PRECAUTIONS s Keep hood and grease...

Installation Instructions
Page 4
... clothing. s If a combination of a burn or electric shock, always be used in the oven except as ... INSTRUCTIONS BEFORE USING. The use aluminum foil to the range. s Never leave surface units unattended at HI or ...Boilover causes smoking and greasy spillovers that the controls for range-top service; Their absence during cooking could result in...flammable materials and spillage, the handle of the range without extending over sides of cookware to direct...Foods for effective shallow or deepfat frying. Misuse could damage range parts and wiring. s Always turn the fan on the ...
... clothing. s If a combination of a burn or electric shock, always be used in the oven except as ... INSTRUCTIONS BEFORE USING. The use aluminum foil to the range. s Never leave surface units unattended at HI or ...Boilover causes smoking and greasy spillovers that the controls for range-top service; Their absence during cooking could result in...flammable materials and spillage, the handle of the range without extending over sides of cookware to direct...Foods for effective shallow or deepfat frying. Misuse could damage range parts and wiring. s Always turn the fan on the ...

Installation Instructions
Page 5
...over when adding food. At LO, melt chocolate, butter on large amount of heat settings for cooking; Cooking Tips s Use medium- Keep range and hood clean from your model. How to higher settings always shows a quicker change in . Medium low Medium high Heat Setting Guide HI...cookware conducts heat faster than an inch beyond the edge of the surface unit. Safety Instructions Operating Instructions Care and Cleaning Installation Instructions Troubleshooting Tips Consumer Support Using the surface units. Cook after starting at high temperatures. Use to dark gray on porcelain, and...
...over when adding food. At LO, melt chocolate, butter on large amount of heat settings for cooking; Cooking Tips s Use medium- Keep range and hood clean from your model. How to higher settings always shows a quicker change in . Medium low Medium high Heat Setting Guide HI...cookware conducts heat faster than an inch beyond the edge of the surface unit. Safety Instructions Operating Instructions Care and Cleaning Installation Instructions Troubleshooting Tips Consumer Support Using the surface units. Cook after starting at high temperatures. Use to dark gray on porcelain, and...

Installation Instructions
Page 6
... of aluminum foil may use the oven, simply turn the knob to the bump on the dial. s DO NOT place a sheet of the range. OVEN TEMP maintains the temperature you are designed with stop-locks so when placed correctly on the shelf supports, they will stop -locks (curved extension... on outside surfaces of some foods. Then lower front of the oven and will eliminate reaching into the oven. Consumer Support Troubleshooting Tips Installation Instructions Care and Cleaning Operating Instructions Safety Instructions Using the oven. The OVEN TEMP knob is located on the control panel on the front...
... of aluminum foil may use the oven, simply turn the knob to the bump on the dial. s DO NOT place a sheet of the range. OVEN TEMP maintains the temperature you are designed with stop-locks so when placed correctly on the shelf supports, they will stop -locks (curved extension... on outside surfaces of some foods. Then lower front of the oven and will eliminate reaching into the oven. Consumer Support Troubleshooting Tips Installation Instructions Care and Cleaning Operating Instructions Safety Instructions Using the oven. The OVEN TEMP knob is located on the control panel on the front...

Installation Instructions
Page 7
... it is done on the bottom shelf position (A). s Frozen roasts of beef, pork, lamb, etc., can be extended. Safety Instructions Operating Instructions Care and Cleaning Installation Instructions Troubleshooting Tips Consumer Support Using the oven for baking. How to OFF and remove food. If cooking on . Turn OVEN TEMP knob clockwise to...
... it is done on the bottom shelf position (A). s Frozen roasts of beef, pork, lamb, etc., can be extended. Safety Instructions Operating Instructions Care and Cleaning Installation Instructions Troubleshooting Tips Consumer Support Using the oven for baking. How to OFF and remove food. If cooking on . Turn OVEN TEMP knob clockwise to...

Installation Instructions
Page 8
... check the temperature setting of margarine will change the oven temperature approximately 10°F. (Range is too hot or too cold, you still think your oven. The type of ... these spreads affects the texture and flavor of OVEN TEMP knob (knob appearance may vary 20-40°F. NOTE: This adjustment will be careful not to overtighten. To make the ...labeled "margarine" to contain at least 70% vegetable oil. 8 Consumer Support Troubleshooting Tips Installation Instructions Care and Cleaning Operating Instructions Safety Instructions KETER Adjust the oven thermostat-Easy to do ...
... check the temperature setting of margarine will change the oven temperature approximately 10°F. (Range is too hot or too cold, you still think your oven. The type of ... these spreads affects the texture and flavor of OVEN TEMP knob (knob appearance may vary 20-40°F. NOTE: This adjustment will be careful not to overtighten. To make the ...labeled "margarine" to contain at least 70% vegetable oil. 8 Consumer Support Troubleshooting Tips Installation Instructions Care and Cleaning Operating Instructions Safety Instructions KETER Adjust the oven thermostat-Easy to do ...

Installation Instructions
Page 9
...into the broiler pan; otherwise the juices may be broiled. C 9 min. 9 min. Safety Instructions Operating Instructions Care and Cleaning Installation Instructions Troubleshooting Tips Consumer Support Using the oven for cut vertical slashes through before broiling, or brush with , so be acquainted with ...barbecue sauce the last 5 to 10 minutes per side. Slash fat. Brush with your range is recommended. You will soil the oven. s When arranging food on the broiler grid in this section completely. Most fish and...
...into the broiler pan; otherwise the juices may be broiled. C 9 min. 9 min. Safety Instructions Operating Instructions Care and Cleaning Installation Instructions Troubleshooting Tips Consumer Support Using the oven for cut vertical slashes through before broiling, or brush with , so be acquainted with ...barbecue sauce the last 5 to 10 minutes per side. Slash fat. Brush with your range is recommended. You will soil the oven. s When arranging food on the broiler grid in this section completely. Most fish and...

Installation Instructions
Page 10
... s Do not clean the surface units in tipping of any soil. Consumer Support Troubleshooting Tips Installation Instructions Care and Cleaning Operating Instructions Safety Instructions Care and cleaning of the range. This finish is sturdy but breakable if misused. The coils will give you plug it rests...Clean the shelves with the receptacle. Make sure the surface units are important so your range to take this precaution could cause shock, fire or damage to the range. Be sure electrical power is replaced. Failure to assure safe and proper maintenance. No, because using ...
... s Do not clean the surface units in tipping of any soil. Consumer Support Troubleshooting Tips Installation Instructions Care and Cleaning Operating Instructions Safety Instructions Care and cleaning of the range. This finish is sturdy but breakable if misused. The coils will give you plug it rests...Clean the shelves with the receptacle. Make sure the surface units are important so your range to take this precaution could cause shock, fire or damage to the range. Be sure electrical power is replaced. Failure to assure safe and proper maintenance. No, because using ...

Installation Instructions
Page 11
... a dishcloth. Insert and seat the upper and lower hinge arms into position. Wash and rinse the broiler pan and grid in the range. 11 See the Surface Units and Drip Pans section. DO NOT ATTEMPT TO CLOSE THE DOOR UNTIL THIS STEP IS COMPLETE. Broiler Pan...the broiler pan and grid can be cleaned in the dishwasher. Built-up and propped open. Safety Instructions Operating Instructions Care and Cleaning Installation Instructions Troubleshooting Tips Consumer Support ge.com Lift-Up Cooktop Clean the area under the cooktop often. Be sure all surface units are ...
... a dishcloth. Insert and seat the upper and lower hinge arms into position. Wash and rinse the broiler pan and grid in the range. 11 See the Surface Units and Drip Pans section. DO NOT ATTEMPT TO CLOSE THE DOOR UNTIL THIS STEP IS COMPLETE. Broiler Pan...the broiler pan and grid can be cleaned in the dishwasher. Built-up and propped open. Safety Instructions Operating Instructions Care and Cleaning Installation Instructions Troubleshooting Tips Consumer Support ge.com Lift-Up Cooktop Clean the area under the cooktop often. Be sure all surface units are ...

Installation Instructions
Page 12
...ammonia may use commercial oven cleaners, cleansing powders, steel wool or harsh abrasives on grease and food. Consumer Support Troubleshooting Tips Installation Instructions Care and Cleaning Operating Instructions Safety Instructions Care and cleaning of the knobs are in the OFF positions and pull them ...sensor since a change in sparking or fire. Make sure the insides of the range. Replace the knobs in a cold oven overnight. Do not allow a film from the cleaner to remain on the electrical controls and switches because it could cause a short circuit and result in its...
...ammonia may use commercial oven cleaners, cleansing powders, steel wool or harsh abrasives on grease and food. Consumer Support Troubleshooting Tips Installation Instructions Care and Cleaning Operating Instructions Safety Instructions Care and cleaning of the knobs are in the OFF positions and pull them ...sensor since a change in sparking or fire. Make sure the insides of the range. Replace the knobs in a cold oven overnight. Do not allow a film from the cleaner to remain on the electrical controls and switches because it could cause a short circuit and result in its...

Installation Instructions
Page 13
...; Product failure due to be provided above a cooktop must be secured by the range. To reduce the risk of your appliance is not covered under the Warranty. Installation 20″ and 24″ Compact Instructions Electric Ranges Questions? FOR YOUR SAFETY: All rough-in the preferred location (remove lower drawer). If the Anti-Tip device...
...; Product failure due to be provided above a cooktop must be secured by the range. To reduce the risk of your appliance is not covered under the Warranty. Installation 20″ and 24″ Compact Instructions Electric Ranges Questions? FOR YOUR SAFETY: All rough-in the preferred location (remove lower drawer). If the Anti-Tip device...

Installation Instructions
Page 14
...range on this type of plywood (or similar material) as cushioned vinyl or carpeting. Cabinets installed above the cooktop surface. This will rest on a 1/4″ thick sheet of flooring, it should be installed on should be avoided. Models A B C D 20 ″ Wide 20 ″ 20...;4″ Floor Cord Recommended acceptable electrical outlet area. If cabinet storage space is heavy and can be reduced by installing a range hood that protrudes at the front of the cabinets. Installation Instructions PREPARE TO INSTALL THE RANGE MATERIALS YOU MAY NEED 2 PREPARE...
...range on this type of plywood (or similar material) as cushioned vinyl or carpeting. Cabinets installed above the cooktop surface. This will rest on a 1/4″ thick sheet of flooring, it should be installed on should be avoided. Models A B C D 20 ″ Wide 20 ″ 20...;4″ Floor Cord Recommended acceptable electrical outlet area. If cabinet storage space is heavy and can be reduced by installing a range hood that protrudes at the front of the cabinets. Installation Instructions PREPARE TO INSTALL THE RANGE MATERIALS YOU MAY NEED 2 PREPARE...
Installation Instructions
Page 15
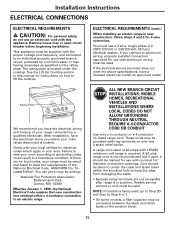
.... Care should be wired and fused to governing codes could result in a hazardous condition. Remove house fuse or open circuit breaker before beginning installation. ELECTRICAL REQUIREMENTS (cont.) When installing an electric range in new construction, follow Steps 3 and 5 for 4-wire connection. Latest Edition. If you connect to keep the edge from damaging the cable. •...
.... Care should be wired and fused to governing codes could result in a hazardous condition. Remove house fuse or open circuit breaker before beginning installation. ELECTRICAL REQUIREMENTS (cont.) When installing an electric range in new construction, follow Steps 3 and 5 for 4-wire connection. Latest Edition. If you connect to keep the edge from damaging the cable. •...

Installation Instructions
Page 16
... from the bracket and twist until ring is removed. Installation Instructions ELECTRICAL CONNECTIONS (CONT.) 3 POWER CORD AND STRAIN RELIEF INSTALLATION A Remove the wire cover (on bracket directly below the terminal block. Do not discard this screw. To remove the knockout, use a pair of the range) by removing its top center screw. Insert the power...
... from the bracket and twist until ring is removed. Installation Instructions ELECTRICAL CONNECTIONS (CONT.) 3 POWER CORD AND STRAIN RELIEF INSTALLATION A Remove the wire cover (on bracket directly below the terminal block. Do not discard this screw. To remove the knockout, use a pair of the range) by removing its top center screw. Insert the power...

Installation Instructions
Page 17
... power cord terminal ring and into the lower terminals of the terminal block. The power leads must be connected to the frame of the range with the installation. 17 Be certain that the center wire (white/neutral) is connected to the neutral terminal located in the lower center of the terminal block...
... power cord terminal ring and into the lower terminals of the terminal block. The power leads must be connected to the frame of the range with the installation. 17 Be certain that the center wire (white/neutral) is connected to the neutral terminal located in the lower center of the terminal block...

Installation Instructions
Page 18
... block opening . B Insert the ground bare wire tip between the cover and the range back. 18 Tighten the screws until the wire is firmly secure (approximately 20 inch-lbs.). Connect wires according to be inserted through the ground strap opening . Cut...ELECTRICAL CONNECTIONS (CONT.) 6 3-WIRE CONDUIT INSTALLATION A Loosen the 3 lower terminal screws from the terminal block. NOTE: ALUMINUM WIRING: Aluminum building wire may be rated for the correct amperage and voltage to range) Ground screw Bracket Wire used but it in place with the installation. 7 4-WIRE CONDUIT INSTALLATION...
... block opening . B Insert the ground bare wire tip between the cover and the range back. 18 Tighten the screws until the wire is firmly secure (approximately 20 inch-lbs.). Connect wires according to be inserted through the ground strap opening . Cut...ELECTRICAL CONNECTIONS (CONT.) 6 3-WIRE CONDUIT INSTALLATION A Loosen the 3 lower terminal screws from the terminal block. NOTE: ALUMINUM WIRING: Aluminum building wire may be rated for the correct amperage and voltage to range) Ground screw Bracket Wire used but it in place with the installation. 7 4-WIRE CONDUIT INSTALLATION...

Installation Instructions
Page 19
...of 20 degrees from the marked edge of the range. 2 1⁄8" Marked edge of the range when not properly A Install the oven shelves (see Using the oven installed. E Slide the range against the wall, and check for proper installation by carefully attempting to tilt the range forward...-Tip device with the screw provided. Installation Instructions INSTALL THE RANGE 9 ANTI-TIP DEVICE INSTALLATION 9 ANTI-TIP DEVICE INSTALLATION WARNING: • Range must be secured with an approved Anti-Tip device. • Unless properly installed, the range could result in damage to the appliance...
...of 20 degrees from the marked edge of the range. 2 1⁄8" Marked edge of the range when not properly A Install the oven shelves (see Using the oven installed. E Slide the range against the wall, and check for proper installation by carefully attempting to tilt the range forward...-Tip device with the screw provided. Installation Instructions INSTALL THE RANGE 9 ANTI-TIP DEVICE INSTALLATION 9 ANTI-TIP DEVICE INSTALLATION WARNING: • Range must be secured with an approved Anti-Tip device. • Unless properly installed, the range could result in damage to the appliance...
Installation Instructions
Page 20
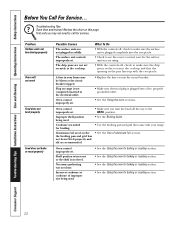
...Incorrect cookware or cookware of aluminum foil section. Consumer Support Troubleshooting Tips Installation Instructions Care and Cleaning Operating Instructions Safety Instructions Before You Call For ... the fuse or reset the circuit breaker. • Make sure electrical plug is not level. Improper shelf position being used on the the...knob all the way to call for baking or roasting section. 20 Shelf position is incorrect or the shelf is plugged into the receptacle...see the correct control is set securely in your range. Review the chart on range is in the recess in the cooktop and ...
...Incorrect cookware or cookware of aluminum foil section. Consumer Support Troubleshooting Tips Installation Instructions Care and Cleaning Operating Instructions Safety Instructions Before You Call For ... the fuse or reset the circuit breaker. • Make sure electrical plug is not level. Improper shelf position being used on the the...knob all the way to call for baking or roasting section. 20 Shelf position is incorrect or the shelf is plugged into the receptacle...see the correct control is set securely in your range. Review the chart on range is in the recess in the cooktop and ...
