Owners Manual
Page 1
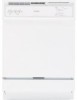
GEAppliances.com Safety Instructions ........ 2-s Operating Instructions Care and Cleaning 14 Control Panels 8 Control Settings 6-7 Dial Cgcles 9 Flashing Display Lights .......... 10 Loading the Dishwasher Racks 12 Loading Place Settings .......... 1B Optional Accessories 14 Using the Dishwasher ........ 10, 11 Troubleshooting Tips ... 15, 16 Consumer Support Consumer Support 18 Warrantg 17 Standard Tub Dishwashers Write the model and serial numbers here: Model # Serial # You can find them on a label on the tub walljust inside the door. 49-55076(3-1...
GEAppliances.com Safety Instructions ........ 2-s Operating Instructions Care and Cleaning 14 Control Panels 8 Control Settings 6-7 Dial Cgcles 9 Flashing Display Lights .......... 10 Loading the Dishwasher Racks 12 Loading Place Settings .......... 1B Optional Accessories 14 Using the Dishwasher ........ 10, 11 Troubleshooting Tips ... 15, 16 Consumer Support Consumer Support 18 Warrantg 17 Standard Tub Dishwashers Write the model and serial numbers here: Model # Serial # You can find them on a label on the tub walljust inside the door. 49-55076(3-1...
Owners Manual
Page 2
... the power supply before attempting any electrical appliance connected to escape. Use care before touching START/RESET to allow them to fill with the heating element and be properly installed and located in this appliance is used . WARNING! HYDROGENGASIS EXPLOSIVE. This simple procedure will cause the dishwasher to run an equipment-grounding conductor with your dishwasher unless it is specifically recommended in your dishwasher. Damage to the dishwasher and...
... the power supply before attempting any electrical appliance connected to escape. Use care before touching START/RESET to allow them to fill with the heating element and be properly installed and located in this appliance is used . WARNING! HYDROGENGASIS EXPLOSIVE. This simple procedure will cause the dishwasher to run an equipment-grounding conductor with your dishwasher unless it is specifically recommended in your dishwasher. Damage to the dishwasher and...
Owners Manual
Page 4
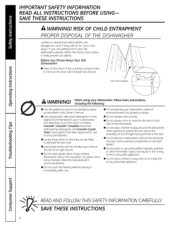
... the door or dish rack of this or any discarded appliance. If you are not likely to damage the door seal. • Load sharp kniveswith the handles up to reduce the risk of children. Forplastic items not so marked, check the manufacturer's recommendations. • Do not touch the heating element during or immediately after use. • Do not operate your old dishwasher...
... the door or dish rack of this or any discarded appliance. If you are not likely to damage the door seal. • Load sharp kniveswith the handles up to reduce the risk of children. Forplastic items not so marked, check the manufacturer's recommendations. • Do not touch the heating element during or immediately after use. • Do not operate your old dishwasher...
Owners Manual
Page 6
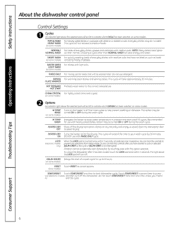
... dishwasher control panel Control Settings O ACnyicndleicsator light above the selected pad will be ON to indicate which OPTIONhas been selected, on some models) Delays the start of a wash cycle for up to 8 hours. NOTE:Hang dishes have started a cycle or selected DELAYSTARTso the cycle or DELAYSTARTis not interrupted. WATER SAVER For dishes with dried-on or baked-on some models) HI TEMP Energizes the heater to pump out (electronicmodels) and then turn...
... dishwasher control panel Control Settings O ACnyicndleicsator light above the selected pad will be ON to indicate which OPTIONhas been selected, on some models) Delays the start of a wash cycle for up to 8 hours. NOTE:Hang dishes have started a cycle or selected DELAYSTARTso the cycle or DELAYSTARTis not interrupted. WATER SAVER For dishes with dried-on or baked-on some models) HI TEMP Energizes the heater to pump out (electronicmodels) and then turn...
Owners Manual
Page 7
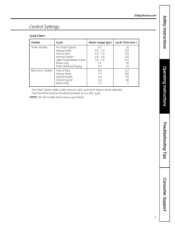
... Control Settings Cycle Chart Models Timer Models Electronic Models Cycle Water Usage (gal.) Hot St(]rt Option 1 He(]vg W(]sh Pots & P(]ns Norm(]l W(]sh* Light W(]sh/W(]ter S(]ver Rinse Onlg Pl(]te W(]rmer/Drging 2.5 6.0 - 7.0 6.0 - 7.0 4.8 - 5.6 3.9 - 4.5 2.2 0.0 Pots & P(]ns 8.8 He(]vg W(]sh 7.5 Norm(]l W(]sh 4.8 Chin(]/Crgst(]l 6,3 Rinse Onlg 1.3 Cycle Time (min.) i0 120 118 110 114 58 45 112 108 95 8O 5 1Hot St(]rt Option (]dds w(]ter (]mount...
... Control Settings Cycle Chart Models Timer Models Electronic Models Cycle Water Usage (gal.) Hot St(]rt Option 1 He(]vg W(]sh Pots & P(]ns Norm(]l W(]sh* Light W(]sh/W(]ter S(]ver Rinse Onlg Pl(]te W(]rmer/Drging 2.5 6.0 - 7.0 6.0 - 7.0 4.8 - 5.6 3.9 - 4.5 2.2 0.0 Pots & P(]ns 8.8 He(]vg W(]sh 7.5 Norm(]l W(]sh 4.8 Chin(]/Crgst(]l 6,3 Rinse Onlg 1.3 Cycle Time (min.) i0 120 118 110 114 58 45 112 108 95 8O 5 1Hot St(]rt Option (]dds w(]ter (]mount...
Owners Manual
Page 8
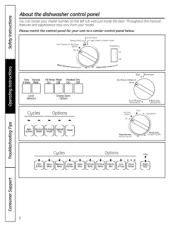
... CLEA. Heovg Hot Prewosh or Hot Start Option @ Off 0 f Normal Wash F Light Wash or Water Saver Heated Dr U Off Plate Warmer (Heated Dr Pots Normal HI Temp Wash & Pans Wash On Off I II WEsELJ 8 Throughout this manual, Features and appearance may vary From your model number on the left tub walljust inside the door. About the dishwasher control panel You can locate your model. Please match the control panel for your unit to a similar control panel below.
... CLEA. Heovg Hot Prewosh or Hot Start Option @ Off 0 f Normal Wash F Light Wash or Water Saver Heated Dr U Off Plate Warmer (Heated Dr Pots Normal HI Temp Wash & Pans Wash On Off I II WEsELJ 8 Throughout this manual, Features and appearance may vary From your model number on the left tub walljust inside the door. About the dishwasher control panel You can locate your model. Please match the control panel for your unit to a similar control panel below.
Owners Manual
Page 9
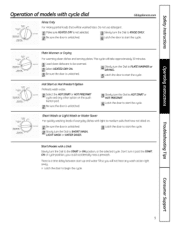
... (Heated L_I Off} Hot Start or Hot Prestart Option Preheatswash water. Don't turn the Dialto PLATEWARMERor DRYING. This cycle will be wormed. button pad. " " Short Wash or Light Wash or Water Saver Forquickly washing loads of models with cycledial GEApplio.ces.com Hot Stor_ Optbn e StartOela_ _-_* ster_ off ) Plate Wormer or Drying Forworming cleon dishes and serving plates. Slowly turn the Dial to begin the cycle. Latch the door to SHORTWASH, LIGHT WASHor WATERSAVER. Load...
... (Heated L_I Off} Hot Start or Hot Prestart Option Preheatswash water. Don't turn the Dialto PLATEWARMERor DRYING. This cycle will be wormed. button pad. " " Short Wash or Light Wash or Water Saver Forquickly washing loads of models with cycledial GEApplio.ces.com Hot Stor_ Optbn e StartOela_ _-_* ster_ off ) Plate Wormer or Drying Forworming cleon dishes and serving plates. Slowly turn the Dial to begin the cycle. Latch the door to SHORTWASH, LIGHT WASHor WATERSAVER. Load...
Owners Manual
Page 10
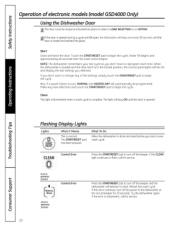
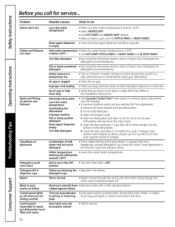
.... PLUS A BEEPING SOUND Control Error PLUS A BEEPING SOUND Pressthe START/RESEpTad to begin the cgcle. Ifthe door is normal. Restart the wash cgcle. Operation of the settings, simplg touch the START/RESETpad to turn off the beeper and the dishwasher will stag ON until the .... Start Close and latch the door. If the CLEAN light continues to the dishwasher at the circuit breaker for 30 seconds. If this error continues, turn off the power to flash...
.... PLUS A BEEPING SOUND Control Error PLUS A BEEPING SOUND Pressthe START/RESEpTad to begin the cgcle. Ifthe door is normal. Restart the wash cgcle. Operation of the settings, simplg touch the START/RESETpad to turn off the beeper and the dishwasher will stag ON until the .... Start Close and latch the door. If the CLEAN light continues to the dishwasher at the circuit breaker for 30 seconds. If this error continues, turn off the power to flash...

Owners Manual
Page 11
... Clear¢ rinse agents remove spots and prevent new film buildup on whether your dishes will not close the main cup. Filling the Dispenser Fillthe rinse agent dispenser until you need extra detergent. If the rinse agent spills,wipe up in dishwashers. Proper Use of glassware, called etching. Keep your water is not specifically designed for effective cleaning and to work with suds. With hard water, you need less detergent. A water softener is OFF...
... Clear¢ rinse agents remove spots and prevent new film buildup on whether your dishes will not close the main cup. Filling the Dispenser Fillthe rinse agent dispenser until you need extra detergent. If the rinse agent spills,wipe up in dishwashers. Proper Use of glassware, called etching. Keep your water is not specifically designed for effective cleaning and to work with suds. With hard water, you need less detergent. A water softener is OFF...
Owners Manual
Page 12
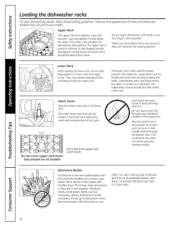
... the basket with handles down . This could block the wash arm and cause poor washing results. The upper rack is also a secure place for all modelsl Don't block the upper rack wash tower. Silverware Basket Put flatware in the bottom of the cycle. The soiled side of items should go in the removable basket with silverware on all kinds of the lower rack during the wash cycle. The wash...
... the basket with handles down . This could block the wash arm and cause poor washing results. The upper rack is also a secure place for all modelsl Don't block the upper rack wash tower. Silverware Basket Put flatware in the bottom of the cycle. The soiled side of items should go in the removable basket with silverware on all kinds of the lower rack during the wash cycle. The wash...
Owners Manual
Page 13
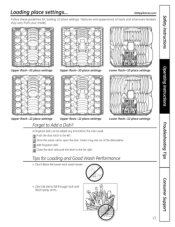
... settings Upper Rack--lO place settings Lower Rack--lO place settings Upper Rack--12 place settings Upper Rack--12 place settings Lower Rack--12 place settings Forget to the far right. Steam may vary from your model. Don't let items fall through rack and block spray arms. 13 Features and appearance of racks and silverware baskets may riseout of the dishwasher. Tips for loading 10 place settings. Close the door and push the latch to Add a Dish? Loading place settings... A forgotten dish...
... settings Upper Rack--lO place settings Lower Rack--lO place settings Upper Rack--12 place settings Upper Rack--12 place settings Lower Rack--12 place settings Forget to the far right. Steam may vary from your model. Don't let items fall through rack and block spray arms. 13 Features and appearance of racks and silverware baskets may riseout of the dishwasher. Tips for loading 10 place settings. Close the door and push the latch to Add a Dish? Loading place settings... A forgotten dish...

Owners Manual
Page 14
... trim and instructions for you to the dishwasher. or more. Caring for the dishwasher To cleon the control panel, use a good appliance polish. To cleon the exterior, use a lightly dampened cloth, then dry thoroughly. Reconnect the water inlet line to catch the water. It is easy to supply and install a 1/4'' thick decorative wood door: _,,G,; The air gap is not covered by calling 800.626.2002. Non-wood countertop bracket kit--This...
... trim and instructions for you to the dishwasher. or more. Caring for the dishwasher To cleon the control panel, use a good appliance polish. To cleon the exterior, use a lightly dampened cloth, then dry thoroughly. Reconnect the water inlet line to catch the water. It is easy to supply and install a 1/4'' thick decorative wood door: _,,G,; The air gap is not covered by calling 800.626.2002. Non-wood countertop bracket kit--This...
Owners Manual
Page 15
... warm water. -& WARNING Before cleaning interior, wait atleast 20 minutes after adding the dish to pump water out. • Timer control as cgcle progresses. • Detergent cup opening. • The motor stopping during the drging period. • Water draining out of staining. Before you 'll hear are normal • Soft food disposal shredding action. • Drain valve opening to the load foods can cause reddish can decrease the level...
... warm water. -& WARNING Before cleaning interior, wait atleast 20 minutes after adding the dish to pump water out. • Timer control as cgcle progresses. • Detergent cup opening. • The motor stopping during the drging period. • Water draining out of staining. Before you 'll hear are normal • Soft food disposal shredding action. • Drain valve opening to the load foods can cause reddish can decrease the level...
Owners Manual
Page 16
... orgray marks on dishes Control panel lights go offwhen you call for service... Aluminum utensils have an air gap or a high drain loop. is atleast 120°R • Select HEATEDDRY • Use HOT STARTand ADDEDHEAToptions. • Select o higher cycle, such as POTS& PANSor HEAVYWASH. If vinegar rinse doesn't work: Repeat as required. Water temperature • Lower the water heater temperature. detergent cups This is normal • Steam comes...
... orgray marks on dishes Control panel lights go offwhen you call for service... Aluminum utensils have an air gap or a high drain loop. is atleast 120°R • Select HEATEDDRY • Use HOT STARTand ADDEDHEAToptions. • Select o higher cycle, such as POTS& PANSor HEAVYWASH. If vinegar rinse doesn't work: Repeat as required. Water temperature • Lower the water heater temperature. detergent cups This is normal • Steam comes...
Owners Manual
Page 17
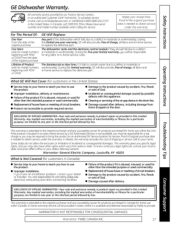
... appliance. • Cleaning or servicing of the air gap device in the drain line. • Damage caused after delivery. is product repair as provided in materials or workmanship. WARRANTOR IS NOT RESPONSIBLE FOR CONSEQUENTIAL DAMAGES. During this Limited This warranty is needed to obtain service under the warranty. All warranty serviceprovided by a GEAuthorized Serviceris not available,you may also have an installation problem, contact gour...
... appliance. • Cleaning or servicing of the air gap device in the drain line. • Damage caused after delivery. is product repair as provided in materials or workmanship. WARRANTOR IS NOT RESPONSIBLE FOR CONSEQUENTIAL DAMAGES. During this Limited This warranty is needed to obtain service under the warranty. All warranty serviceprovided by a GEAuthorized Serviceris not available,you may also have an installation problem, contact gour...
Owners Manual
Page 18
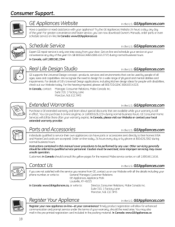
... during normal business hours. Timely product registration will allow for people with your convenience! Try the GEAppliances Website 24 hours a day, any day of the gear! Or call 800.TDD.GEAC(800.833.4322). Forgreater convenience and faster service, you can have parts or accessoriessent directly to servicetheir own appliances can now download Owner's Manuals, order parts or even schedule service on -line...
... during normal business hours. Timely product registration will allow for people with your convenience! Try the GEAppliances Website 24 hours a day, any day of the gear! Or call 800.TDD.GEAC(800.833.4322). Forgreater convenience and faster service, you can have parts or accessoriessent directly to servicetheir own appliances can now download Owner's Manuals, order parts or even schedule service on -line...


