
Energy Guide
Page 1
Estimated operating cost based on standard capacity models. Government Federal law prohibits removal of Similar Models 355kWh Estimated Yearly Electricity Use $29 Estimated Yearly Operating Cost (when used with a natural gas water heater) Your cost will ...kWh and natural gas cost of $1.218 per therm. U.S. For more information, visit www.ftc.gov/appliances. 165D9046P025A Dishwasher Capacity: Standard General Electric Models HDA****N, ADW1***N, GSM2***N,GSC3***N,GSD****N,GHDA3***N Estimated Yearly Operating Cost (when used with an electric water heater) $38 $20 $50 Cost Range of...
Estimated operating cost based on standard capacity models. Government Federal law prohibits removal of Similar Models 355kWh Estimated Yearly Electricity Use $29 Estimated Yearly Operating Cost (when used with a natural gas water heater) Your cost will ...kWh and natural gas cost of $1.218 per therm. U.S. For more information, visit www.ftc.gov/appliances. 165D9046P025A Dishwasher Capacity: Standard General Electric Models HDA****N, ADW1***N, GSM2***N,GSC3***N,GSD****N,GHDA3***N Estimated Yearly Operating Cost (when used with an electric water heater) $38 $20 $50 Cost Range of...

Installation Instructions
Page 2
...hex-head screw ■ Hose clamp ■ Drain hose (approximately 78" long) ■ Zip ties ■ Side and top trim pieces (some models) ■ Literature, samples and/or coupons ■ 2 Side-mounting brackets with four #8 pan-head mounting screws for non-wood countertops (some... models) Side and Top Trim Pieces on some models Drain Hose Hose Clamp Screw Kit Side Mount Kit (some models) Zip Ties #8 Phillips #10 Special Hex-Head Head Screws J-Box Screw 5/8" long 1/2" long #8 ...
...hex-head screw ■ Hose clamp ■ Drain hose (approximately 78" long) ■ Zip ties ■ Side and top trim pieces (some models) ■ Literature, samples and/or coupons ■ 2 Side-mounting brackets with four #8 pan-head mounting screws for non-wood countertops (some... models) Side and Top Trim Pieces on some models Drain Hose Hose Clamp Screw Kit Side Mount Kit (some models) Zip Ties #8 Phillips #10 Special Hex-Head Head Screws J-Box Screw 5/8" long 1/2" long #8 ...
Installation Instructions
Page 4
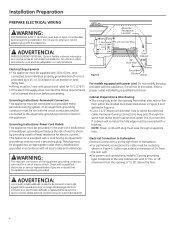
Do not use an extension cord or adapter plug with the appliance; Grounding Instructions-Power Cord Models This appliance must be connected to the equipment-grounding terminal or lead on the right front of 24" from either side, rear or the floor ... conexión inadecuada del conductor de conexión a tierra del equipamiento puede provocar un riesgo de descarga eléctrica. Figure E Ground Black White For models equipped with power cord: Do not modify the plug provided with this appliance. No utilice un cable de extensión o un enchufe adaptador con este...
Do not use an extension cord or adapter plug with the appliance; Grounding Instructions-Power Cord Models This appliance must be connected to the equipment-grounding terminal or lead on the right front of 24" from either side, rear or the floor ... conexión inadecuada del conductor de conexión a tierra del equipamiento puede provocar un riesgo de descarga eléctrica. Figure E Ground Black White For models equipped with power cord: Do not modify the plug provided with this appliance. No utilice un cable de extensión o un enchufe adaptador con este...
Installation Instructions
Page 6
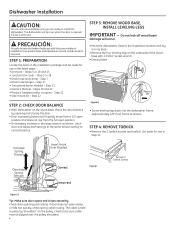
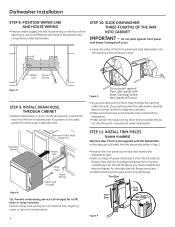
... from frame as shown. Si se quita la base, el lavaplatos se volcará cuando se abra la puerta. Step 17 • Trim pieces (some models) - Step 11 • Owner's Manual - STEP 3: REMOVE WOOD BASE, INSTALL LEVELING LEGS IMPORTANT - Damage will tip over the pulley shoulders. 6 Check to correct balance. STEP...
... from frame as shown. Si se quita la base, el lavaplatos se volcará cuando se abra la puerta. Step 17 • Trim pieces (some models) - Step 11 • Owner's Manual - STEP 3: REMOVE WOOD BASE, INSTALL LEVELING LEGS IMPORTANT - Damage will tip over the pulley shoulders. 6 Check to correct balance. STEP...
Installation Instructions
Page 8
STEP 11: INSTALL TRIM PIECES (some models) Skip this step you will occur. • As you move towards the bottom. Do not push against front door panel with base of the front ...
STEP 11: INSTALL TRIM PIECES (some models) Skip this step you will occur. • As you move towards the bottom. Do not push against front door panel with base of the front ...
Quick Specs
Page 4
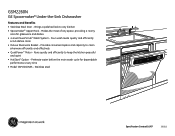
Provides convenient space and capacity to keep the kitchen peaceful and quiet • HotStart™ Option - Stainless steel GSM2260NSS Specification Created 10/07 350512 GSM2260N GE Spacemaker® Under-the-Sink Dishwasher Features and Benefits • Stainless Steel ...Door - Brings a polished look to any space, providing a roomy area for dependable performance every time • Model GSM2260NSS - Makes the most of any kitchen • Spacemaker® Upper Rack - Preheats water before the main wash cycle for glassware and dishes •...
Provides convenient space and capacity to keep the kitchen peaceful and quiet • HotStart™ Option - Stainless steel GSM2260NSS Specification Created 10/07 350512 GSM2260N GE Spacemaker® Under-the-Sink Dishwasher Features and Benefits • Stainless Steel ...Door - Brings a polished look to any space, providing a roomy area for dependable performance every time • Model GSM2260NSS - Makes the most of any kitchen • Spacemaker® Upper Rack - Preheats water before the main wash cycle for glassware and dishes •...

Use and Care Manual / Warranty
Page 1
Dishwashers Safety Instructions 2, 3 Operating Instructions Care and Cleaning 12 Control Panels 6 Control Settings 4-5 Dial Cycles 7 Flashing Display Lights 8 Loading the Dishwasher Racks 10 Loading Place Settings 11 Optional Accessories 12 Using the Dishwasher 8, 9 Troubleshooting Tips . . . 13, 14 Consumer Support Consumer Support 16 Warranty 15 Owner's Manual Write the model and serial numbers here: Model Serial You can find them on a label on the tub wall just inside the door. 165D4700P368 49-55043 10-07 JR
Dishwashers Safety Instructions 2, 3 Operating Instructions Care and Cleaning 12 Control Panels 6 Control Settings 4-5 Dial Cycles 7 Flashing Display Lights 8 Loading the Dishwasher Racks 10 Loading Place Settings 11 Optional Accessories 12 Using the Dishwasher 8, 9 Troubleshooting Tips . . . 13, 14 Consumer Support Consumer Support 16 Warranty 15 Owner's Manual Write the model and serial numbers here: Model Serial You can find them on a label on the tub wall just inside the door. 165D4700P368 49-55043 10-07 JR
Use and Care Manual / Warranty
Page 4
...for use with heavily soiled dishes. Children cannot accidentally start dishwasher by 30 minutes. Do not use with this option selected. LOCK (electronic models only) When the LOCK pad is saved. You can lock the controls after it has been locked, touch the LOCK pad twice within...spotting on dishware. To unlock the dishwasher after you intend to end the cycle. Touch START/RESET a second time to pump out (electronic models) and then turn off. Troubleshooting Tips Consumer Support 4 Dishes air dry naturally and energy is touched twice within 3 seconds. ON DO NOT ...
...for use with heavily soiled dishes. Children cannot accidentally start dishwasher by 30 minutes. Do not use with this option selected. LOCK (electronic models only) When the LOCK pad is saved. You can lock the controls after it has been locked, touch the LOCK pad twice within...spotting on dishware. To unlock the dishwasher after you intend to end the cycle. Touch START/RESET a second time to pump out (electronic models) and then turn off. Troubleshooting Tips Consumer Support 4 Dishes air dry naturally and energy is touched twice within 3 seconds. ON DO NOT ...
Use and Care Manual / Warranty
Page 5
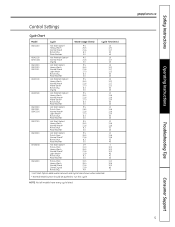
... every cycle listed. Safety Instructions Operating Instructions Control Settings Cycle Chart Model Cycle Water Usage (litres) Cycle Time (min.) GSD1100 Hot Start Option1 9.5 10 Heavy Wash 26.5 120 Normal Wash 21.6 117 Rinse Only 8.3 53 Plate Warmer 0.0 ...
... every cycle listed. Safety Instructions Operating Instructions Control Settings Cycle Chart Model Cycle Water Usage (litres) Cycle Time (min.) GSD1100 Hot Start Option1 9.5 10 Heavy Wash 26.5 120 Normal Wash 21.6 117 Rinse Only 8.3 53 Plate Warmer 0.0 ...

Use and Care Manual / Warranty
Page 6
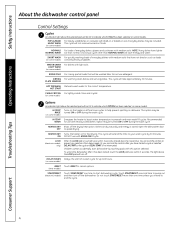
Throughout this manual, features and appearance may vary from your unit to a similar control panel below. 6 Troubleshooting Tips Consumer Support Please match the control panel for your model. Safety Instructions Operating Instructions About the dishwasher control panel You can locate your model number on the left tub wall just inside the door.
Throughout this manual, features and appearance may vary from your unit to a similar control panel below. 6 Troubleshooting Tips Consumer Support Please match the control panel for your model. Safety Instructions Operating Instructions About the dishwasher control panel You can locate your model number on the left tub wall just inside the door.

Use and Care Manual / Warranty
Page 7
...any wash action right away. Short Wash or Light Wash or Water Saver For quickly washing loads of models with a Dial) Slowly turn the Dial to HOT START or HOT PREWASH. 4 Latch the door ... of any cycle automatically up and water fill so you to start the cycle. Start Delay (on some models) The START DELAY will allow you will come on the push button pad. 2 Be sure the door ...is unlatched. 3 Slowly turn the Dial to be washed later. Start (Models with cycle dial geappliances.ca Rinse Only For rinsing partial loads that have not dried on. 1 Be sure the...
...any wash action right away. Short Wash or Light Wash or Water Saver For quickly washing loads of models with a Dial) Slowly turn the Dial to HOT START or HOT PREWASH. 4 Latch the door ... of any cycle automatically up and water fill so you to start the cycle. Start Delay (on some models) The START DELAY will allow you will come on the push button pad. 2 Be sure the door ...is unlatched. 3 Slowly turn the Dial to be washed later. Start (Models with cycle dial geappliances.ca Rinse Only For rinsing partial loads that have not dried on. 1 Be sure the...
Use and Care Manual / Warranty
Page 8
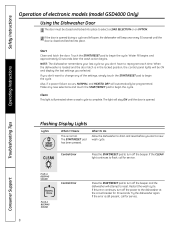
... the power to the dishwasher at the circuit breaker for 30 seconds. Try the dishwasher again. If the error is normal. Make any of electronic models (model GSD4000 Only) Using the Dishwasher Door 1 The door must be closed and latched into place to select a LOAD SELECTION or an OPTION. 2 If the door...
... the power to the dishwasher at the circuit breaker for 30 seconds. Try the dishwasher again. If the error is normal. Make any of electronic models (model GSD4000 Only) Using the Dishwasher Door 1 The door must be closed and latched into place to select a LOAD SELECTION or an OPTION. 2 If the door...

Use and Care Manual / Warranty
Page 10
... knives, forks and spoons so they can't fall through rack and block rotation of the lower rack during the wash cycle. This is for all models) Don't block the upper rack wash tower. Large items such as a pot or dish handle extend through the center of the spray arm. Don't block... the wash tower or load tall things next to protect your model. This could block the wash arm and cause poor washing results. Distribute evenly. Troubleshooting Tips Consumer Support 10 Tower Wash Tower Keep the center area...
... knives, forks and spoons so they can't fall through rack and block rotation of the lower rack during the wash cycle. This is for all models) Don't block the upper rack wash tower. Large items such as a pot or dish handle extend through the center of the spray arm. Don't block... the wash tower or load tall things next to protect your model. This could block the wash arm and cause poor washing results. Distribute evenly. Troubleshooting Tips Consumer Support 10 Tower Wash Tower Keep the center area...
Use and Care Manual / Warranty
Page 11
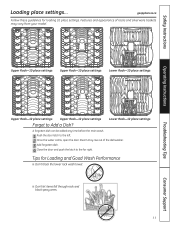
... guidelines for Loading and Good Wash Performance I Don't let items fall through rack and block spray arms. 11 Consumer Support Steam may vary from your model. Safety Instructions Loading place settings... Features and appearance of racks and silverware baskets may rise out of the dishwasher. 3 Add forgotten dish. 4 Close the door...
... guidelines for Loading and Good Wash Performance I Don't let items fall through rack and block spray arms. 11 Consumer Support Steam may vary from your model. Safety Instructions Loading place settings... Features and appearance of racks and silverware baskets may rise out of the dishwasher. 3 Add forgotten dish. 4 Close the door...

Use and Care Manual / Warranty
Page 12
... line to the water valve. 5 Remove the plastic sump cover in the tub bottom and use sharp objects, scouring pads or harsh cleaners on some models) You can be ordered and installed when the door panel weighs four lbs. The air gap is not covered by adding a custom panel trim kit... if a drain clogs. Sump cover screws Protect Against Freezing If your dishwasher isn't draining well. Never use a sponge to get the correct kit for your model. Check the air gap any part of the dishwasher.
... line to the water valve. 5 Remove the plastic sump cover in the tub bottom and use sharp objects, scouring pads or harsh cleaners on some models) You can be ordered and installed when the door panel weighs four lbs. The air gap is not covered by adding a custom panel trim kit... if a drain clogs. Sump cover screws Protect Against Freezing If your dishwasher isn't draining well. Never use a sponge to get the correct kit for your model. Check the air gap any part of the dishwasher.
Use and Care Manual / Warranty
Page 13
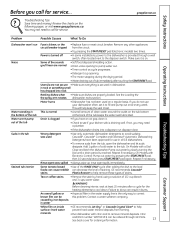
...valve opening to help surface-hard water prevent hard water mineral deposits from the circuit. • Try pressing the START/RESET pad (Electronic models) two times. This is clogged • If you have been approved for ordering information. 13 Consumer Support Drain is normal • ...A small amount of clean water around the outlet on . Wrong detergent was spilled • Always wipe up rinse agent spills immediately. On Models with a Dial: Close and latch the dishwasher. GE recommends Cascade® stains Plastic Booster to the load foods can cause reddish can be...
...valve opening to help surface-hard water prevent hard water mineral deposits from the circuit. • Try pressing the START/RESET pad (Electronic models) two times. This is clogged • If you have been approved for ordering information. 13 Consumer Support Drain is normal • ...A small amount of clean water around the outlet on . Wrong detergent was spilled • Always wipe up rinse agent spills immediately. On Models with a Dial: Close and latch the dishwasher. GE recommends Cascade® stains Plastic Booster to the load foods can cause reddish can be...
Use and Care Manual / Warranty
Page 15
... an authorized Customer Care® technician. If you how to use within Canada. I Service trips to your home to teach you have serial number and model number available when calling for other connecting facilities. To schedule service, on-line, visit us at www.geappliances.ca, or call 1.800.561.3344. Safety...
... an authorized Customer Care® technician. If you how to use within Canada. I Service trips to your home to teach you have serial number and model number available when calling for other connecting facilities. To schedule service, on-line, visit us at www.geappliances.ca, or call 1.800.561.3344. Safety...

