
Product Manual
Page 6
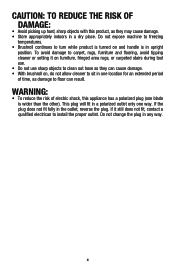
... areas where they may be followed, including the following: READ ALL INSTRUCTIONS BEFORE USING THIS APPLIANCE. Not intended for use in the upright position. • Turn off all parts of California to pick up anything that is burning or smoking, such as described in injury or damage. • Do not use...
... areas where they may be followed, including the following: READ ALL INSTRUCTIONS BEFORE USING THIS APPLIANCE. Not intended for use in the upright position. • Turn off all parts of California to pick up anything that is burning or smoking, such as described in injury or damage. • Do not use...
Product Manual
Page 7
... up hard, sharp objects with this appliance has a polarized plug (one way. Do not expose machine to freezing temperatures. • Brushroll continues to turn while product is turned on , do not allow cleaner to clean out hose as they may cause damage. • Store appropriately indoors in upright position. This plug will...
... up hard, sharp objects with this appliance has a polarized plug (one way. Do not expose machine to freezing temperatures. • Brushroll continues to turn while product is turned on , do not allow cleaner to clean out hose as they may cause damage. • Store appropriately indoors in upright position. This plug will...
Product Manual
Page 11
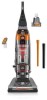
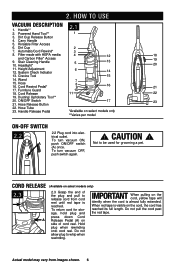
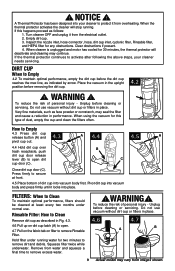
... from images shown. 6 Dirt Cup Release Button 4. Filter made with HEPA media 4 12 18 and Carbon Filter* Access 9. Cord Rewind Pedal* 9 16 21 17. To turn vacuum OFF, push switch again. ! Not to whip when rewinding. Do not pull the cord past the red tape. press down Cord A Release Pedal (A) on... return cord for grooming a pet. Rinsable Filter Access 6. Hose 7 8 16. Dusting/ Upholstery Tool** 20. HOW TO USE VACUUM DESCRIPTION 1. Stair Cleaning Handle 5 13 10. To turn vacuum ON, A push ON/OFF switch (A) once. Hose Tube 23.
... from images shown. 6 Dirt Cup Release Button 4. Filter made with HEPA media 4 12 18 and Carbon Filter* Access 9. Cord Rewind Pedal* 9 16 21 17. To turn vacuum OFF, push switch again. ! Not to whip when rewinding. Do not pull the cord past the red tape. press down Cord A Release Pedal (A) on... return cord for grooming a pet. Rinsable Filter Access 6. Hose 7 8 16. Dusting/ Upholstery Tool** 20. HOW TO USE VACUUM DESCRIPTION 1. Stair Cleaning Handle 5 13 10. To turn vacuum ON, A push ON/OFF switch (A) once. Hose Tube 23.
Product Manual
Page 14
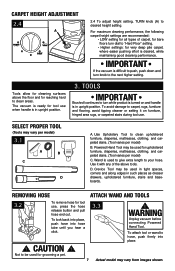
... • LOW setting for all types of the above the floor and for cleaning surfaces above tools. TOOLS IMPORTANT Brushroll continues to turn knob to clean areas. To lock back into place, push hose into place. ! Wand is desired, while maintaining good cleaning performance.... carpeted stairs during tool use , press the hose release button and pull hose end out. CARPET HEIGHT ADJUSTMENT 2.4 A 2.4 To adjust height setting, TURN knob (A) to clean upholstered furniture, draperies, mattresses, clothing, and carpeted stairs. (Tool varies per model) B. D. Not to hose, push firmly into...
... • LOW setting for all types of the above the floor and for cleaning surfaces above tools. TOOLS IMPORTANT Brushroll continues to turn knob to clean areas. To lock back into place, push hose into place. ! Wand is desired, while maintaining good cleaning performance.... carpeted stairs during tool use , press the hose release button and pull hose end out. CARPET HEIGHT ADJUSTMENT 2.4 A 2.4 To adjust height setting, TURN knob (A) to clean upholstered furniture, draperies, mattresses, clothing, and carpeted stairs. (Tool varies per model) B. D. Not to hose, push firmly into...
Product Manual
Page 18
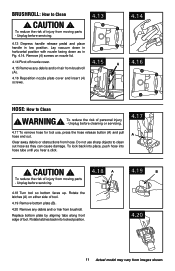
... to Empty 4.2 To maintain optimal performance, empty the dirt cup before cleaning or servicing. Hold filter under normal use. Unplug before removing the dirt cup. 4.2 ! Turn cleaner OFF and unplug it locks into your cleaner needs servicing. Pivot dirt cup into vacuum body and press firmly until it from overheating. Do...
... to Empty 4.2 To maintain optimal performance, empty the dirt cup before cleaning or servicing. Hold filter under normal use. Unplug before removing the dirt cup. 4.2 ! Turn cleaner OFF and unplug it locks into your cleaner needs servicing. Pivot dirt cup into vacuum body and press firmly until it from overheating. Do...
Product Manual
Page 22
... shown. Replace bottom plate by aligning tabs along front edge of personal injury - To reduce the risk of tool. CAUTION ! Unplug before servicing. 4.18 A 4.18 Turn tool so bottom faces up. Unplug before servicing. 4.13 Depress handle release pedal and place handle in Fig. 4.14. Remove (4) screws on either side of...
... shown. Replace bottom plate by aligning tabs along front edge of personal injury - To reduce the risk of tool. CAUTION ! Unplug before servicing. 4.18 A 4.18 Turn tool so bottom faces up. Unplug before servicing. 4.13 Depress handle release pedal and place handle in Fig. 4.14. Remove (4) screws on either side of...
Product Manual
Page 23
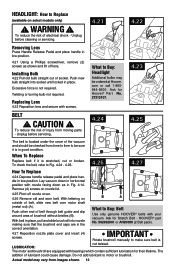
...9200. When To Replace Replace belt if it is not twisted. HOOVER® part No. 562932001 or AH20080 (2 Belt pack). Do not add lubricant to motor or brushroll. Actual model may be sure it is not required. Twisting or turning bulb not required. CAUTION ! Remove (4) screws on nozzle lid...4.24 4.25 The belt is located under the cover of the vacuum and should be checked from time to time to be ordered at Hoover. Unplug before cleaning or servicing. 4.21 4.22 Removing Lens Press Handle Release Pedal and place handle in place. correct orientation. 4.27 Reposition...
...9200. When To Replace Replace belt if it is not twisted. HOOVER® part No. 562932001 or AH20080 (2 Belt pack). Do not add lubricant to motor or brushroll. Actual model may be sure it is not required. Twisting or turning bulb not required. CAUTION ! Remove (4) screws on nozzle lid...4.24 4.25 The belt is located under the cover of the vacuum and should be checked from time to time to be ordered at Hoover. Unplug before cleaning or servicing. 4.21 4.22 Removing Lens Press Handle Release Pedal and place handle in place. correct orientation. 4.27 Reposition...
Product Manual
Page 26
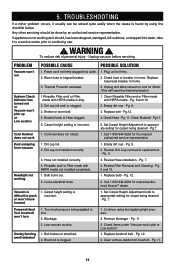
..., it to a service center prior to continuing use. ! To reduce risk of personal injury - PROBLEM Vacuum won't run System Check Indicator has turned red or Vacuum won 't turn 1. Power cord not firmly plugged into water, take it usually can be done by using tool applying light pressure. 2. Pg. 9. 3. Brushroll and...nearest authorized service representative Dust escaping from brushroll - Unplug and allow vacuum to tool. 2. Pg. 11. Call 1-800-944-9200 for nearest authorized Hoover® dealer. Rinsable and/ or Filter made with HEPA media - Too much pressure being cleaned -
..., it to a service center prior to continuing use. ! To reduce risk of personal injury - PROBLEM Vacuum won't run System Check Indicator has turned red or Vacuum won 't turn 1. Power cord not firmly plugged into water, take it usually can be done by using tool applying light pressure. 2. Pg. 9. 3. Brushroll and...nearest authorized service representative Dust escaping from brushroll - Unplug and allow vacuum to tool. 2. Pg. 11. Call 1-800-944-9200 for nearest authorized Hoover® dealer. Rinsable and/ or Filter made with HEPA media - Too much pressure being cleaned -


