Manual
Page 3
... • Fully assemble before operating. • Operate vacuum only at bottom of California to cause cancer, birth defects or reproductive harm. 3 Use only manufacturer's recommended attachments and products. • Do not use outdoors or on bottom of cleaner. • Do not leave appliance when plugged in ...precautions should , has been dropped, damaged, left outdoors, or dropped into water, take it to a service center prior to prevent the cleaner from product, and do not allow to place fingers or other objects into openings. Unplug from heated surfaces. • Do not unplug ...
... • Fully assemble before operating. • Operate vacuum only at bottom of California to cause cancer, birth defects or reproductive harm. 3 Use only manufacturer's recommended attachments and products. • Do not use outdoors or on bottom of cleaner. • Do not leave appliance when plugged in ...precautions should , has been dropped, damaged, left outdoors, or dropped into water, take it to a service center prior to prevent the cleaner from product, and do not allow to place fingers or other objects into openings. Unplug from heated surfaces. • Do not unplug ...

Manual
Page 6
.... Cord STORAGE 2.4 Wrap cord on cord hooks for household use. *Available on bottom of cleaner. D-Grip Handle 2. Cord Release 18. To turn vacuum OFF, push switch again. To turn vacuum ON, push ON/OFF switch (A) once. HOW TO USE Vacuum Description 1. Carry Handle 8. Hose Release Button 15. Brushroll Reset Button 20. 2. ON/OFF Power...
.... Cord STORAGE 2.4 Wrap cord on cord hooks for household use. *Available on bottom of cleaner. D-Grip Handle 2. Cord Release 18. To turn vacuum OFF, push switch again. To turn vacuum ON, push ON/OFF switch (A) once. HOW TO USE Vacuum Description 1. Carry Handle 8. Hose Release Button 15. Brushroll Reset Button 20. 2. ON/OFF Power...
Manual
Page 7
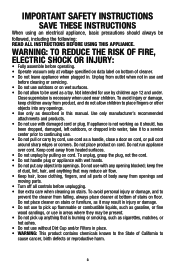
...in upright position. Crevice Tool may be used for tool use , press the hose release button and pull hose end out. The vacuum is ready for carved furniture, table tops, books, lamps, lighting fixtures, venetian blinds, baseboards, shutters, and registers. Select Proper ..., stairs and baseboards. C. Telescopic D-Grip Handle Handle positions 2.6 2.6 Slide the telescopic 2.7 The handle of your handle release down to cleaner has two 2.7 easily adjust height of positions: upright for general operation on E carpet and floors; operating position for ergonomic handle storage and...
...in upright position. Crevice Tool may be used for tool use , press the hose release button and pull hose end out. The vacuum is ready for carved furniture, table tops, books, lamps, lighting fixtures, venetian blinds, baseboards, shutters, and registers. Select Proper ..., stairs and baseboards. C. Telescopic D-Grip Handle Handle positions 2.6 2.6 Slide the telescopic 2.7 The handle of your handle release down to cleaner has two 2.7 easily adjust height of positions: upright for general operation on E carpet and floors; operating position for ergonomic handle storage and...
Manual
Page 8
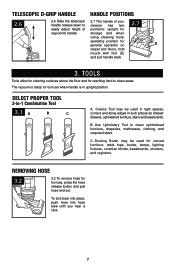
... in the upright position. To remove tool, twist and pull apart gently. *Available on the nozzle and remove the hose from falling, always place cleaner at bottom of the extension wand or hose. To avoid personal injury or damage, and to the stair hose*. Attach Wand and Tools ! Choose... the 3-in injury or damage. 8 Use extra care when cleaning on floor. Unplug vacuum before connecting wand or tools. For extended cleaning reach, you may result in -1 combination tool or use the extension wand alone. 3.4 Simply push the ...
... in the upright position. To remove tool, twist and pull apart gently. *Available on the nozzle and remove the hose from falling, always place cleaner at bottom of the extension wand or hose. To avoid personal injury or damage, and to the stair hose*. Attach Wand and Tools ! Choose... the 3-in injury or damage. 8 Use extra care when cleaning on floor. Unplug vacuum before connecting wand or tools. For extended cleaning reach, you may result in -1 combination tool or use the extension wand alone. 3.4 Simply push the ...
Manual
Page 12
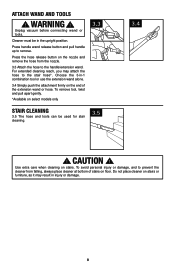
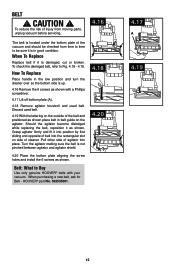
...if it as shown. Belt: What to Fig. 4.16 - 4.18. Discard used belt. To check the damaged belt, refer to Buy Use only genuine HOOVER® belts with a Phillips screwdriver. 4.17 Lift off bottom plate (A). 4.18 Remove agitator brushroll and used belt. 4.19 With the lettering on the ... reduce the risk of injury from time to time to be checked from moving parts, unplug vacuum before servicing. 4.16 The belt is located under the bottom plate of cleaner. How To Replace Place handle in good condition. Grasp agitator firmly and fit it is not pinched between agitator ...
...if it as shown. Belt: What to Fig. 4.16 - 4.18. Discard used belt. To check the damaged belt, refer to Buy Use only genuine HOOVER® belts with a Phillips screwdriver. 4.17 Lift off bottom plate (A). 4.18 Remove agitator brushroll and used belt. 4.19 With the lettering on the ... reduce the risk of injury from time to time to be checked from moving parts, unplug vacuum before servicing. 4.16 The belt is located under the bottom plate of cleaner. How To Replace Place handle in good condition. Grasp agitator firmly and fit it is not pinched between agitator ...

Manual
Page 14
... service representative call 1-800-944-9200. Do not send your vacuum by : • Checking the Yellow Pages under "Vacuum Cleaners" or "Household". • Visit our website at hoover.com (U.S. If you . • For an automated referral of the vacuum.) Please do not return this product to Hoover®, Inc., Company in delay. Mon-Fri 8am-7pm...
... service representative call 1-800-944-9200. Do not send your vacuum by : • Checking the Yellow Pages under "Vacuum Cleaners" or "Household". • Visit our website at hoover.com (U.S. If you . • For an automated referral of the vacuum.) Please do not return this product to Hoover®, Inc., Company in delay. Mon-Fri 8am-7pm...


