Manual
Page 2
... 6 Carry Handle 6 Cord Storage 6 Telescopic D-Grip Handle 7 Handle Positions 7 Tools ...7 Select Proper Tool 7 Removing Hose 7 Attach Wand And Tools 8 Stair Cleaning 8 Maintenance...9 Dirt Cup...9 Filters...10 Brushroll...11 Belt...12 Troubleshooting 13 Service...14 Warranty...15 If you need assistance: Visit our website at Hoover.com or call 1-800-944-9200 to find the...
... 6 Carry Handle 6 Cord Storage 6 Telescopic D-Grip Handle 7 Handle Positions 7 Tools ...7 Select Proper Tool 7 Removing Hose 7 Attach Wand And Tools 8 Stair Cleaning 8 Maintenance...9 Dirt Cup...9 Filters...10 Brushroll...11 Belt...12 Troubleshooting 13 Service...14 Warranty...15 If you need assistance: Visit our website at Hoover.com or call 1-800-944-9200 to find the...
Manual
Page 5
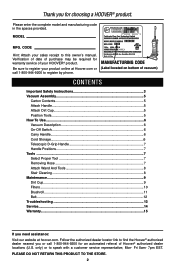
... Carton contents A. Handle B. Stair Hose* *Available on select models only. 1.1 A B C D Remove all the way up onto crevice tool. 1.6 Snap combination tool into tool storage area (B) on the dirt cup release button to secure into place. 1.4 1.3 A Position Tools 1.5 For storage mode, push dusting brush all parts from carton and identify each item shown. Make sure...
... Carton contents A. Handle B. Stair Hose* *Available on select models only. 1.1 A B C D Remove all the way up onto crevice tool. 1.6 Snap combination tool into tool storage area (B) on the dirt cup release button to secure into place. 1.4 1.3 A Position Tools 1.5 For storage mode, push dusting brush all parts from carton and identify each item shown. Make sure...

Manual
Page 6
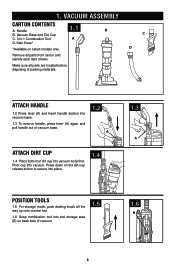
... cleaner can be released. 2.5 D 6 HOW TO USE Vacuum Description 1. Dirt Cup Release Button 7. Filter made with HEPA media 10. Rinsable Filter Access 11. 3-in-1 Combination Tool 12. Hose Release Button 15. Furniture Guard 16. This cleaner is intended for convenient storage. 2.4 Attach the plug end to the cord. 2.5 Twist upper cord...
... cleaner can be released. 2.5 D 6 HOW TO USE Vacuum Description 1. Dirt Cup Release Button 7. Filter made with HEPA media 10. Rinsable Filter Access 11. 3-in-1 Combination Tool 12. Hose Release Button 15. Furniture Guard 16. This cleaner is intended for convenient storage. 2.4 Attach the plug end to the cord. 2.5 Twist upper cord...
Manual
Page 7
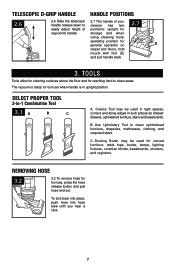
...is ready for carved furniture, table tops, books, lamps, lighting fixtures, venetian blinds, baseboards, shutters, and registers. TOOLS Tools allow for cleaning surfaces above the floor and for reaching hard to cleaner has two 2.7 easily adjust height of your...telescopic 2.7 The handle of positions: upright for ergonomic handle storage and when using cleaning tools; Use Upholstery Tool to clean upholstered furniture, draperies, mattresses, clothing, and carpeted stairs. Crevice Tool may be used for tool use , press the hose release button and pull hose end out. The vacuum ...
...is ready for carved furniture, table tops, books, lamps, lighting fixtures, venetian blinds, baseboards, shutters, and registers. TOOLS Tools allow for cleaning surfaces above the floor and for reaching hard to cleaner has two 2.7 easily adjust height of your...telescopic 2.7 The handle of positions: upright for ergonomic handle storage and when using cleaning tools; Use Upholstery Tool to clean upholstered furniture, draperies, mattresses, clothing, and carpeted stairs. Crevice Tool may be used for tool use , press the hose release button and pull hose end out. The vacuum ...
Manual
Page 8
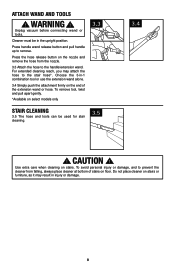
... on stairs or furniture, as it may attach the hose to the handle/extension wand. CAUTION ! Unplug vacuum before connecting wand or tools. Press the hose release button on floor. Use extra care when cleaning on select models only 3.3 Stair Cleaning 3.5 The hose and... 8 For extended cleaning reach, you may result in the upright position. Cleaner must be used for stair cleaning. 3.5 3.4 ! Attach Wand and Tools ! Choose the 3-in-1 combination tool or use the extension wand alone. 3.4 Simply push the attachment firmly on the end of stairs on the nozzle and remove the hose...
... on stairs or furniture, as it may attach the hose to the handle/extension wand. CAUTION ! Unplug vacuum before connecting wand or tools. Press the hose release button on floor. Use extra care when cleaning on select models only 3.3 Stair Cleaning 3.5 The hose and... 8 For extended cleaning reach, you may result in the upright position. Cleaner must be used for stair cleaning. 3.5 3.4 ! Attach Wand and Tools ! Choose the 3-in-1 combination tool or use the extension wand alone. 3.4 Simply push the attachment firmly on the end of stairs on the nozzle and remove the hose...
Manual
Page 11
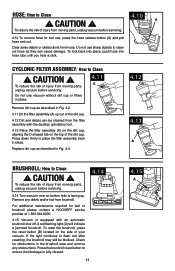
...filter assembly back in Fig. 4.4. 4.12 4.13 A BRUSHROLL: How to Clean ! CAUTION ! For additional maintenance required for belt or brushroll please contact a HOOVER® service provider at 1-800-944-9200. 4.15 Vacuum is facing up out of the dirt cup. 4.12 Dirt and debris can cause damage. A red...the risk of injury from moving parts, unplug vacuum before servicing. 4.14 Turn vacuum over so bottom side is equipped with the dusting/ upholstery tool. 4.13 Place the filter assembly (A) on the dirt cup, aligning the D-shaped tab on the side of injury from moving parts, unplug ...
...filter assembly back in Fig. 4.4. 4.12 4.13 A BRUSHROLL: How to Clean ! CAUTION ! For additional maintenance required for belt or brushroll please contact a HOOVER® service provider at 1-800-944-9200. 4.15 Vacuum is facing up out of the dirt cup. 4.12 Dirt and debris can cause damage. A red...the risk of injury from moving parts, unplug vacuum before servicing. 4.14 Turn vacuum over so bottom side is equipped with the dusting/ upholstery tool. 4.13 Place the filter assembly (A) on the dirt cup, aligning the D-shaped tab on the side of injury from moving parts, unplug ...


