Manual
Page 2
...Hoover® authorized dealer nearest you for assembly and maintenance. Please enter the complete model and Manufacturing Code in China Manufacturing code (Label located on back of vacuum) Contents Important Safety Instructions 3 Vacuum Assembly 5 Carton Contents 5 Attach Handle 5 Attach Dirt Cup 5 Position Tools 5 How To Use...6 Vacuum...Tools 8 Maintenance...8 Dirt Cup...9 Filters...9 Brushroll...11 Hose...11 Powered Hand Tool 11 Headlight...12 Belt...13 Troubleshooting 14 Service...15 Warranty...16 If you need assistance: Visit our website at Hoover.com or call 1-800-944-9200...
...Hoover® authorized dealer nearest you for assembly and maintenance. Please enter the complete model and Manufacturing Code in China Manufacturing code (Label located on back of vacuum) Contents Important Safety Instructions 3 Vacuum Assembly 5 Carton Contents 5 Attach Handle 5 Attach Dirt Cup 5 Position Tools 5 How To Use...6 Vacuum...Tools 8 Maintenance...8 Dirt Cup...9 Filters...9 Brushroll...11 Hose...11 Powered Hand Tool 11 Headlight...12 Belt...13 Troubleshooting 14 Service...15 Warranty...16 If you need assistance: Visit our website at Hoover.com or call 1-800-944-9200...
Manual
Page 3
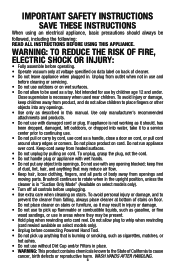
...8226; Unplug before cleaning or servicing. • Do not use without Dirt Cup and/or Filters in areas where they may be used near children. WASH HANDS AFTER HANDLING. 3 IMPORTANT SAFETY... damage, keep free of dust, lint, hair, and anything that may result in the upright position, unless the cleaner is burning or smoking, such as a toy. To unplug, grasp the plug, not.... • Keep hair, loose clothing, fingers, and all controls before operating. • Operate vacuum only at bottom of California to cause cancer, birth defects or reproductive harm. WARNING: TO REDUCE THE...
...8226; Unplug before cleaning or servicing. • Do not use without Dirt Cup and/or Filters in areas where they may be used near children. WASH HANDS AFTER HANDLING. 3 IMPORTANT SAFETY... damage, keep free of dust, lint, hair, and anything that may result in the upright position, unless the cleaner is burning or smoking, such as a toy. To unplug, grasp the plug, not.... • Keep hair, loose clothing, fingers, and all controls before operating. • Operate vacuum only at bottom of California to cause cancer, birth defects or reproductive harm. WARNING: TO REDUCE THE...
Manual
Page 6
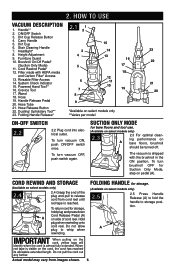
Dirt Cup 6. Filter made with the brushroll in the ON position. To turn vacuum ON, push ON/OFF switch once. The vacuum is almost fully extended. FOLDING HANDLE for bare floors and tool use. (Available on select models only) 2.3 2.3 For optimal cleaning ...the handle to storage position. Do not pull the cord out any further. 2. Handle** 2. ON/OFF Switch 3. Carry Handle 5. Headlight* 8. Rinsable Filter Access 14. Crevice Tool 17. Dusting/ Upholstery Tool** 23. Hold plug when rewinding onto cord reel. Dirt Cup Release Button 4. Height Adjustment 9. ...
Dirt Cup 6. Filter made with the brushroll in the ON position. To turn vacuum ON, push ON/OFF switch once. The vacuum is almost fully extended. FOLDING HANDLE for bare floors and tool use. (Available on select models only) 2.3 2.3 For optimal cleaning ...the handle to storage position. Do not pull the cord out any further. 2. Handle** 2. ON/OFF Switch 3. Carry Handle 5. Headlight* 8. Rinsable Filter Access 14. Crevice Tool 17. Dusting/ Upholstery Tool** 23. Hold plug when rewinding onto cord reel. Dirt Cup Release Button 4. Height Adjustment 9. ...
Manual
Page 8
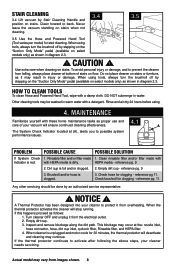
... located at the: nozzle inlet, hose connector, hose, dirt cup inlet, cyclonic filter, Rinsable filter, and HEPA filter. 4. Rinsable filter and/or filter made with Indicator is red: with a damp cloth. Clean rinsable filter and/or filter made 1. Brushroll and/or hose is full and/or clogged. 2. reference pg.... stepping on the "Suction Only Mode" pedal (available on select models only) as shown in diagram 2.3. When cleaner is dirty. Never leave the vacuum standing on floor. Use extra care when cleaning on stairs. PROBLEM POSSIBLE CAUSE POSSIBLE SOLUTION If System Check 1. ...
... located at the: nozzle inlet, hose connector, hose, dirt cup inlet, cyclonic filter, Rinsable filter, and HEPA filter. 4. Rinsable filter and/or filter made with Indicator is red: with a damp cloth. Clean rinsable filter and/or filter made 1. Brushroll and/or hose is full and/or clogged. 2. reference pg.... stepping on the "Suction Only Mode" pedal (available on select models only) as shown in diagram 2.3. When cleaner is dirty. Never leave the vacuum standing on floor. Use extra care when cleaning on stairs. PROBLEM POSSIBLE CAUSE POSSIBLE SOLUTION If System Check 1. ...
Manual
Page 9
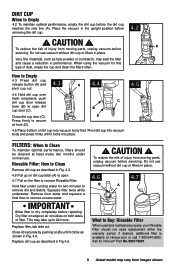
... (A) to open dirt cup door (C). Replace filter, tab side out. To reduce the risk of filter. Do not use vacuum without dirt cup or filters in Fig. 4.6. Close dirt cup door (C). Ask for Hoover® Part No.303173001. 9 Actual model may seal the filter and cause a reduction in the upright position before removing the dirt cup. 4.2 ! When...
... (A) to open dirt cup door (C). Replace filter, tab side out. To reduce the risk of filter. Do not use vacuum without dirt cup or filters in Fig. 4.6. Close dirt cup door (C). Ask for Hoover® Part No.303173001. 9 Actual model may seal the filter and cause a reduction in the upright position before removing the dirt cup. 4.2 ! When...
Manual
Page 10
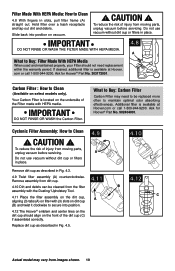
... to maintain optimal odor absorbing effectiveness. CAUTION ! If desired, additional filter is available at Hoover. Your Carbon Filter is located on the front of injury from moving parts, unplug vacuum before servicing. Ask for Hoover® Part No. 303172001. Do not use vacuum without dirt cup or filters in place. 4.9 A 4.10 Remove dirt cup as described in...
... to maintain optimal odor absorbing effectiveness. CAUTION ! If desired, additional filter is available at Hoover. Your Carbon Filter is located on the front of injury from moving parts, unplug vacuum before servicing. Ask for Hoover® Part No. 303172001. Do not use vacuum without dirt cup or filters in place. 4.9 A 4.10 Remove dirt cup as described in...
Manual
Page 14
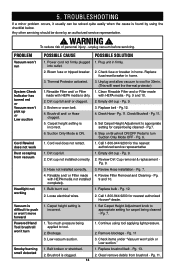
... firmly. Pg. 11. 5. Loose electrical wires. 1. Low vacuum suction. 1. Pg. 11 3. Unplug and allow vacuum to appropriate setting for 30min. (This willl reset the thermal protector) 1.Rinsable Filter and/ or Filter 1. Set Carpet Height Adjustment to cool for carpet being cleaned...incorrect. 2. Clean Rinsable Filter and or Filter made made 4. Dirt cup not installed correctly. 2. Power cord not firmly plugged 1. Plug unit in home. 3. Replace bulb - Check fuse or breaker in home. 5. Pg.7. 6. Call 1-800-944-9200 for nearest authorized Hoover® dealer. 1. Empty...
... firmly. Pg. 11. 5. Loose electrical wires. 1. Low vacuum suction. 1. Pg. 11 3. Unplug and allow vacuum to appropriate setting for 30min. (This willl reset the thermal protector) 1.Rinsable Filter and/ or Filter 1. Set Carpet Height Adjustment to cool for carpet being cleaned...incorrect. 2. Clean Rinsable Filter and or Filter made made 4. Dirt cup not installed correctly. 2. Power cord not firmly plugged 1. Plug unit in home. 3. Replace bulb - Check fuse or breaker in home. 5. Pg.7. 6. Call 1-800-944-9200 for nearest authorized Hoover® dealer. 1. Empty...


