Manual
Page 2
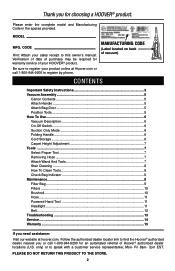
.... Follow the authorized dealer locator link to find the Hoover® authorized dealer nearest you for choosing a HOOVER® product. Mon- Manufacturing code (Label located on back of vacuum) Contents Important Safety Instructions 3 Vacuum Assembly 5 Carton Contents 5 Attach Handle 5 Attach Bag Door 5 Position Tools 5 How To Use...6 Vacuum Description 6 On-Off Switch 6 Suction Only Mode 6 Folding...
.... Follow the authorized dealer locator link to find the Hoover® authorized dealer nearest you for choosing a HOOVER® product. Mon- Manufacturing code (Label located on back of vacuum) Contents Important Safety Instructions 3 Vacuum Assembly 5 Carton Contents 5 Attach Handle 5 Attach Bag Door 5 Position Tools 5 How To Use...6 Vacuum Description 6 On-Off Switch 6 Suction Only Mode 6 Folding...
Manual
Page 3
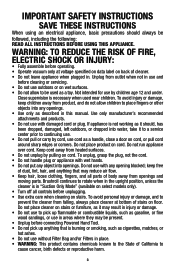
...upright position, unless the cleaner is burning or smoking, such as cigarettes, matches, or hot ashes. • Do not use without Filter Bag and/or Filters in this manual. WARNING: TO REDUCE THE RISK OF FIRE, ELECTRIC SHOCK OR INJURY: • Fully assemble before operating. ...• Operate vacuum only at bottom of body away from openings and moving parts. Use only manufacturer's recommended attachments and products. • Do not use with...
...upright position, unless the cleaner is burning or smoking, such as cigarettes, matches, or hot ashes. • Do not use without Filter Bag and/or Filters in this manual. WARNING: TO REDUCE THE RISK OF FIRE, ELECTRIC SHOCK OR INJURY: • Fully assemble before operating. ...• Operate vacuum only at bottom of body away from openings and moving parts. Use only manufacturer's recommended attachments and products. • Do not use with...
Manual
Page 5
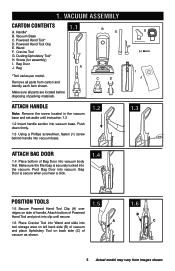
... of Powered Hand Tool and pivot into clip until instruction 1.3 1.2 Insert handle section into vacuum body first. Pivot Bag Door into the vacuum. Crevice Tool G. Vacuum ASSEMBLY Carton contents A. Make sure all parts from images shown. Attach bottom of Bag Door into vacuum base. Powered Hand Tool* D. C D Attach handle Note: Remove the screw located in the...
... of Powered Hand Tool and pivot into clip until instruction 1.3 1.2 Insert handle section into vacuum body first. Pivot Bag Door into the vacuum. Crevice Tool G. Vacuum ASSEMBLY Carton contents A. Make sure all parts from images shown. Attach bottom of Bag Door into vacuum base. Powered Hand Tool* D. C D Attach handle Note: Remove the screw located in the...
Manual
Page 6
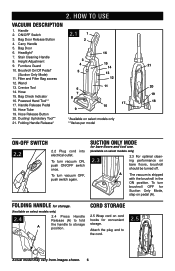
...brushroll in the ON position. Attach the plug end to storage position. Handle 2. Carry Handle 2.1 1 2 5. Bag Door 6. Wand 13. Dusting/ Upholstery Tool** 21. To turn vacuum ON, push ON/OFF switch once. FOLDING HANDLE for bare floors and tool use. (Available on select models only... images shown. 6 Height Adjustment 9. Bag Check Indicator 16. Powered Hand Tool** 17. Furniture Guard 10. Hose 15. Hose Tube 3 4 5 6 7 8 9 16 15 14 13 12 11 17 10 19. To turn vacuum OFF, push switch again. 2. HOW TO USE Vacuum Description 1. Stair Cleaning Handle 8. SUCTION...
...brushroll in the ON position. Attach the plug end to storage position. Handle 2. Carry Handle 2.1 1 2 5. Bag Door 6. Wand 13. Dusting/ Upholstery Tool** 21. To turn vacuum ON, push ON/OFF switch once. FOLDING HANDLE for bare floors and tool use. (Available on select models only... images shown. 6 Height Adjustment 9. Bag Check Indicator 16. Powered Hand Tool** 17. Furniture Guard 10. Hose 15. Hose Tube 3 4 5 6 7 8 9 16 15 14 13 12 11 17 10 19. To turn vacuum OFF, push switch again. 2. HOW TO USE Vacuum Description 1. Stair Cleaning Handle 8. SUCTION...
Manual
Page 8
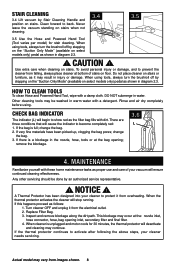
... continued cleaning effectiveness. How to show red as the filter bag fills with a detergent. Check bag indicator The indicator (L) will stop running. Inspect and remove blockage along the dirt path. Stair Cleaning 3.4 Lift vacuum by stepping on the "Suction Only Mode" (available on... been designed into your cleaner to activate after following the above steps, your vacuum will deactivate and cleaning may vary from falling, always place cleaner at the: nozzle inlet, hose connector, hose, bag opening ; If this happens proceed as shown in water. If the thermal ...
... continued cleaning effectiveness. How to show red as the filter bag fills with a detergent. Check bag indicator The indicator (L) will stop running. Inspect and remove blockage along the dirt path. Stair Cleaning 3.4 Lift vacuum by stepping on the "Suction Only Mode" (available on... been designed into your cleaner to activate after following the above steps, your vacuum will deactivate and cleaning may vary from falling, always place cleaner at the: nozzle inlet, hose connector, hose, bag opening ; If this happens proceed as shown in water. If the thermal ...
Manual
Page 9
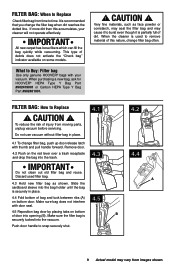
... of this accumulates, your vacuum. When purchasing a new bag, ask for HOOVER® HEPA Type Y Bag Part #902419001 or Carbon HEPA Type Y Bag Part #902481001. ! CAUTION ! Do not use vacuum without filter bag in place. 4.4 Fold bottom of bag and tuck between ribs (A) on some models. This type of injury from moving parts, unplug vacuum before servicing. Very fine...
... of this accumulates, your vacuum. When purchasing a new bag, ask for HOOVER® HEPA Type Y Bag Part #902419001 or Carbon HEPA Type Y Bag Part #902481001. ! CAUTION ! Do not use vacuum without filter bag in place. 4.4 Fold bottom of bag and tuck between ribs (A) on some models. This type of injury from moving parts, unplug vacuum before servicing. Very fine...
Manual
Page 13
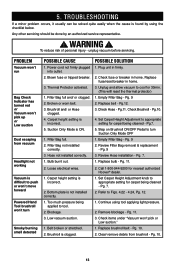
... not firmly plugged into outlet. 2. Replace fuse/reset breaker in home. Pg. 9 2. Clear/ remove debris from vacuum Headlight not working Vacuum is incorrect. 2. Broken or worn belt. 3. Filter Bag not installed correctly. 3. Pg. 10. 2. Empty Filter Bag - Carpet height setting is difficult to push or won't move forward Powered Hand Tool brushroll won 't pick... light pressure. 2. Blockage. 3. Blown fuse or tripped breaker. 3. Plug unit in firmly. 2. Check Brushroll - Step on Brushroll ON/OFF Pedal to cool for nearest authorized Hoover® dealer. 1.
... not firmly plugged into outlet. 2. Replace fuse/reset breaker in home. Pg. 9 2. Clear/ remove debris from vacuum Headlight not working Vacuum is incorrect. 2. Broken or worn belt. 3. Filter Bag not installed correctly. 3. Pg. 10. 2. Empty Filter Bag - Carpet height setting is difficult to push or won't move forward Powered Hand Tool brushroll won 't pick... light pressure. 2. Blockage. 3. Blown fuse or tripped breaker. 3. Plug unit in firmly. 2. Check Brushroll - Step on Brushroll ON/OFF Pedal to cool for nearest authorized Hoover® dealer. 1.


