Manual
Page 1
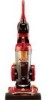
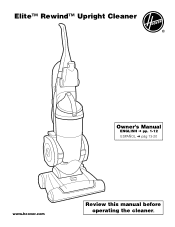
Elite™ Rewind™ Upright Cleaner ® Owner's Manual ENGLISH § pp. 1-12 ESPAÑOL § pág 13-20 www.hoover.com Review this manual before operating the cleaner.
Elite™ Rewind™ Upright Cleaner ® Owner's Manual ENGLISH § pp. 1-12 ESPAÑOL § pág 13-20 www.hoover.com Review this manual before operating the cleaner.
Manual
Page 2
... SERIAL NUMBER Contents Assembling Cleaner 3 Carton Contents 3 Cleaner Descriptions 4 How To Use 4-6 Cleaning Tools 6 If You Have a Problem 11 Important Safeguards 2 Lubrication 9 Maintenance 6-11 Authorized Service 11 Cleaning Filters 7-8 Clearing Blockages 12 Emptying Dirt Cup 6-7 Replacing Agitator Brush Roll ........9 Replacing Belt 8-9 Replacing Powered Hand Tool Agitator Brush Roll 10 Replacing Power Hand Tool Belt ..10 Replacing Headlight 8 Thermal Protector 11 Warranty 12 Parts and accessories mail order form 21 Important Safeguards! Do not operate cleaner...
... SERIAL NUMBER Contents Assembling Cleaner 3 Carton Contents 3 Cleaner Descriptions 4 How To Use 4-6 Cleaning Tools 6 If You Have a Problem 11 Important Safeguards 2 Lubrication 9 Maintenance 6-11 Authorized Service 11 Cleaning Filters 7-8 Clearing Blockages 12 Emptying Dirt Cup 6-7 Replacing Agitator Brush Roll ........9 Replacing Belt 8-9 Replacing Powered Hand Tool Agitator Brush Roll 10 Replacing Power Hand Tool Belt ..10 Replacing Headlight 8 Thermal Protector 11 Warranty 12 Parts and accessories mail order form 21 Important Safeguards! Do not operate cleaner...
Manual
Page 3
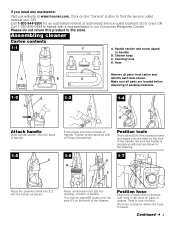
... in place. The crevice wand (E) slides over slots in the drawing. 1-7 LLOOCCKK Place the powered hand tool (C) into hole on back of authorized service outlet locations (U.S. The hose connector allows the hose to find the service outlet nearest you need any assistance: Visit our website at www.hoover.com. Hose Remove all parts are located before disposing of packing materials. 1-2 A 1-3 1-4 B Attach handle Slide handle section (A) onto back of...
... in place. The crevice wand (E) slides over slots in the drawing. 1-7 LLOOCCKK Place the powered hand tool (C) into hole on back of authorized service outlet locations (U.S. The hose connector allows the hose to find the service outlet nearest you need any assistance: Visit our website at www.hoover.com. Hose Remove all parts are located before disposing of packing materials. 1-2 A 1-3 1-4 B Attach handle Slide handle section (A) onto back of...
Manual
Page 4
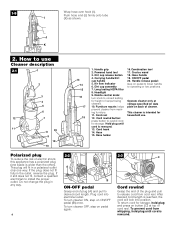
.... Nozzle control knob: turn knob to desired cord length. Crevice wand 18. Handle release pedal: step on back of cord reel. Dirt cup release button 4. Dirt cup assembly 7. To turn cleaner OFF, step on pedal again. 2-3 C AC TAB LE C O R D SYSTEM C TAB LE C O R D SYSTEM Cord rewind Grasp the end of plug (A) and pull to correct setting for storage, hold plug until cord is wider than the other). Handle grip 2. Hose handle 19. Plug cord into position. Powered hand tool 3. Cord rewind button: press button to release cord...
.... Nozzle control knob: turn knob to desired cord length. Crevice wand 18. Handle release pedal: step on back of cord reel. Dirt cup release button 4. Dirt cup assembly 7. To turn cleaner OFF, step on pedal again. 2-3 C AC TAB LE C O R D SYSTEM C TAB LE C O R D SYSTEM Cord rewind Grasp the end of plug (A) and pull to correct setting for storage, hold plug until cord is wider than the other). Handle grip 2. Hose handle 19. Plug cord into position. Powered hand tool 3. Cord rewind button: press button to release cord...
Manual
Page 5
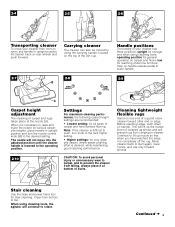
... following carpet height settings are recommended: • Lowest setting: for all types of stairs. Move cleaner back to the operating position. Stair cleaning Use the hose and power hand tool for various carpet pile heights, place handle in upright position, tilt cleaner back on handle. The nozzle will lift up nozzle so that when you have reached the edge, it at the nozzle (A). Before reaching edge, push down on rear wheels...
... following carpet height settings are recommended: • Lowest setting: for all types of stairs. Move cleaner back to the operating position. Stair cleaning Use the hose and power hand tool for various carpet pile heights, place handle in upright position, tilt cleaner back on handle. The nozzle will lift up nozzle so that when you have reached the edge, it at the nozzle (A). Before reaching edge, push down on rear wheels...
Manual
Page 6
..., books, lamps, lighting fixtures, venetian blinds, baseboards, shutters, and registers. CAUTION: The agitator continues to clean tools To clean the hose and powered hand tool, wipe off dirt with these home maintenance tasks as proper use and care of your cleaner will show red when the dirt cup is full or there is a blockage or clog in upright position. DO NOT submerge powered hand tool in upright position. To use with the dusting brush. 2-13 F Attach wand and tools Attach tool...
..., books, lamps, lighting fixtures, venetian blinds, baseboards, shutters, and registers. CAUTION: The agitator continues to clean tools To clean the hose and powered hand tool, wipe off dirt with these home maintenance tasks as proper use and care of your cleaner will show red when the dirt cup is full or there is a blockage or clog in upright position. DO NOT submerge powered hand tool in upright position. To use with the dusting brush. 2-13 F Attach wand and tools Attach tool...
Manual
Page 7
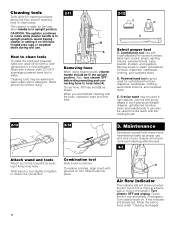
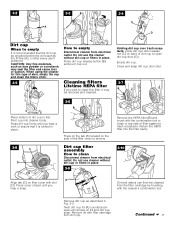
... HEPA filter (B) and brush with filter cartridge from the filter cartridge by brushing with slot (D). Cleaning filters Lifetime HEPA filter If you wish to clean this type of dust, empty the cup and clean the filters often. 3-5 How to empty Disconnect cleaner from electrical outlet. Empty dirt cup. Dirt cup filter assembly How to clean Disconnect cleaner from electrical outlet. Press cover closed until you hear a click to ensure that the dirt cup be removed and cleaned. Remove lid with the combination tool...
... HEPA filter (B) and brush with filter cartridge from the filter cartridge by brushing with slot (D). Cleaning filters Lifetime HEPA filter If you wish to clean this type of dust, empty the cup and clean the filters often. 3-5 How to empty Disconnect cleaner from electrical outlet. Empty dirt cup. Dirt cup filter assembly How to clean Disconnect cleaner from electrical outlet. Press cover closed until you hear a click to ensure that the dirt cup be removed and cleaned. Remove lid with the combination tool...
Manual
Page 8
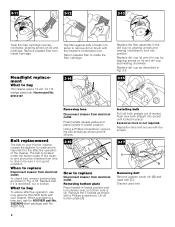
... located under the bottom plate of the cleaner. To check belt, remove bottom plate as shown with the screws. 3-17 C B Removing belt Remove agitator brush roll (B) and used belt. 8 Remove the 5 screws as shown in Fig. 3-16. Reposition lens and secure with a Phillips screwdriver. When purchasing a new belt, ask for the effective operation of the cleaner and should be checked from electrical outlet. Replace dirt cup lid onto dirt cup by aligning arrows on lid and cartridge. Installing...
... located under the bottom plate of the cleaner. To check belt, remove bottom plate as shown with the screws. 3-17 C B Removing belt Remove agitator brush roll (B) and used belt. 8 Remove the 5 screws as shown in Fig. 3-16. Reposition lens and secure with a Phillips screwdriver. When purchasing a new belt, ask for the effective operation of the cleaner and should be checked from electrical outlet. Replace dirt cup lid onto dirt cup by aligning arrows on lid and cartridge. Installing...
Manual
Page 9
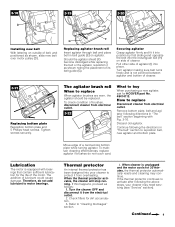
... reposition belt, new agitator and bottom plate. The agitator brush roll When to buy When purchasing a new agitator, ask for 30 minutes, the thermal protector automatically resets and cleaning may need servicing (see "Service" section). How to "Clearing blockages" section. 4. The addition of a card across bottom plate while turning agitator. Check filters for the life of the motor. Lubrication The motor is not pinched between agitator and bottom of cleaner. 3-21 Replacing bottom plate Reposition bottom plate and 5 Phillips head...
... reposition belt, new agitator and bottom plate. The agitator brush roll When to buy When purchasing a new agitator, ask for 30 minutes, the thermal protector automatically resets and cleaning may need servicing (see "Service" section). How to "Clearing blockages" section. 4. The addition of a card across bottom plate while turning agitator. Check filters for the life of the motor. Lubrication The motor is not pinched between agitator and bottom of cleaner. 3-21 Replacing bottom plate Reposition bottom plate and 5 Phillips head...
Manual
Page 10
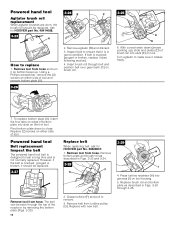
... slots on front of brush roll into grooves (I 4. Replace brush roll and bottom plate as described in Figs. 3-24 through 3-26. Replace with new belt. Ask for HOOVER part No. 38528037. 1. However, if the belt is cracked, gouged or broken, replace it so bottom faces up ), slide end plates (D) of tool. Remove tool from hose and turn it (see following section). 4. Powered hand tool 3-24 B C Agitator brush roll replacement When agitator brushes are worn, the brush roll should be seen through...
... slots on front of brush roll into grooves (I 4. Replace brush roll and bottom plate as described in Figs. 3-24 through 3-26. Replace with new belt. Ask for HOOVER part No. 38528037. 1. However, if the belt is cracked, gouged or broken, replace it so bottom faces up ), slide end plates (D) of tool. Remove tool from hose and turn it (see following section). 4. Powered hand tool 3-24 B C Agitator brush roll replacement When agitator brushes are worn, the brush roll should be seen through...
Manual
Page 11
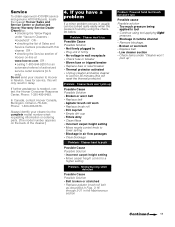
... HOOVER service and genuine HOOVER parts, locate the nearest Hoover Sales and Service Center or Authorized Hoover Warranty Service Dealer (Depot) by: • checking the Yellow Pages under "Cleaner won't pick up Problem: Smoky Possible Cause Possible Solution • Broken or worn belt • Replace belt • Agitator brush roll worn • Replace brush roll • Dirt cup full • Empty dirt cup • Filters dirty • Clean filters • Incorrect carpet height setting • Move nozzle control knob to lower setting • Blockage in air...
... HOOVER service and genuine HOOVER parts, locate the nearest Hoover Sales and Service Center or Authorized Hoover Warranty Service Dealer (Depot) by: • checking the Yellow Pages under "Cleaner won't pick up Problem: Smoky Possible Cause Possible Solution • Broken or worn belt • Replace belt • Agitator brush roll worn • Replace brush roll • Dirt cup full • Empty dirt cup • Filters dirty • Clean filters • Incorrect carpet height setting • Move nozzle control knob to lower setting • Blockage in air...
Manual
Page 12
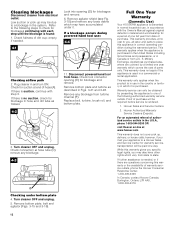
... in hose and dirt tube as described in accordance with step 3. Remove any blockage from hose. This warranty provides, at end of hose (A). Hoover Authorized Warranty Service Dealers (Depots). Check connection at www.hoover.com This warranty does not cover pick up may be required before service is found: 1. Disconnect powered hand tool from turbine channel (F). Replace belt, turbine, brush roll, and bottom plate. If further assistance is warranted in normal household use, in...
... in hose and dirt tube as described in accordance with step 3. Remove any blockage from hose. This warranty provides, at end of hose (A). Hoover Authorized Warranty Service Dealers (Depots). Check connection at www.hoover.com This warranty does not cover pick up may be required before service is found: 1. Disconnect powered hand tool from turbine channel (F). Replace belt, turbine, brush roll, and bottom plate. If further assistance is warranted in normal household use, in...

Manual
Page 21
... this section and mail to: THE HOOVER COMPANY ® 101 East Maple St. Please allow 3-4 weeks for delivery. North Canton, OH 44720 Attn: Sales & Service Center Part No. in ink. ¢ 21 ¢ PARTS & ACCESSORIES MAIL ORDER FORM ® Item Description Primary filter Secondary filter (HEPA) Headlight bulb Agitator belt (belt part no. 38528040) Powered hand tool Combination tool Crevice wand Part No. 59157055 59157014 27313107 40201190...
... this section and mail to: THE HOOVER COMPANY ® 101 East Maple St. Please allow 3-4 weeks for delivery. North Canton, OH 44720 Attn: Sales & Service Center Part No. in ink. ¢ 21 ¢ PARTS & ACCESSORIES MAIL ORDER FORM ® Item Description Primary filter Secondary filter (HEPA) Headlight bulb Agitator belt (belt part no. 38528040) Powered hand tool Combination tool Crevice wand Part No. 59157055 59157014 27313107 40201190...

Manual
Page 24
1-06 U5507-/09-900 HOOVER y ®son marcas registradas HOOVER and ® are registered trademarks Printed in China 59157088
1-06 U5507-/09-900 HOOVER y ®son marcas registradas HOOVER and ® are registered trademarks Printed in China 59157088


