
Manual
Page 1
™ CYCLONIC BAGLESS CANISTER OWNER'S MANUAL OPERATING AND SERVICING INSTRUCTIONS Please read these instructions carefully before using your vacuum.
™ CYCLONIC BAGLESS CANISTER OWNER'S MANUAL OPERATING AND SERVICING INSTRUCTIONS Please read these instructions carefully before using your vacuum.

Manual
Page 2
... 3. Primary Filter 13 HEPA Filter 14 Brushroll 15 Turbine Hand Tool 16 6. FEATURES 5 2. HOW TO OPERATE 8 Carrying Handle 8 Cord Release/Rewind 8 Vacuum Controls 9 Carpet Cleaning 10 Hard Floor Cleaning 10 Edge Cleaning 10 Stair Cleaning 10 Select Proper Cleaning Tools 11 Attaching Tools 11 5. WA R R A N T Y 2 0 OWNER'S INSTRUCTIONS English pp. 1-20 Español pàg. HOW TO ASSEMBLE 7 Connect Hose 7 Connect Wand 7 Connect Nozzle 7 4. Small parts can present a choking hazard. 2 GENERAL MAINTENANCE ..... 12 Dirt Cup 12 Umbrella Tube 12. TROUBLESHOOTING 18...
... 3. Primary Filter 13 HEPA Filter 14 Brushroll 15 Turbine Hand Tool 16 6. FEATURES 5 2. HOW TO OPERATE 8 Carrying Handle 8 Cord Release/Rewind 8 Vacuum Controls 9 Carpet Cleaning 10 Hard Floor Cleaning 10 Edge Cleaning 10 Stair Cleaning 10 Select Proper Cleaning Tools 11 Attaching Tools 11 5. WA R R A N T Y 2 0 OWNER'S INSTRUCTIONS English pp. 1-20 Español pàg. HOW TO ASSEMBLE 7 Connect Hose 7 Connect Wand 7 Connect Nozzle 7 4. Small parts can present a choking hazard. 2 GENERAL MAINTENANCE ..... 12 Dirt Cup 12 Umbrella Tube 12. TROUBLESHOOTING 18...

Manual
Page 3
... air flow. • Keep hair, loose clothing, fingers, and all controls before cleaning or servicing. • Do not use cord as it should always be present. • The hose contains electrical wires. turer's recommended attachments. • Do not use with any object into water. • Do not pull or carry by pulling on stairs. Unplug from openings and moving parts. • Turn off all parts of dust...
... air flow. • Keep hair, loose clothing, fingers, and all controls before cleaning or servicing. • Do not use cord as it should always be present. • The hose contains electrical wires. turer's recommended attachments. • Do not use with any object into water. • Do not pull or carry by pulling on stairs. Unplug from openings and moving parts. • Turn off all parts of dust...
Manual
Page 4
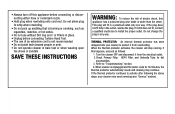
... Hand Tool. • The use without Dirt Cup and / or Filters in place. • Unplug before connecting or disconnecting either hose or motorized nozzle. • Hold plug when rewinding onto cord reel. Check Primary Filter, HEPA Filter, and Umbrella Tube for 30 minutes, the thermal protector automatically resets and cleaning may need servicing (see "Service" section). This plug will stop running. THERMAL PROTECTOR: An internal thermal protector has been designed into your cleaner may continue. Do not allow plug to "Troubleshooting" section. 4. If the plug...
... Hand Tool. • The use without Dirt Cup and / or Filters in place. • Unplug before connecting or disconnecting either hose or motorized nozzle. • Hold plug when rewinding onto cord reel. Check Primary Filter, HEPA Filter, and Umbrella Tube for 30 minutes, the thermal protector automatically resets and cleaning may need servicing (see "Service" section). This plug will stop running. THERMAL PROTECTOR: An internal thermal protector has been designed into your cleaner may continue. Do not allow plug to "Troubleshooting" section. 4. If the plug...
Manual
Page 5
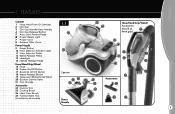
... Canister 1 Hose Inlet (Front Of Canister) 2 Dirt Cup 3 Dirt Cup Handle/Carry Handle 4 Dirt Cup Release Button 5 Auto Cord Rewind Pedal 6 Power Ready Light 7 Power Cord 8 Exhaust Filter Cover Power Nozzle 9 Reset Button 10 Floor Selector Indicator Light 11 Floor Selector Pedal 12 Wand Release Pedal 13 Headlight 14 Handle Release Pedal Hose/Hand Grip/Wand 15 Hose 16 Power On/Off Button 17 Brushroll On/Off Button 18 Wand Release Button 19 Telescopic/Bidirectional Wand 20 Suction Control Valve 21 Tool Storage Accessories 22 Crevice Tool 23 Dusting Brush 24 Hard Floor Brush 25 Turbine Hand Tool...
... Canister 1 Hose Inlet (Front Of Canister) 2 Dirt Cup 3 Dirt Cup Handle/Carry Handle 4 Dirt Cup Release Button 5 Auto Cord Rewind Pedal 6 Power Ready Light 7 Power Cord 8 Exhaust Filter Cover Power Nozzle 9 Reset Button 10 Floor Selector Indicator Light 11 Floor Selector Pedal 12 Wand Release Pedal 13 Headlight 14 Handle Release Pedal Hose/Hand Grip/Wand 15 Hose 16 Power On/Off Button 17 Brushroll On/Off Button 18 Wand Release Button 19 Telescopic/Bidirectional Wand 20 Suction Control Valve 21 Tool Storage Accessories 22 Crevice Tool 23 Dusting Brush 24 Hard Floor Brush 25 Turbine Hand Tool...

Manual
Page 6
CARTON CONTENTS 2. CARTON CONTENTS Remove all parts are located before disposing of packing material. 2.1 A D A Canister B Hose C Telescopic/Bidirectional Wand B C D Power Nozzle E Turbine Hand Tool F Crevice Tool G Dusting Brush E F G H H Hard Floor Brush 6 Make sure all parts from carton and identify each item shown.
CARTON CONTENTS 2. CARTON CONTENTS Remove all parts are located before disposing of packing material. 2.1 A D A Canister B Hose C Telescopic/Bidirectional Wand B C D Power Nozzle E Turbine Hand Tool F Crevice Tool G Dusting Brush E F G H H Hard Floor Brush 6 Make sure all parts from carton and identify each item shown.

Manual
Page 7
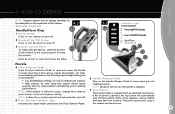
.... Connect Nozzle 3.3 Push the opposite end of Wand (E) until Latch clicks. To Release, step on front of cleaner. To disconnect hose from cleaner, press release buttons (C) on end of Hose Connector and pull out. To remove Wand from nozzle. 3.1 3.3 B 3.2 D A E F C G H 7 NOTE: The flexible hose contains electrical wires for connection to disconnect from Hose, press on Wand Releases Button (F) on sides of Wand and pull apart. HOW TO ASSEMBLE Connect Hose 3.1 Push Hose Connector end (A) into Power Nozzle.
.... Connect Nozzle 3.3 Push the opposite end of Wand (E) until Latch clicks. To Release, step on front of cleaner. To disconnect hose from cleaner, press release buttons (C) on end of Hose Connector and pull out. To remove Wand from nozzle. 3.1 3.3 B 3.2 D A E F C G H 7 NOTE: The flexible hose contains electrical wires for connection to disconnect from Hose, press on Wand Releases Button (F) on sides of Wand and pull apart. HOW TO ASSEMBLE Connect Hose 3.1 Push Hose Connector end (A) into Power Nozzle.

Manual
Page 8
... rewind the Power Cord, press the Cord Rewind Pedal (A), located on the Power Cord indicates the maximum recommended cord length. NOTE: A YELLOW mark on the top of the vacuum cleaner, and guide the Power Cord with one hand. To unwind Power Cord from whipping which could cause damage or injury. 8 HOW TO OPERATE 4. NOTE: Make sure Dirt Cup is securely fastened before moving unit. HOW TO OPERATE Carry Handle 4.1 Cord Release/Rewind 4.2 A Use the Carry Handle located on...
... rewind the Power Cord, press the Cord Rewind Pedal (A), located on the Power Cord indicates the maximum recommended cord length. NOTE: A YELLOW mark on the top of the vacuum cleaner, and guide the Power Cord with one hand. To unwind Power Cord from whipping which could cause damage or injury. 8 HOW TO OPERATE 4. NOTE: Make sure Dirt Cup is securely fastened before moving unit. HOW TO OPERATE Carry Handle 4.1 Cord Release/Rewind 4.2 A Use the Carry Handle located on...
Manual
Page 9
... rest button will not run until handle is released. 7 Reset Button This power nozzle is equipped with an electrical reset button. Low to lower the suction. If this happens, unplug cleaner and clear jam from brushroll. CLOSED - Slide as shown to open position to Mid Pile Carpets. NOTE: In Bare Floor mode brushroll will automatically shut off the brushroll motor. Press the reset button, plug in the cleaner and resume use. 9 HOW TO OPERATE 4.
... rest button will not run until handle is released. 7 Reset Button This power nozzle is equipped with an electrical reset button. Low to lower the suction. If this happens, unplug cleaner and clear jam from brushroll. CLOSED - Slide as shown to open position to Mid Pile Carpets. NOTE: In Bare Floor mode brushroll will automatically shut off the brushroll motor. Press the reset button, plug in the cleaner and resume use. 9 HOW TO OPERATE 4.
Manual
Page 10
... TO OPERATE 4. Guide side of Nozzle parallel to Bare Floor. NOTE: Take extra care when vacuuming stairs. Do not store canister in vertical position. 10 HOW TO OPERATE Carpet Cleaning Hard Floor Cleaning 4.5 4.6 Edge Cleaning 4.7 Stair Cleaning 4.8 B After attaching the Power Nozzle, set the Floor Selector to top. Power Nozzle may also be used for hard floor cleaning, by simply seting the Floor Selector to edge of Power Nozzle. (pg. 9) The Hard Floor Brush is recommended for your carpet type.
... TO OPERATE 4. Guide side of Nozzle parallel to Bare Floor. NOTE: Take extra care when vacuuming stairs. Do not store canister in vertical position. 10 HOW TO OPERATE Carpet Cleaning Hard Floor Cleaning 4.5 4.6 Edge Cleaning 4.7 Stair Cleaning 4.8 B After attaching the Power Nozzle, set the Floor Selector to top. Power Nozzle may also be used for hard floor cleaning, by simply seting the Floor Selector to edge of Power Nozzle. (pg. 9) The Hard Floor Brush is recommended for your carpet type.

Manual
Page 11
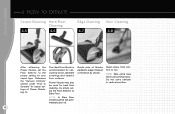
... wand. Dusting Brush with swivel neck may be used for upholstered furniture and carpeted stairs. D. Turbine Hand Tool may be used to dust furniture, lamps, lighting fixtures, blinds, baseboards, shutters and registers. Power Nozzle may be used for carpets, rugs and hard floor surfaces. (See "Hard Floor Cleaning" section for instructions) Tools may be used for upholstered furniture, draperies, tapestries and mattresses. (Tool stored under Hand Grip) B. HOW TO OPERATE Select the Proper Tool 4.9 A B C D E Attaching Tools...
... wand. Dusting Brush with swivel neck may be used for upholstered furniture and carpeted stairs. D. Turbine Hand Tool may be used to dust furniture, lamps, lighting fixtures, blinds, baseboards, shutters and registers. Power Nozzle may be used for carpets, rugs and hard floor surfaces. (See "Hard Floor Cleaning" section for instructions) Tools may be used for upholstered furniture, draperies, tapestries and mattresses. (Tool stored under Hand Grip) B. HOW TO OPERATE Select the Proper Tool 4.9 A B C D E Attaching Tools...

Manual
Page 12
... the vacuum cleaner from How to Clean 5.3 CAUTION: Very fine Disconnect cleaner from electrical outlet. How to Clean Disconnect cleaner from electrical outlet. materials, such as face powder or cornstarch, may clog the Remove Dirt Cup as described in place. type of dust, empty the cup and clean Replace Umbrella Tube in performance. IMPORTANT Maintenance Instructions Dirt Cup When to open er without Dirt Cup, and empty Dirt Cup. Filters in Fig. 5.1. 5.3 Press red Dirt Cup Door Release Button to Clean Empty the Dirt Cup at...
... the vacuum cleaner from How to Clean 5.3 CAUTION: Very fine Disconnect cleaner from electrical outlet. How to Clean Disconnect cleaner from electrical outlet. materials, such as face powder or cornstarch, may clog the Remove Dirt Cup as described in place. type of dust, empty the cup and clean Replace Umbrella Tube in performance. IMPORTANT Maintenance Instructions Dirt Cup When to open er without Dirt Cup, and empty Dirt Cup. Filters in Fig. 5.1. 5.3 Press red Dirt Cup Door Release Button to Clean Empty the Dirt Cup at...
Manual
Page 13
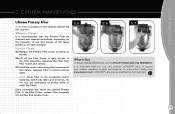
... boiling water to Buy To assure cleaning effectiveness, use and volume of dirt being picked up to remove dirt and debris. Separate the Filter from Filter Frame and remove. 5.7 Hold Filter under cold running water to 24 hours. GENERAL MAINTENANCE 5. NOTE: Allow Filter to dry completely before replacing, which may take up on the canister behind the Dirt Cup bin. To order Filters please visit www.hoover.com. When to assure your cleaner operates at...
... boiling water to Buy To assure cleaning effectiveness, use and volume of dirt being picked up to remove dirt and debris. Separate the Filter from Filter Frame and remove. 5.7 Hold Filter under cold running water to 24 hours. GENERAL MAINTENANCE 5. NOTE: Allow Filter to dry completely before replacing, which may take up on the canister behind the Dirt Cup bin. To order Filters please visit www.hoover.com. When to assure your cleaner operates at...
Manual
Page 14
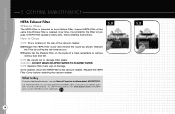
... HOOVER® parts to assure your cleaner operates at the same time Primary Filter is normal for the Filter to remove excess dust and dirt. GENERAL MAINTENANCE 5. Inspect HEPA Filter at peak performance. NOTE: Replace Filter if any sign of a trash receptacle to turn gray. Once cleaned, return the HEPA Filter to damage Filter pleats. It is important that you . 5.9 Gently tap the Pleated Filter on the rear of the vacuum cleaner. 5.8 Release...
... HOOVER® parts to assure your cleaner operates at the same time Primary Filter is normal for the Filter to remove excess dust and dirt. GENERAL MAINTENANCE 5. Inspect HEPA Filter at peak performance. NOTE: Replace Filter if any sign of a trash receptacle to turn gray. Once cleaned, return the HEPA Filter to damage Filter pleats. It is important that you . 5.9 Gently tap the Pleated Filter on the rear of the vacuum cleaner. 5.8 Release...
Manual
Page 15
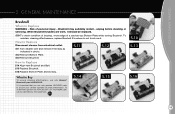
... brushes do not touch card. What to Buy To assure cleaning effectiveness, use only Hoover® Brushroll part #59143012. 5.14 5.15 It is important that you use only genuine HOOVER® parts to Replace WARNING - How to Remove Disconnect cleaner from electrical outlet. 5.11 Turn cleaner over and remove 9 Screws as indicated in photo. 5.12 Remove Bottom Plate. 5.13 Remove Brushroll. 5.11 5.12 How to Replace 5.14 Align new Brushroll and Belt...
... brushes do not touch card. What to Buy To assure cleaning effectiveness, use only Hoover® Brushroll part #59143012. 5.14 5.15 It is important that you use only genuine HOOVER® parts to Replace WARNING - How to Remove Disconnect cleaner from electrical outlet. 5.11 Turn cleaner over and remove 9 Screws as indicated in photo. 5.12 Remove Bottom Plate. 5.13 Remove Brushroll. 5.11 5.12 How to Replace 5.14 Align new Brushroll and Belt...

Manual
Page 16
... to assure your cleaner operates at peak performance. Pivot Bottom Plate down , slide End Plates (C) of Tool. A 5.17 Remove Tool from electrical outlet. Press the Latches on Tool. 5.20 Replace Belt Guard (B) making sure it so bottom faces up. To order Filters please visit www.hoover.com. HOOVER® parts can be replaced. 5.17 How to Buy To assure cleaning effectiveness, use only genuine HOOVER® parts to pinch brush bristles in...
... to assure your cleaner operates at peak performance. Pivot Bottom Plate down , slide End Plates (C) of Tool. A 5.17 Remove Tool from electrical outlet. Press the Latches on Tool. 5.20 Replace Belt Guard (B) making sure it so bottom faces up. To order Filters please visit www.hoover.com. HOOVER® parts can be replaced. 5.17 How to Buy To assure cleaning effectiveness, use only genuine HOOVER® parts to pinch brush bristles in...

Manual
Page 17
... or broken, it should be identified by the trademark- 5.23 F 5.24 E H G 17 GENERAL MAINTENANCE Remove Belt (F) from Hose and turn it so bottom faces up. Press the Latches on either side of Tool Housing and snap into grooves (H) on both sides of Tool and remove Bottom Plate (A). HOOVER® parts can be replaced. 5.22 Remove Tool from Turbine Pulley. GENERAL MAINTENANCE Turbine Hand Tool Inspecting the Belt The Turbine Hand Tool Belt...
... or broken, it should be identified by the trademark- 5.23 F 5.24 E H G 17 GENERAL MAINTENANCE Remove Belt (F) from Hose and turn it so bottom faces up. Press the Latches on either side of Tool Housing and snap into grooves (H) on both sides of Tool and remove Bottom Plate (A). HOOVER® parts can be replaced. 5.22 Remove Tool from Turbine Pulley. GENERAL MAINTENANCE Turbine Hand Tool Inspecting the Belt The Turbine Hand Tool Belt...

Manual
Page 18
.... Dirt Cup not installed properly. Suction Control Valve is automatically shut off and unplug the vacuum cleaner. Depress Reset Button located on Hand Grip. Replace Brushroll. POSSIBLE CAUSE Switch not "ON" at Hand Grip. No Voltage in firmly. Power Nozzle won 't run Needs Service. Switch not "ON" at Hand Grip. See "Service" section in . See "Low suction" section above . The service parts used in stored upright position. Power Cord not firmly plugged in manual. POSSIBLE SOLUTION Turn switch "ON" at Hand Grip. Filters dirty or clogged. Floor...
.... Dirt Cup not installed properly. Suction Control Valve is automatically shut off and unplug the vacuum cleaner. Depress Reset Button located on Hand Grip. Replace Brushroll. POSSIBLE CAUSE Switch not "ON" at Hand Grip. No Voltage in firmly. Power Nozzle won 't run Needs Service. Switch not "ON" at Hand Grip. See "Service" section in . See "Low suction" section above . The service parts used in stored upright position. Power Cord not firmly plugged in manual. POSSIBLE SOLUTION Turn switch "ON" at Hand Grip. Filters dirty or clogged. Floor...
Manual
Page 19
....5866) for service, this product to Hoover, Inc., in Glenwillow for an automated referral of the cleaner.) Please do not return this will only result in delay. Do not send your cleaner by : • Checking the Yellow Pages under Vacuum Cleaners - Customers) or hoover.ca (Canadian Customers). If further assistance is needed, contact the Exclusive Hoover Platinum Collection™ Member Services Line 1.877...
....5866) for service, this product to Hoover, Inc., in Glenwillow for an automated referral of the cleaner.) Please do not return this will only result in delay. Do not send your cleaner by : • Checking the Yellow Pages under Vacuum Cleaners - Customers) or hoover.ca (Canadian Customers). If further assistance is needed, contact the Exclusive Hoover Platinum Collection™ Member Services Line 1.877...
Manual
Page 20
... WHATSOEVER. you may not apply to a Hoover® Authorized Warranty Service Dealer along with the Owner's Manual, your Hoover Platinum Collection™ Bagless Cyclonic Canister is not transferable and may not be extended by the original owner. WARRANTY 8. WARRANTY Limited SIX Year Wa r r a n t y f o r H o o v e r P l a t i n u m C o l l e c t i o n ™ Bagless Cyclonic Canister (Domestic Use) WHAT THIS WARRANTY COVERS When used and maintained in normal household use of the product in French or Spanish, call 1.800.263...
... WHATSOEVER. you may not apply to a Hoover® Authorized Warranty Service Dealer along with the Owner's Manual, your Hoover Platinum Collection™ Bagless Cyclonic Canister is not transferable and may not be extended by the original owner. WARRANTY 8. WARRANTY Limited SIX Year Wa r r a n t y f o r H o o v e r P l a t i n u m C o l l e c t i o n ™ Bagless Cyclonic Canister (Domestic Use) WHAT THIS WARRANTY COVERS When used and maintained in normal household use of the product in French or Spanish, call 1.800.263...


