
Product Manual
Page 3
Do not immerse product. • For use on stairs. Keep cord away from heated surfaces. • Always disconnect cord from openings and moving parts. • Do not pick up hard, sharp objects with the cleaner. See "Grounding Instructions". • Do not clean over cord. WARNING: TO ... • Unplug cleaner when not in place. • Use extra care when cleaning on bare floors or sealed wood floors. Turn off all parts of body away from electrical outlet before any wet pick up operation. • Close supervision is necessary when any other toxic material with this machine...
Do not immerse product. • For use on stairs. Keep cord away from heated surfaces. • Always disconnect cord from openings and moving parts. • Do not pick up hard, sharp objects with the cleaner. See "Grounding Instructions". • Do not clean over cord. WARNING: TO ... • Unplug cleaner when not in place. • Use extra care when cleaning on bare floors or sealed wood floors. Turn off all parts of body away from electrical outlet before any wet pick up operation. • Close supervision is necessary when any other toxic material with this machine...

Product Manual
Page 5
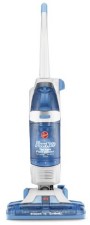
...(B) on upper handle (C) with opening (E) on cleaner. Remove cardboard packing insert from carton and identify each item shown. Push upper handle (C) all parts are out. A 1.6 To install nozzle, make sure latches (C) are located before disposing of nozzle. 1.6 CD E 1.7 While holding nozzle in ... is felt. 1.3 Align control rod (B) on bottom of nozzle with slot in place. 5 1.3 C D B 1.5 1.7 Brush assembly D. 1. Nozzle Remove all parts from squeegee area on the floor. Align middle section (D) of cleaner. Cleaner ASSEMBLY Carton contents 1.1 B C D A A.
...(B) on upper handle (C) with opening (E) on cleaner. Remove cardboard packing insert from carton and identify each item shown. Push upper handle (C) all parts are out. A 1.6 To install nozzle, make sure latches (C) are located before disposing of nozzle. 1.6 CD E 1.7 While holding nozzle in ... is felt. 1.3 Align control rod (B) on bottom of nozzle with slot in place. 5 1.3 C D B 1.5 1.7 Brush assembly D. 1. Nozzle Remove all parts from squeegee area on the floor. Align middle section (D) of cleaner. Cleaner ASSEMBLY Carton contents 1.1 B C D A A.

Product Manual
Page 11
... water. Align middle section (E) of your cleaner will ensure continued cleaning effectiveness. MAINTENANCE Familiarize yourself with opening (F) on non-carpeted floors. Remove debris from moving parts, unplug cleaner before servicing. 4.1 Slide the two nozzle release latches (A) outward. 4.2 Remove nozzle (B) by an authorized service representative. Continue to move cleaner over the area...
... water. Align middle section (E) of your cleaner will ensure continued cleaning effectiveness. MAINTENANCE Familiarize yourself with opening (F) on non-carpeted floors. Remove debris from moving parts, unplug cleaner before servicing. 4.1 Slide the two nozzle release latches (A) outward. 4.2 Remove nozzle (B) by an authorized service representative. Continue to move cleaner over the area...

Product Manual
Page 12
... which contain sufficient lubrication for the life of the motor. Replace tanks. 4.6 A 4.8 D C 4.10 4.7 B A 4.9 EF G E StorAGE Before storing cleaner: Turn cleaner OFF and disconnect from moving parts, unplug cleaner before servicing. Do not add lubricant to prevent leaking. Lubrication The motor is completely dry. CAUTION ! Tilt cleaner back so handle rests on...
... which contain sufficient lubrication for the life of the motor. Replace tanks. 4.6 A 4.8 D C 4.10 4.7 B A 4.9 EF G E StorAGE Before storing cleaner: Turn cleaner OFF and disconnect from moving parts, unplug cleaner before servicing. Do not add lubricant to prevent leaking. Lubrication The motor is completely dry. CAUTION ! Tilt cleaner back so handle rests on...

Product Manual
Page 14
...Hoover® service and genuine Hoover® parts, locate the nearest Authorized Hoover® Warranty Service Dealer (Depot) by the complete model number when requesting information or ordering parts. (The model number appears on the bottom of authorized service outlet locations call 1-800-944-9200. In Canada, contact Hoover...® Canada, Toronto: 755 Progress Ave., Scarborough, ON M1H 2W7 OR Hoover® Canada, ...
...Hoover® service and genuine Hoover® parts, locate the nearest Authorized Hoover® Warranty Service Dealer (Depot) by the complete model number when requesting information or ordering parts. (The model number appears on the bottom of authorized service outlet locations call 1-800-944-9200. In Canada, contact Hoover...® Canada, Toronto: 755 Progress Ave., Scarborough, ON M1H 2W7 OR Hoover® Canada, ...

Product Manual
Page 15
P 3 When cleaning a hard surface, the optional Hoover® hard surface attachment below must be used : 6 Brush Hoover® part # 36419008 5 Brush Hoover® part # 48417007. For optimal performance use with the appliance as noted below. ® Hoover Cleaning Product Guide Hoover Hoover Platinum Platinum Collection® Collection® Deep Professional Pet Plus Product Name Cleansing Premium Pet Oxy Anti...
P 3 When cleaning a hard surface, the optional Hoover® hard surface attachment below must be used : 6 Brush Hoover® part # 36419008 5 Brush Hoover® part # 48417007. For optimal performance use with the appliance as noted below. ® Hoover Cleaning Product Guide Hoover Hoover Platinum Platinum Collection® Collection® Deep Professional Pet Plus Product Name Cleansing Premium Pet Oxy Anti...


