
Manual
Page 5
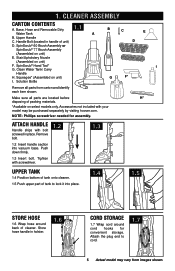
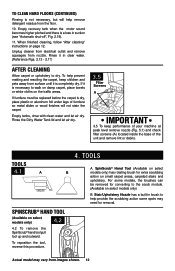
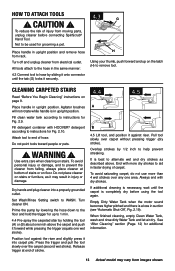
... Stair/Upholstery Nozzle (Assembled on unit) E. SpinScrub® Hand Tool* G. NOTE: Phillips screwdriver needed for convenient storage. Store hose handle in place. Clean Water Tank/ Carry Handle H. Squeegee* (Assembled on select models only. 1. SpinScrub® 60 Brush Assembly or SpinScrub® 77 Brush Assembly (Assembled on unit)... F. attaCh handle Handle ships with bolt screwed in holster. 1.6 Cord storaGe 1.7 Wrap cord around back of tank to cord. 1.7 5 Actual model may be purchased separately by visiting hoover.com. Push down firmly. 1.3 Insert bolt.
... Stair/Upholstery Nozzle (Assembled on unit) E. SpinScrub® Hand Tool* G. NOTE: Phillips screwdriver needed for convenient storage. Store hose handle in place. Clean Water Tank/ Carry Handle H. Squeegee* (Assembled on select models only. 1. SpinScrub® 60 Brush Assembly or SpinScrub® 77 Brush Assembly (Assembled on unit)... F. attaCh handle Handle ships with bolt screwed in holster. 1.6 Cord storaGe 1.7 Wrap cord around back of tank to cord. 1.7 5 Actual model may be purchased separately by visiting hoover.com. Push down firmly. 1.3 Insert bolt.
Manual
Page 6
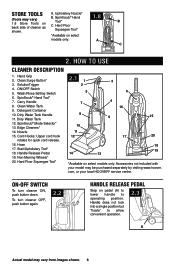
...HOOVER® service center. A C 2. ON/OFF Switch 5. Wash/Rinse Setting Switch 6. Cord Hooks: Upper cord hook rotates for quick cord release. 16. Upholstery Nozzle* B. Hard Floor Squeegee Tool* 1.8 B *Available on select models only. Hand Grip 2. Clean Water Tank 9. Dirty Water Tank... operation. 2.3 A Actual model may be purchased separately by visiting www.hoover. A. HOW TO USE Cleaner Description 1. SolutionTrigger 4. Carry Handle 8. Detergent Container 10. Dirty Water Tank Handle 11. SpinScrub® Mode Selector* 13. Hose 17. com,...
...HOOVER® service center. A C 2. ON/OFF Switch 5. Wash/Rinse Setting Switch 6. Cord Hooks: Upper cord hook rotates for quick cord release. 16. Upholstery Nozzle* B. Hard Floor Squeegee Tool* 1.8 B *Available on select models only. Hand Grip 2. Clean Water Tank 9. Dirty Water Tank... operation. 2.3 A Actual model may be purchased separately by visiting www.hoover. A. HOW TO USE Cleaner Description 1. SolutionTrigger 4. Carry Handle 8. Detergent Container 10. Dirty Water Tank Handle 11. SpinScrub® Mode Selector* 13. Hose 17. com,...
Manual
Page 7
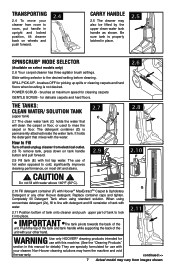
... carpet or floor. brushes at maximum speed for delicate carpets and hard floors. 2.6 The tanks: CLEAN WATER/ SOLUTION TANK 2.7 (upper tank) C D 2.7 The clean water tank (C) holds the water that mixes with your other Hoover detergent. SPILL PICK-UP - The use with this machine. (See the "Cleaning Products" section in this manual for details) They are specially formulated for picking up spills...
... carpet or floor. brushes at maximum speed for delicate carpets and hard floors. 2.6 The tanks: CLEAN WATER/ SOLUTION TANK 2.7 (upper tank) C D 2.7 The clean water tank (C) holds the water that mixes with your other Hoover detergent. SPILL PICK-UP - The use with this machine. (See the "Cleaning Products" section in this manual for details) They are specially formulated for picking up spills...
Manual
Page 8
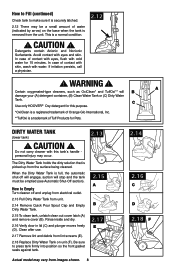
... and the tank must be a small amount of contact with eyes, flush with water. C Use only HOOVER® Oxy detergent for this tank's handle personal injury may occur. The Dirty Water Tank holds the ...Clean after use. 2.17 Remove lint and debris from lint screens (E). 2.18 Replace Dirty Water Tank on the base when the tank is a normal condition. 2.12 ! how to empty Turn cleaner off will engage, suction will B A damage your (A) detergent container, (B) Clean Water Tank or (C) Dirty Water Tank. In case of Tuff Products for 15 minutes. CAUTION ! dirty water tank (lower tank...
... and the tank must be a small amount of contact with eyes, flush with water. C Use only HOOVER® Oxy detergent for this tank's handle personal injury may occur. The Dirty Water Tank holds the ...Clean after use. 2.17 Remove lint and debris from lint screens (E). 2.18 Replace Dirty Water Tank on the base when the tank is a normal condition. 2.12 ! how to empty Turn cleaner off will engage, suction will B A damage your (A) detergent container, (B) Clean Water Tank or (C) Dirty Water Tank. In case of Tuff Products for 15 minutes. CAUTION ! dirty water tank (lower tank...
Manual
Page 9
... yellow float disk will become noticeably higher in place. Test for repair. 3. d. Pretreat spots and heavy traffic areas with the detergent. B Check clean water tank also; Wet a white absorbent cloth with HOOVER® Spot & Stain Spray Cleaner*- e. g. For carpet, use without float and float retainer in pitch. In a small, hidden area, gently rub the...
... yellow float disk will become noticeably higher in place. Test for repair. 3. d. Pretreat spots and heavy traffic areas with the detergent. B Check clean water tank also; Wet a white absorbent cloth with HOOVER® Spot & Stain Spray Cleaner*- e. g. For carpet, use without float and float retainer in pitch. In a small, hidden area, gently rub the...
Manual
Page 10
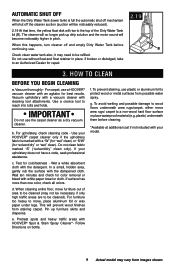
...4 times = 2 while squeezing the trigger and 2 without squeezing trigger (dry stroke). For best cleaning results and to instructions for Fig. 2.10. Always end with Hoover® detergent according to aid in suction (see "Automatic shut-off", Fig. 2.19). Actual model...back toward you (second wet stroke). When finished cleaning, follow "After Cleaning" instructions on both forward and reverse strokes. 3.3 If you without ). 8&5 8&5 %3: %3: Cleaning Carpet 3.1/3.1a Read "Before You Begin Cleaning" instructions. 3.2 Fill Clean Water Tank according to keep the cleaner on floor for both...
...4 times = 2 while squeezing the trigger and 2 without squeezing trigger (dry stroke). For best cleaning results and to instructions for Fig. 2.10. Always end with Hoover® detergent according to aid in suction (see "Automatic shut-off", Fig. 2.19). Actual model...back toward you (second wet stroke). When finished cleaning, follow "After Cleaning" instructions on both forward and reverse strokes. 3.3 If you without ). 8&5 8&5 %3: %3: Cleaning Carpet 3.1/3.1a Read "Before You Begin Cleaning" instructions. 3.2 Fill Clean Water Tank according to keep the cleaner on floor for both...
Manual
Page 11
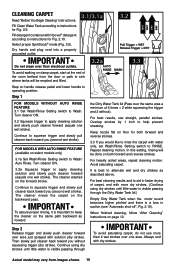
... and plug cleaner into place. Place the floor nozzle with HOOVER® Hard Floor that handle rests on page 9. 3. Cleaning hard floors 3.4 How to Attach Squeegee for Fig. 2.9. Fill clean water tank according to GENTLE SCRUB. 4. Clean Surge® Button (Available on select models only) The Clean Surge® button can be used to dispense extra solution...
... and plug cleaner into place. Place the floor nozzle with HOOVER® Hard Floor that handle rests on page 9. 3. Cleaning hard floors 3.4 How to Attach Squeegee for Fig. 2.9. Fill clean water tank according to GENTLE SCRUB. 4. Clean Surge® Button (Available on select models only) The Clean Surge® button can be used to dispense extra solution...
Manual
Page 12
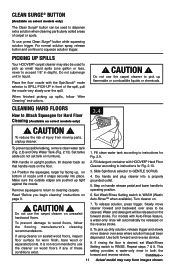
... A IMPORTANT 3.5 To keep children and pets away from the floor. 10. tools 4.1 A B SpinScrub® hand tool (Available on page 12. Empty tanks, rinse with clean water and let air dry. For some spots may vary from nozzle. If it is dry, place plastic or aluminum foil under legs of the... it in suction (see "Automatic shut-off", Fig. 2.19). 11. Empty recovery tank when the motor sound becomes higher pitched and there is a loss in clear water. (Reference Figs. 2.13 - 2.17) After cleaning Allow carpet or upholstery to walk on damp carpet, place towels or white cloths on ...
... A IMPORTANT 3.5 To keep children and pets away from the floor. 10. tools 4.1 A B SpinScrub® hand tool (Available on page 12. Empty tanks, rinse with clean water and let air dry. For some spots may vary from nozzle. If it is dry, place plastic or aluminum foil under legs of the... it in suction (see "Automatic shut-off", Fig. 2.19). 11. Empty recovery tank when the motor sound becomes higher pitched and there is a loss in clear water. (Reference Figs. 2.13 - 2.17) After cleaning Allow carpet or upholstery to walk on damp carpet, place towels or white cloths on ...
Manual
Page 13
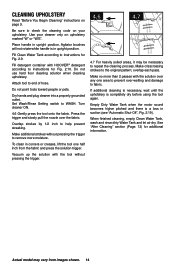
...in upright position. Do not point tools toward people or pets. ! Do not place cleaner on floor. When finished cleaning, empty Clean Water Tank, wash and rinse dirty Water Tank and let air dry. Dry hands and plug cleaner into carpet pile. Always end with more than 4 wet strokes ...upright position. End with dry strokes. WARNING ! Pull tool slowly over the carpet (second wet stroke). Fill detergent container with HOOVER® detergent according to alternate wet and dry strokes as it against the riser and slightly press it onto connector until the carpet...
...in upright position. Do not point tools toward people or pets. ! Do not place cleaner on floor. When finished cleaning, empty Clean Water Tank, wash and rinse dirty Water Tank and let air dry. Dry hands and plug cleaner into carpet pile. Always end with more than 4 wet strokes ...upright position. End with dry strokes. WARNING ! Pull tool slowly over the carpet (second wet stroke). Fill detergent container with HOOVER® detergent according to alternate wet and dry strokes as it against the riser and slightly press it onto connector until the carpet...
Manual
Page 14
...or pets. Dry hands and plug cleaner into a properly grounded outlet. Make no more moisture. When finished cleaning, empty Clean Water Tank, wash and rinse dirty Water Tank and let air dry. Attach tool to help prevent streaking. Vacuum up the solution with the solution over ...images shown. 14 Place handle in upright position. Do not use hard floor cleaning solution when cleaning upholstery. Make crisscrossing strokes to WASH. Use your upholstery. Fill detergent container with HOOVER® detergent according to fabric. Press the trigger and slowly pull the nozzle...
...or pets. Dry hands and plug cleaner into a properly grounded outlet. Make no more moisture. When finished cleaning, empty Clean Water Tank, wash and rinse dirty Water Tank and let air dry. Attach tool to help prevent streaking. Vacuum up the solution with the solution over ...images shown. 14 Place handle in upright position. Do not use hard floor cleaning solution when cleaning upholstery. Make crisscrossing strokes to WASH. Use your upholstery. Fill detergent container with HOOVER® detergent according to fabric. Press the trigger and slowly pull the nozzle...
Manual
Page 15
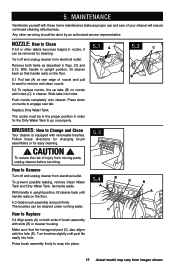
... Dirty Water Tank. The nozzle must be in the proper position in nozzle, it 5.1 A can be done by an authorized service representative. Follow these home maintenance tasks as described in cleaner housing. C How to engage rear tab. Any other debris becomes lodged in order for cleaning. 5. To prevent possible leaking, remove Clean Water Tank and Dirty Water Tank.
... Dirty Water Tank. The nozzle must be in the proper position in nozzle, it 5.1 A can be done by an authorized service representative. Follow these home maintenance tasks as described in cleaner housing. C How to engage rear tab. Any other debris becomes lodged in order for cleaning. 5. To prevent possible leaking, remove Clean Water Tank and Dirty Water Tank.
Manual
Page 16
... move freely. 5.6 Remove lint and debris from inside of tank. Remove dirt and debris from lint screens (C). 5.5 A B Storage Before storing: • Empty Clean Water Tank and let air dry. Replace on cleaner. • Empty Dirty Water Tank, rinse tank and lid thoroughly with clean water and let air dry. • Verify door lid and plunger on a carpeted or wood...
... move freely. 5.6 Remove lint and debris from inside of tank. Remove dirt and debris from lint screens (C). 5.5 A B Storage Before storing: • Empty Clean Water Tank and let air dry. Replace on cleaner. • Empty Dirty Water Tank, rinse tank and lid thoroughly with clean water and let air dry. • Verify door lid and plunger on a carpeted or wood...
Manual
Page 17
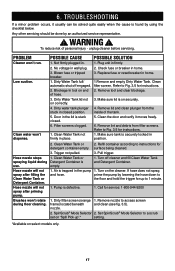
... Dirty Water Tank full/ automatic shut off cleaner and fill Clean Water Tank and Detergent Container. 1. Filter screens clogged. 1. Clean filter screen. Remove tool and clear blockage. 3. Refer to instructions for surface being cleaned. 3. Make sure tank is securely locked in place. 2. Clean Water Tank or ...for instructions. 2. Set SpinScrub® Mode Selector to Fig. 3.5 for service: 1-800-944-9200 1. Low suction. Clean Water Tank or Detergent Container is defective. 1. Replace fuse or reset breaker in home. 3. Hose nozzle will not spray after priming...
... Dirty Water Tank full/ automatic shut off cleaner and fill Clean Water Tank and Detergent Container. 1. Filter screens clogged. 1. Clean filter screen. Remove tool and clear blockage. 3. Refer to instructions for surface being cleaned. 3. Make sure tank is securely locked in place. 2. Clean Water Tank or ...for instructions. 2. Set SpinScrub® Mode Selector to Fig. 3.5 for service: 1-800-944-9200 1. Low suction. Clean Water Tank or Detergent Container is defective. 1. Replace fuse or reset breaker in home. 3. Hose nozzle will not spray after priming...


