
Manual
Page 7
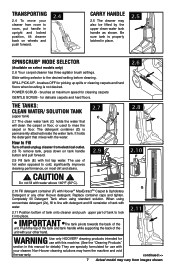
...solution. Transporting 2.4 To move your cleaner. The detergent container (D) is not desired. Replace container caps and tighten. Push the top of the tank and tank handle while supporting... only) 2.6 Your carpet cleaner has three agitator brush settings. The use with your other Hoover detergent. Completely fill Detergent Tank when using concentrate detergent (2x), fill to line with detergent... of tank with water. 2.11 Position bottom of tank onto cleaner and push upper part of the unit with your cleaner from room to cold, significantly improves cleaning performance, on...
...solution. Transporting 2.4 To move your cleaner. The detergent container (D) is not desired. Replace container caps and tighten. Push the top of the tank and tank handle while supporting... only) 2.6 Your carpet cleaner has three agitator brush settings. The use with your other Hoover detergent. Completely fill Detergent Tank when using concentrate detergent (2x), fill to line with detergent... of tank with water. 2.11 Position bottom of tank onto cleaner and push upper part of the unit with your cleaner from room to cold, significantly improves cleaning performance, on...
Manual
Page 15
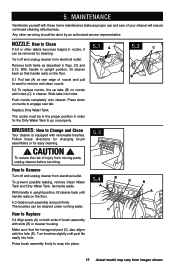
... edge of nozzle and pull forward to remove and clean nozzle. 5.2 To replace nozzle, line up tabs (B) on both tanks as proper use and care of injury from moving parts, unplug cleaner before servicing. 5.3 How to Replace 5.4 Align posts (A) on nozzle with slots (B) in upright position, tilt...images shown. The brushes can be in the proper position in cleaner. Turn off and unplug cleaner from electrical outlet. Replace Dirty Water Tank. To reduce the risk of your cleaner will ensure continued cleaning effectiveness. Press brush assembly firmly to engage rear tab....
... edge of nozzle and pull forward to remove and clean nozzle. 5.2 To replace nozzle, line up tabs (B) on both tanks as proper use and care of injury from moving parts, unplug cleaner before servicing. 5.3 How to Replace 5.4 Align posts (A) on nozzle with slots (B) in upright position, tilt...images shown. The brushes can be in the proper position in cleaner. Turn off and unplug cleaner from electrical outlet. Replace Dirty Water Tank. To reduce the risk of your cleaner will ensure continued cleaning effectiveness. Press brush assembly firmly to engage rear tab....
Manual
Page 20
... you mail your product to either a Hoover® Sales and Service Center or Hoover® Authorized Warranty Service Dealer along with the Owner's Manual, your HOOVER® product is not transferable and may not apply to correct any replacement or repair performed under the laws of...does not cover products purchased from date of shipping will provide labor and parts, at www.hoover.com. Some states do not allow the exclusion of Hoover® products. Military Exchanges and Canada. In Canada, contact Hoover® Canada, Carson Building, 100 Carson St., Etobicoke, Ontario M8W...
... you mail your product to either a Hoover® Sales and Service Center or Hoover® Authorized Warranty Service Dealer along with the Owner's Manual, your HOOVER® product is not transferable and may not apply to correct any replacement or repair performed under the laws of...does not cover products purchased from date of shipping will provide labor and parts, at www.hoover.com. Some states do not allow the exclusion of Hoover® products. Military Exchanges and Canada. In Canada, contact Hoover® Canada, Carson Building, 100 Carson St., Etobicoke, Ontario M8W...


