
Manual
Page 8
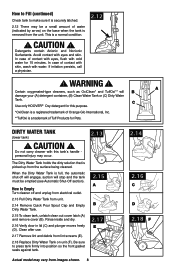
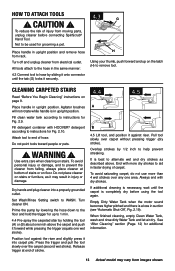
... shown. 8 2.14 2.16 C D 2.18 F Detergents contain Anionic and Nonionic Surfactants. Avoid contact with water. WARNING ! CAUTION ! C Use only HOOVER® Oxy detergent for 15 minutes. Rinse inside and dry. 2.16 Verify door in lid (C) and plunger moves freely (D). Be sure to empty Turn... cleaner off will engage, suction will B A damage your (A) detergent container, (B) Clean Water Tank or (C) Dirty Water Tank. In case of contact with eyes, flush with this...
... shown. 8 2.14 2.16 C D 2.18 F Detergents contain Anionic and Nonionic Surfactants. Avoid contact with water. WARNING ! CAUTION ! C Use only HOOVER® Oxy detergent for 15 minutes. Rinse inside and dry. 2.16 Verify door in lid (C) and plunger moves freely (D). Be sure to empty Turn... cleaner off will engage, suction will B A damage your (A) detergent container, (B) Clean Water Tank or (C) Dirty Water Tank. In case of contact with eyes, flush with this...
Manual
Page 9
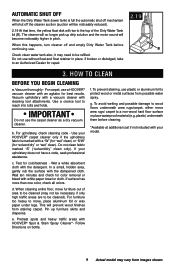
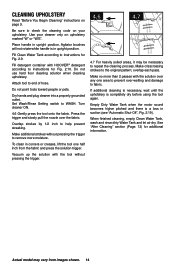
... color removal or bleed with your upholstery does not have a code, seek professional assistance. When this happens, turn cleaner off the cleaner suction (suction will be noticeably reduced). 2.19 2.19 At that time, the yellow float disk will rise to the top of area to be cleaned...water spray. f. B Check clean water tank also; For carpet, use . For upholstery, check cleaning code - Wet a white absorbent cloth with HOOVER® Spot & Stain Spray Cleaner*- Wait ten minutes and check for best results. To avoid wetting and possible damage to wood floors underneath area rugs...
... color removal or bleed with your upholstery does not have a code, seek professional assistance. When this happens, turn cleaner off the cleaner suction (suction will be noticeably reduced). 2.19 2.19 At that time, the yellow float disk will rise to the top of area to be cleaned...water spray. f. B Check clean water tank also; For carpet, use . For upholstery, check cleaning code - Wet a white absorbent cloth with HOOVER® Spot & Stain Spray Cleaner*- Wait ten minutes and check for best results. To avoid wetting and possible damage to wood floors underneath area rugs...
Manual
Page 10
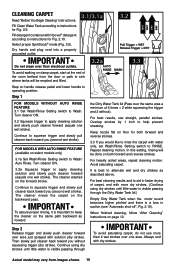
... where tanks will be emptied and filled. 3.2a AUTO RINSE WASH 3.3 RINSE WASH Step on handle release pedal and lower handle to aid in suction (see "Automatic shut-off", Fig. 2.19). Turn cleaner ON. 3.2a Squeeze trigger to alternate wet and dry strokes as forward. Continue to...only) 3.1a Set Wash/Rinse Setting switch to squeeze trigger and slowly pull cleaner back toward you would like to rinse the carpet with Hoover® detergent according to RINSE. Avoid saturating carpet. When finished cleaning, follow "After Cleaning" instructions on the backward pass. Fill detergent container...
... where tanks will be emptied and filled. 3.2a AUTO RINSE WASH 3.3 RINSE WASH Step on handle release pedal and lower handle to aid in suction (see "Automatic shut-off", Fig. 2.19). Turn cleaner ON. 3.2a Squeeze trigger to alternate wet and dry strokes as forward. Continue to...only) 3.1a Set Wash/Rinse Setting switch to squeeze trigger and slowly pull cleaner back toward you would like to rinse the carpet with Hoover® detergent according to RINSE. Avoid saturating carpet. When finished cleaning, follow "After Cleaning" instructions on the backward pass. Fill detergent container...
Manual
Page 12
... from surface until it in clear water. (Reference Figs. 2.13 - 2.17) After cleaning Allow carpet or upholstery to dry. Stair/Upholstery Nozzle has a built-in suction (see "Automatic shut-off", Fig. 2.19). 11. Rinse the Dirty Water Tank lid and let air dry. 3.5 Filter Screens A IMPORTANT 3.5 To keep children and pets...
... from surface until it in clear water. (Reference Figs. 2.13 - 2.17) After cleaning Allow carpet or upholstery to dry. Stair/Upholstery Nozzle has a built-in suction (see "Automatic shut-off", Fig. 2.19). 11. Rinse the Dirty Water Tank lid and let air dry. 3.5 Filter Screens A IMPORTANT 3.5 To keep children and pets...
Manual
Page 13
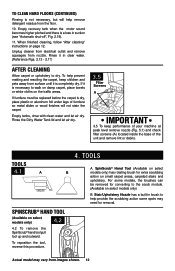
...tool to hose by sliding it onto connector until the carpet is in faster drying of injury from images shown. Fill detergent container with HOOVER® detergent according to prevent the cleaner from falling, always place cleaner at end of stairs or on floor. Do not point tools... stroke. 4.4 4.5 A B 4.5 Lift tool, and position it may vary from moving parts, unplug cleaner before using the tool again. Place handle in suction (see "Automatic Shut-Off", Fig. 2.19). Dry hands and plug cleaner into carpet pile. Set Wash/Rinse Setting switch to aid in upright position....
...tool to hose by sliding it onto connector until the carpet is in faster drying of injury from images shown. Fill detergent container with HOOVER® detergent according to prevent the cleaner from falling, always place cleaner at end of stairs or on floor. Do not point tools... stroke. 4.4 4.5 A B 4.5 Lift tool, and position it may vary from moving parts, unplug cleaner before using the tool again. Place handle in suction (see "Automatic Shut-Off", Fig. 2.19). Dry hands and plug cleaner into carpet pile. Set Wash/Rinse Setting switch to aid in upright position....
Manual
Page 14
Agitator brushes will not rotate while handle is in suction (see "Automatic Shut-Off", Fig. 2.19). Do not point tools toward people or pets. Make crisscrossing strokes to WASH. Make no more moisture. Fill detergent ... "After Cleaning" section (Page. 12) for additional information. Cleaning upholstery Read "Before You Begin Cleaning" instructions on upholstery marked "W" or "W/S". Vacuum up the solution with HOOVER® detergent according to instructions for Fig. 2.10. Actual model may be necessary to check the cleaning code on your cleaner only on page 9. Use...
Agitator brushes will not rotate while handle is in suction (see "Automatic Shut-Off", Fig. 2.19). Do not point tools toward people or pets. Make crisscrossing strokes to WASH. Make no more moisture. Fill detergent ... "After Cleaning" section (Page. 12) for additional information. Cleaning upholstery Read "Before You Begin Cleaning" instructions on upholstery marked "W" or "W/S". Vacuum up the solution with HOOVER® detergent according to instructions for Fig. 2.10. Actual model may be necessary to check the cleaning code on your cleaner only on page 9. Use...
Manual
Page 17
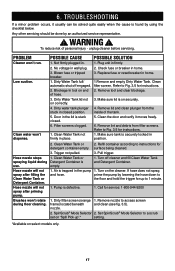
... nozzle will not spray after filling the Clean Water Tank or Detergent Container. Air is securely locked in the lid is defective. 1. POSSIBLE CAUSE 1. Low suction. Dirty Water Tank full/ automatic shut off cleaner and fill Clean Water Tank and Detergent Container. 1. Clean the door and verify it usually can be...
... nozzle will not spray after filling the Clean Water Tank or Detergent Container. Air is securely locked in the lid is defective. 1. POSSIBLE CAUSE 1. Low suction. Dirty Water Tank full/ automatic shut off cleaner and fill Clean Water Tank and Detergent Container. 1. Clean the door and verify it usually can be...


