Manual
Page 1
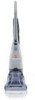
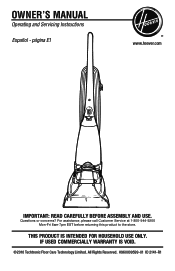
All Rights Reserved. #960009599-01 ID 2141-R1 Owner's Manual Operating and Servicing Instructions Español - IF USED COMMERCIALLY WARRANTY IS VOID. ©2010 Techtronic Floor Care Technology Limited. For assistance, please call Customer Service at 1-800-944-9200 Mon-Fri 8am-7pm EST before returning this product to the store. página E1 www.hoover.com IMPORTANT: READ CAREFULLY BEFORE ASSEMBLY AND USE. THIS PRODUCT IS INTENDED FOR HOUSEHOLD USE ONLY. Questions or concerns?
All Rights Reserved. #960009599-01 ID 2141-R1 Owner's Manual Operating and Servicing Instructions Español - IF USED COMMERCIALLY WARRANTY IS VOID. ©2010 Techtronic Floor Care Technology Limited. For assistance, please call Customer Service at 1-800-944-9200 Mon-Fri 8am-7pm EST before returning this product to the store. página E1 www.hoover.com IMPORTANT: READ CAREFULLY BEFORE ASSEMBLY AND USE. THIS PRODUCT IS INTENDED FOR HOUSEHOLD USE ONLY. Questions or concerns?
Manual
Page 2
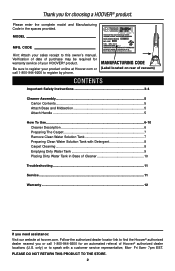
... a HOOVER® product. Manufacturing code (Label located on rear of vacuum) Contents Important Safety Instructions 3-4 Cleaner Assembly 5 Carton Contents 5 Attach Base and Midsection 5 Attach Handle 5 How To Use...6-10 Cleaner Description 6 Preparing The Carpet 7 Remove Clean Water Solution Tank 7 Preparing Clean Water Solution Tank with a customer service representative; Please do not return this owner's manual. Mon- only) or to find the Hoover® authorized dealer nearest you for warranty service of Cleaner 10 Troubleshooting 11 Service...11 Warranty...
... a HOOVER® product. Manufacturing code (Label located on rear of vacuum) Contents Important Safety Instructions 3-4 Cleaner Assembly 5 Carton Contents 5 Attach Base and Midsection 5 Attach Handle 5 How To Use...6-10 Cleaner Description 6 Preparing The Carpet 7 Remove Clean Water Solution Tank 7 Preparing Clean Water Solution Tank with a customer service representative; Please do not return this owner's manual. Mon- only) or to find the Hoover® authorized dealer nearest you for warranty service of Cleaner 10 Troubleshooting 11 Service...11 Warranty...
Manual
Page 3
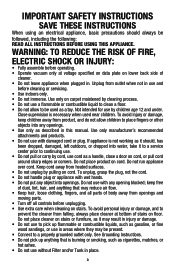
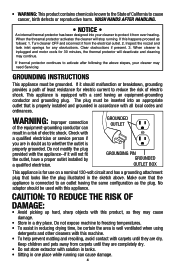
...ALL INSTRUCTIONS BEFORE USING THIS APPLIANCE. WARNING: TO REDUCE THE RISK OF FIRE, ELECTRIC SHOCK OR INJURY: • Fully assemble before operating. • Operate vacuum only at bottom of stairs on lower back side of cleaner. ...free of body away from heated surfaces. • Do not unplug by cord, use cord as a handle, close a door on stairs or furniture, as it may reduce air flow. • Keep hair, loose clothing, fingers, and all controls before cleaning or servicing. • Use indoors only. • Do not immerse. Do not place product on cord. Do not use with wet hands...
...ALL INSTRUCTIONS BEFORE USING THIS APPLIANCE. WARNING: TO REDUCE THE RISK OF FIRE, ELECTRIC SHOCK OR INJURY: • Fully assemble before operating. • Operate vacuum only at bottom of stairs on lower back side of cleaner. ...free of body away from heated surfaces. • Do not unplug by cord, use cord as a handle, close a door on stairs or furniture, as it may reduce air flow. • Keep hair, loose clothing, fingers, and all controls before cleaning or servicing. • Use indoors only. • Do not immerse. Do not place product on cord. Do not use with wet hands...
Manual
Page 4
... using detergents and other cleaners with this happens proceed as they are dry. Do not expose machine to freezing temperatures. • To assist in a dry place. The plug must be inserted into your cleaner may need Servicing GROUNDING INSTRUCTIONS This appliance must be grounded. Keep children and pets away from carpets until they are completely dry. • Do not store extractor...
... using detergents and other cleaners with this happens proceed as they are dry. Do not expose machine to freezing temperatures. • To assist in a dry place. The plug must be inserted into your cleaner may need Servicing GROUNDING INSTRUCTIONS This appliance must be grounded. Keep children and pets away from carpets until they are completely dry. • Do not store extractor...
Manual
Page 5
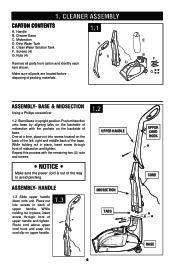
... screw through front of upper handle. Clean Water Solution Tank F. Place nut into cord clip on the backside of midsection with the remaining two (2) nuts and screws 1.2 UPPER HANDLE • NOTICE • Make sure the power cord is out of the way to avoid pinching. CVlaecaunuemr AASSSSEEMMBBLLYY Carton contents A. Handle B. E B F G ASSEMBLY- ASSEMBLY- Screws (4) G. Base & Midsection Using a Phillips screwdriver 1.2 Stand base in...
... screw through front of upper handle. Clean Water Solution Tank F. Place nut into cord clip on the backside of midsection with the remaining two (2) nuts and screws 1.2 UPPER HANDLE • NOTICE • Make sure the power cord is out of the way to avoid pinching. CVlaecaunuemr AASSSSEEMMBBLLYY Carton contents A. Handle B. E B F G ASSEMBLY- ASSEMBLY- Screws (4) G. Base & Midsection Using a Phillips screwdriver 1.2 Stand base in...
Manual
Page 6
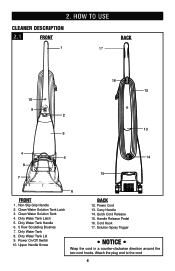
Clean Water Solution Tank Latch 3. Dirty Water Tank Latch 5. Carry Handle 14. Power On/Off Switch 10. Non-Slip Grip Handle 2. Upper Handle Screw BACK 12. Quick Cord Release 15. Dirty Water Tank 8. Power Cord 13. Cord Hook 17. Dirty Water Tank Handle 6. 5 Row Scrubbing Brushes 7. HOW TO USE Cleaner Description 2.1 FRONT BACK 17 FRONT 1. Dirty Water Tank Lid 9. Attach the plug end to the cord 6 Handle Release Pedal 16. Solution Spray Trigger • NOTICE • Wrap the cord in a counter-clockwise...
Clean Water Solution Tank Latch 3. Dirty Water Tank Latch 5. Carry Handle 14. Power On/Off Switch 10. Non-Slip Grip Handle 2. Upper Handle Screw BACK 12. Quick Cord Release 15. Dirty Water Tank 8. Power Cord 13. Cord Hook 17. Dirty Water Tank Handle 6. 5 Row Scrubbing Brushes 7. HOW TO USE Cleaner Description 2.1 FRONT BACK 17 FRONT 1. Dirty Water Tank Lid 9. Attach the plug end to the cord 6 Handle Release Pedal 16. Solution Spray Trigger • NOTICE • Wrap the cord in a counter-clockwise...

Manual
Page 7
... carpet cleaner as possible. If unable to dry completely. Dampen a white cloth with a revolving brushroll for best results. • Thoroughly clean the dirty water tank with hot tap water. Gently rub the cloth over previously cleaned areas. Test a small area in garage or area where unit could freeze. Check each color for color fastness. Preparing the Carpet Vacuum carpet thoroughly. Use a Hoover® vacuum cleaner with solution...
... carpet cleaner as possible. If unable to dry completely. Dampen a white cloth with a revolving brushroll for best results. • Thoroughly clean the dirty water tank with hot tap water. Gently rub the cloth over previously cleaned areas. Test a small area in garage or area where unit could freeze. Check each color for color fastness. Preparing the Carpet Vacuum carpet thoroughly. Use a Hoover® vacuum cleaner with solution...
Manual
Page 8
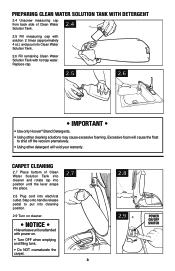
... handle release pedal to shut off the vacuum prematurely. • Using other cleaning solutions may cause excessive foaming. CARPET CLEANING 2.7 Place bottom of Clean Water Solution Tank. 2.4 2.5 Fill measuring cap with solution 2 times (approximately 4 oz.) and pour into Clean Water Solution Tank. 2.6 Fill remaining Clean Water Solution Tank with power on cleaner. • NOTICE • • Never leave unit unattended with hot tap water. Replace cap. 2.5 2.6 • IMPORTANT • • Use only Hoover® Brand Detergents. • Using...
... handle release pedal to shut off the vacuum prematurely. • Using other cleaning solutions may cause excessive foaming. CARPET CLEANING 2.7 Place bottom of Clean Water Solution Tank. 2.4 2.5 Fill measuring cap with solution 2 times (approximately 4 oz.) and pour into Clean Water Solution Tank. 2.6 Fill remaining Clean Water Solution Tank with power on cleaner. • NOTICE • • Never leave unit unattended with hot tap water. Replace cap. 2.5 2.6 • IMPORTANT • • Use only Hoover® Brand Detergents. • Using...
Manual
Page 9
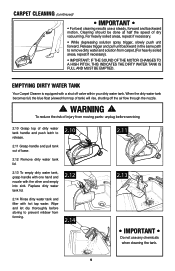
... before servicing 2.10 Grasp top of base. 2.12 Remove dirty water tank lid. 2.13 To empty dirty water tank, grasp handle with one hand and nozzle with the other and empty into sink. CARPET CLEANING (continued) • IMPORTANT • • For best cleaning results use any chemicals when cleaning the tank. 9 EMPTYING DIRTY WATER TANK Your Carpet Cleaner is equipped with hot tap water. For heavily soiled areas, repeat if necessary. • While depressing solution spray...
... before servicing 2.10 Grasp top of base. 2.12 Remove dirty water tank lid. 2.13 To empty dirty water tank, grasp handle with one hand and nozzle with the other and empty into sink. CARPET CLEANING (continued) • IMPORTANT • • For best cleaning results use any chemicals when cleaning the tank. 9 EMPTYING DIRTY WATER TANK Your Carpet Cleaner is equipped with hot tap water. For heavily soiled areas, repeat if necessary. • While depressing solution spray...

Manual
Page 10
... suction. • Use two capfuls (4 ounces) of Hoover® Brand Carpet & Upholstery Detergents per fill up of the clean water tank. Push handle down until it latches. 10 2.18 • IMPORTANT • Do not store cleaner with one hand. 2.16 2.16 Grasp handle and hook front of dirty water tank into base of cleaner, making sure the front of the cleaner. The Dirty Water Tank has 3 tabs on the base (Diagram 2.16). EMPTYING DIRTY WATER TANK...
... suction. • Use two capfuls (4 ounces) of Hoover® Brand Carpet & Upholstery Detergents per fill up of the clean water tank. Push handle down until it latches. 10 2.18 • IMPORTANT • Do not store cleaner with one hand. 2.16 2.16 Grasp handle and hook front of dirty water tank into base of cleaner, making sure the front of the cleaner. The Dirty Water Tank has 3 tabs on the base (Diagram 2.16). EMPTYING DIRTY WATER TANK...
Manual
Page 11
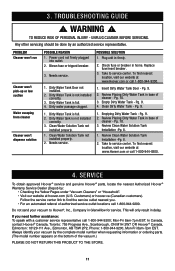
...model number appears on the bottom of cleaner - Dirty Water Tank Door not installed. 2. Dirty water passage clogged. Check fuse or breaker in base of authorized service outlet locations call 1-800-944-9200. 1. Replace fuse/reset breaker. 3. Take to find the service outlet nearest you need further assistance: To speak with a customer service representative call 1-800-944-9200. 4. Pg. 9. 2. Review Placing Dirty Water Tank in home. Clean Dirty Water Tank - Dirty Water tank is not installed correctly. 3. Review Clean Water Solution Tank Installation -Pg. 8. 1. Review Clean Water...
...model number appears on the bottom of cleaner - Dirty Water Tank Door not installed. 2. Dirty water passage clogged. Check fuse or breaker in base of authorized service outlet locations call 1-800-944-9200. 1. Replace fuse/reset breaker. 3. Take to find the service outlet nearest you need further assistance: To speak with a customer service representative call 1-800-944-9200. 4. Pg. 9. 2. Review Placing Dirty Water Tank in home. Clean Dirty Water Tank - Dirty Water tank is not installed correctly. 3. Review Clean Water Solution Tank Installation -Pg. 8. 1. Review Clean Water...
Manual
Page 12
... rental services), improper maintenance of the product, damage due to state. 12 The Warranty Period will provide labor and parts, at www.hoover.com. WHAT THIS WARRANTY DOES NOT COVER This Warranty does not cover: use of the product in a commercial operation (such as warranted, take or send the product to either a Hoover® Sales and Service Center or Hoover® Authorized Warranty Service Dealer along with the Owner's Manual, your product to...
... rental services), improper maintenance of the product, damage due to state. 12 The Warranty Period will provide labor and parts, at www.hoover.com. WHAT THIS WARRANTY DOES NOT COVER This Warranty does not cover: use of the product in a commercial operation (such as warranted, take or send the product to either a Hoover® Sales and Service Center or Hoover® Authorized Warranty Service Dealer along with the Owner's Manual, your product to...


