Product Manual
Page 2
...may be required for warranty service of cleaner) Contents Important Safeguards 3 Cleaner Assembly...5 How To Use...7 Cleaner Description 7 The Tanks...8 How to Clean...10 Tools...13 Maintenance...17 Nozzle...17 Brushes...17 Valve...18 Storage...18 Lubrication...18... Troubleshooting...19 Helpful Reminders 19 Service...20 Cleaning Products...21 Warranty...22 If you need assistance: Visit our website at Hoover...
...may be required for warranty service of cleaner) Contents Important Safeguards 3 Cleaner Assembly...5 How To Use...7 Cleaner Description 7 The Tanks...8 How to Clean...10 Tools...13 Maintenance...17 Nozzle...17 Brushes...17 Valve...18 Storage...18 Lubrication...18... Troubleshooting...19 Helpful Reminders 19 Service...20 Cleaning Products...21 Warranty...22 If you need assistance: Visit our website at Hoover...

Product Manual
Page 5
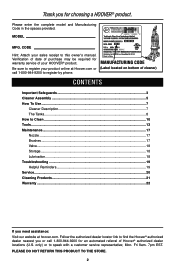
... Carton contents 1.1 Carpet Upholstery Cleaner Bare floor cleaner PreCleaner G C H D F I . Hose/Cord Hook E. F. Cleaner B. Handle Bolts and Nuts (Three nuts may be in bag with hose) D. Accessories not included with screwdriver. 1.2 1.3 Cord Protector -V2 1.4 1.5 5 Actual model may vary from carton and identify each item shown. SpinScrub® Brush Assembly Remove all parts are located before disposing...
... Carton contents 1.1 Carpet Upholstery Cleaner Bare floor cleaner PreCleaner G C H D F I . Hose/Cord Hook E. F. Cleaner B. Handle Bolts and Nuts (Three nuts may be in bag with hose) D. Accessories not included with screwdriver. 1.2 1.3 Cord Protector -V2 1.4 1.5 5 Actual model may vary from carton and identify each item shown. SpinScrub® Brush Assembly Remove all parts are located before disposing...
Product Manual
Page 8
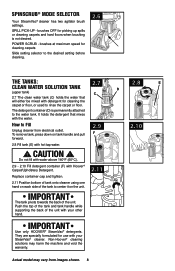
... selector to rinse the carpet or floor. IMPORTANT Use only HOOVER® SteamVac® detergents. Non-Hoover® cleaning solutions may vary from electrical outlet. CAUTION ! Replace container cap and tighten. 2.11 Position bottom of tank onto cleaner using one hand on each side ... detergent that will either be mixed with Hoover® Carpet/Upholstery Detergent. How to the water tank. They are specially formulated for picking up spills or cleaning carpets and hard floors when brushing is permanently attached to Fill Unplug cleaner from images shown. 8 SPILL PICK-UP...
... selector to rinse the carpet or floor. IMPORTANT Use only HOOVER® SteamVac® detergents. Non-Hoover® cleaning solutions may vary from electrical outlet. CAUTION ! Replace container cap and tighten. 2.11 Position bottom of tank onto cleaner using one hand on each side ... detergent that will either be mixed with Hoover® Carpet/Upholstery Detergent. How to the water tank. They are specially formulated for picking up spills or cleaning carpets and hard floors when brushing is permanently attached to Fill Unplug cleaner from images shown. 8 SPILL PICK-UP...
Product Manual
Page 12
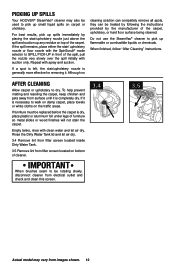
...any residue on the traffic areas. IMPORTANT When brushes seem to pick up flammable or combustible liquids or chemicals. After cleaning Allow carpet or upholstery to pick up small liquid spills on bottom of the carpet, upholstery, or hard floor surface being cleaned. Rinse the Dirty Water ...Tank lid and let air dry. 3.4 Remove lint from filter screen located inside Dirty Water Tank. 3.5 Remove lint from images shown. 12 Picking up spills Your HOOVER® SteamVac® cleaner may vary from filter screen ...
...any residue on the traffic areas. IMPORTANT When brushes seem to pick up flammable or combustible liquids or chemicals. After cleaning Allow carpet or upholstery to pick up small liquid spills on bottom of the carpet, upholstery, or hard floor surface being cleaned. Rinse the Dirty Water ...Tank lid and let air dry. 3.4 Remove lint from filter screen located inside Dirty Water Tank. 3.5 Remove lint from images shown. 12 Picking up spills Your HOOVER® SteamVac® cleaner may vary from filter screen ...

Product Manual
Page 13
...firmly into place. 4.4 4.2 C B B 4.5 13 Actual model may need for extra 4.3 scrubbing action on select models only) has rotating brushes for removal. Stair/Upholstery Nozzle has a built-in connection port. TOOLS Attach hose ! To reattach, align hinges of injury from images shown.... For some spots may vary from moving parts, unplug cleaner. 4.1 A How to Remove 4.2 Squeeze latches (C) on select models only) B. Snap door into solution connection port (B). tools A. How ...
...firmly into place. 4.4 4.2 C B B 4.5 13 Actual model may need for extra 4.3 scrubbing action on select models only) has rotating brushes for removal. Stair/Upholstery Nozzle has a built-in connection port. TOOLS Attach hose ! To reattach, align hinges of injury from images shown.... For some spots may vary from moving parts, unplug cleaner. 4.1 A How to Remove 4.2 Squeeze latches (C) on select models only) B. Snap door into solution connection port (B). tools A. How ...

Product Manual
Page 15
Agitator brushes will not rotate while handle is a loss in Figs. 4.1 and 4.2. Do not place cleaner on page 10. End with dry strokes. If additional cleaning is necessary, wait until the carpet is best to clean lower half. ! Cleaning carpeted...). 4.9 4.10 A B Position tool against riser. WARNING ! Attach tool to clean upper half of stairway and at end of hose. Fill detergent container with HOOVER® detergent according to instructions for Figs. 2.9 to WASH. Pull tool slowly over the carpet (second wet stroke). It is completely dry before using the...
Agitator brushes will not rotate while handle is a loss in Figs. 4.1 and 4.2. Do not place cleaner on page 10. End with dry strokes. If additional cleaning is necessary, wait until the carpet is best to clean lower half. ! Cleaning carpeted...). 4.9 4.10 A B Position tool against riser. WARNING ! Attach tool to clean upper half of stairway and at end of hose. Fill detergent container with HOOVER® detergent according to instructions for Figs. 2.9 to WASH. Pull tool slowly over the carpet (second wet stroke). It is completely dry before using the...
Product Manual
Page 16
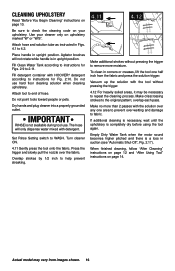
... trigger to 2.11. Do not use . Dry hands and plug cleaner into a properly grounded outlet. Vacuum up the solution with HOOVER® detergent according to instructions for Figs. 2.9 to remove more ...one area to check the cleaning code on your cleaner only on upholstery marked "W" or "W/S". Make crisscrossing strokes to end of hose. Turn cleaner ON. 4.11 Gently press the tool onto the ... is necessary, wait until the upholstery is not available during tool use hard floor cleaning solution when cleaning upholstery. Overlap strokes by 1/2 inch to WASH. Cleaning upholstery Read ...
... trigger to 2.11. Do not use . Dry hands and plug cleaner into a properly grounded outlet. Vacuum up the solution with HOOVER® detergent according to instructions for Figs. 2.9 to remove more ...one area to check the cleaning code on your cleaner only on upholstery marked "W" or "W/S". Make crisscrossing strokes to end of hose. Turn cleaner ON. 4.11 Gently press the tool onto the ... is necessary, wait until the upholstery is not available during tool use hard floor cleaning solution when cleaning upholstery. Overlap strokes by 1/2 inch to WASH. Cleaning upholstery Read ...
Product Manual
Page 17
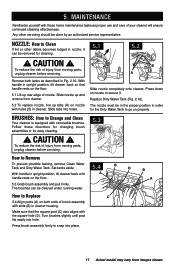
...properly. Replace Dirty Water Tank (Fig. 2.16). To reduce the risk of brush assembly with slots (B) in cleaner housing. Turn brushes slightly until handle rests on the floor. 5.1 Lift up rear edge of your cleaner will ensure continued cleaning effectiveness. nozzle: How to go on both tanks as ... should be in the proper position in nozzle, it . Make sure that handle rests on the floor. 5.3 Grab brush assembly and pull firmly. B A Slide nozzle completely onto cleaner. CAUTION ! Any other debris becomes lodged in order for easy cleaning. ! The nozzle must be...
...properly. Replace Dirty Water Tank (Fig. 2.16). To reduce the risk of brush assembly with slots (B) in cleaner housing. Turn brushes slightly until handle rests on the floor. 5.1 Lift up rear edge of your cleaner will ensure continued cleaning effectiveness. nozzle: How to go on both tanks as ... should be in the proper position in nozzle, it . Make sure that handle rests on the floor. 5.3 Grab brush assembly and pull firmly. B A Slide nozzle completely onto cleaner. CAUTION ! Any other debris becomes lodged in order for easy cleaning. ! The nozzle must be...
Product Manual
Page 18
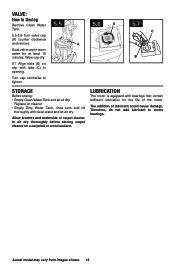
Wipe cap dry. 5.7 Align slots (B) on cleaner. • Empty Dirty Water Tank, rinse tank and lid thoroughly with clean water and let air dry. Actual model may vary from images shown. 18 ... on cap with bearings that contain sufficient lubrication for at least 15 minutes. Therefore, do not add lubricant to air dry thoroughly before storing carpet cleaner on a carpeted or wood surface. Lubrication The motor is equipped with tabs (C) in warm water for the life of lubricant could cause damage. Allow...
Wipe cap dry. 5.7 Align slots (B) on cleaner. • Empty Dirty Water Tank, rinse tank and lid thoroughly with clean water and let air dry. Actual model may vary from images shown. 18 ... on cap with bearings that contain sufficient lubrication for at least 15 minutes. Therefore, do not add lubricant to air dry thoroughly before storing carpet cleaner on a carpeted or wood surface. Lubrication The motor is equipped with tabs (C) in warm water for the life of lubricant could cause damage. Allow...
Product Manual
Page 19
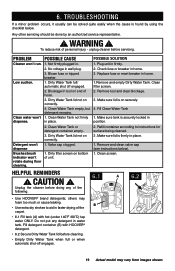
... an authorized service representative. ! Fill Clean Water Tank 1. Detergent won't dispense Brushes/brush indicator won 't dispense. 2. Remove and clean valve cap (see instructions below . others may... vary from images shown. Clean water won 't rotate during floor cleaning. 1. Dirty Water Tank full/ automatic shut off engages. 19 Actual model.... Clean screen. Unplug the cleaner before cleaning. • Empty Dirty Water Tank when full or when automatic shut-off engaged. 2. A 6.2 • Use HOOVER® brand detergents; TROUBLESHOOTING ...
... an authorized service representative. ! Fill Clean Water Tank 1. Detergent won't dispense Brushes/brush indicator won 't dispense. 2. Remove and clean valve cap (see instructions below . others may... vary from images shown. Clean water won 't rotate during floor cleaning. 1. Dirty Water Tank full/ automatic shut off engages. 19 Actual model.... Clean screen. Unplug the cleaner before cleaning. • Empty Dirty Water Tank when full or when automatic shut-off engaged. 2. A 6.2 • Use HOOVER® brand detergents; TROUBLESHOOTING ...
Product Manual
Page 21
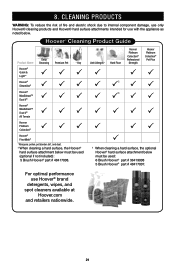
... V® All Terrain Hoover Platinum Collection® Hoover® FloorMate® 1 Allergens: pollen, pet dander, dirt, and dust. 2 When cleaning a hard surface, the Hoover® hard surface attachment below . For optimal performance use with the appliance as noted below must be used : 6 Brush Hoover® part # 36419008 5 Brush Hoover® part # 48417007...
... V® All Terrain Hoover Platinum Collection® Hoover® FloorMate® 1 Allergens: pollen, pet dander, dirt, and dust. 2 When cleaning a hard surface, the Hoover® hard surface attachment below . For optimal performance use with the appliance as noted below must be used : 6 Brush Hoover® part # 36419008 5 Brush Hoover® part # 48417007...


