
Manual
Page 3
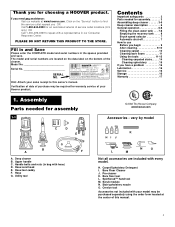
... speed selector 7 Automatic shut-off 7 How to speak with your model may be purchased separately using the order form located at www.hoover.com. H. Carpet/Upholstery Detergent I. Fill in and Save Please enter the COMPLETE model and serial numbers in bag with every model.... Accessories not included with a representative in our Consumer Response Center. If you for assembly 1-1 © 2002 The Hoover Company www.hoover.com Accessories - Upper handle C. Hose/tool caddy F. Scrub module N. Model No Serial No SERIAL NO. Bare floor tool L. Handle bolts and nuts ...
... speed selector 7 Automatic shut-off 7 How to speak with your model may be purchased separately using the order form located at www.hoover.com. H. Carpet/Upholstery Detergent I. Fill in and Save Please enter the COMPLETE model and serial numbers in bag with every model.... Accessories not included with a representative in our Consumer Response Center. If you for assembly 1-1 © 2002 The Hoover Company www.hoover.com Accessories - Upper handle C. Hose/tool caddy F. Scrub module N. Model No Serial No SERIAL NO. Bare floor tool L. Handle bolts and nuts ...
Manual
Page 4
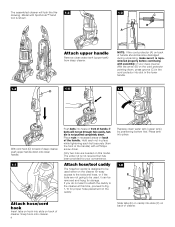
... cord protector pointing down, press groove (C) in the cord protector into slot in the lower handle. 1-4 1-5 1-6 D With cord hook (D) to the tools and hose, or if the tools are needed on back of cleaner. NOTE: If the cord protector (A) on back of handle should become dislodged during unpacking, make... to be removed and hung for your deep cleaner. Only two nuts are not going to Fig. 1-10 for proper hose placement on back of the handle. Attach hose/tool caddy The hose/tool caddy is shown. 1-3 C B A Attach upper handle Remove clean water tank (upper tank) from the front of ...
... cord protector pointing down, press groove (C) in the cord protector into slot in the lower handle. 1-4 1-5 1-6 D With cord hook (D) to the tools and hose, or if the tools are needed on back of cleaner. NOTE: If the cord protector (A) on back of handle should become dislodged during unpacking, make... to be removed and hung for your deep cleaner. Only two nuts are not going to Fig. 1-10 for proper hose placement on back of the handle. Attach hose/tool caddy The hose/tool caddy is shown. 1-3 C B A Attach upper handle Remove clean water tank (upper tank) from the front of ...

Manual
Page 5
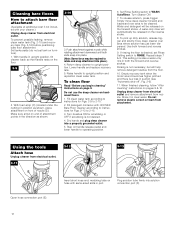
...floor tool (available at bottom of cleaner and press into opposite side of hook (K). Continued § 5 L Loop hose over top of caddy. 1-12 1-13 1-14 M K Press hose into top of caddy. Slide tool down so notch (G) on caddy rests in a plastic bag for protection. Slide caddy...tool (not included with your cleaner) through "loop" on other end of caddy again. 1-9 H 1-10 I . Nozzle connector end J. Bring hose up and over top of hose. I 1-11 G Rotate top of caddy toward end of clip. 1-15 1-16 1-17 Snap stair/upholstery nozzle onto caddy. Press solution tube ...
...floor tool (available at bottom of cleaner and press into opposite side of hook (K). Continued § 5 L Loop hose over top of caddy. 1-12 1-13 1-14 M K Press hose into top of caddy. Slide tool down so notch (G) on caddy rests in a plastic bag for protection. Slide caddy...tool (not included with your cleaner) through "loop" on other end of caddy again. 1-9 H 1-10 I . Nozzle connector end J. Bring hose up and over top of hose. I 1-11 G Rotate top of caddy toward end of clip. 1-15 1-16 1-17 Snap stair/upholstery nozzle onto caddy. Press solution tube ...

Manual
Page 7
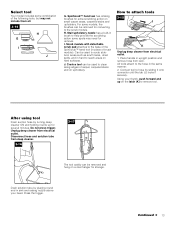
... at additional cost if not included with SpinScrub™ hand tool is intended for quick cord release 18. Rinse Setting switch 5. Hose connection port 17. Hose 19. A Handle release pedal Step on pedal (A) to lower handle to release cleaning solution 3. Continued § 7 Model with... outlet. 2-2 2-3 2-4 WASH AUTO RINSE OFF Rinse ON ON/OFF switch To turn cleaner OFF, push switch up. 2. Hand grip 2. Cord/hose hook 23. How to allow convenient operation. Detergent container 10. Solution tube connection port 15. Handle release pedal This deep cleaner is shown. 1. ...
... at additional cost if not included with SpinScrub™ hand tool is intended for quick cord release 18. Rinse Setting switch 5. Hose connection port 17. Hose 19. A Handle release pedal Step on pedal (A) to lower handle to release cleaning solution 3. Continued § 7 Model with... outlet. 2-2 2-3 2-4 WASH AUTO RINSE OFF Rinse ON ON/OFF switch To turn cleaner OFF, push switch up. 2. Hand grip 2. Cord/hose hook 23. How to allow convenient operation. Detergent container 10. Solution tube connection port 15. Handle release pedal This deep cleaner is shown. 1. ...
Manual
Page 12
... short hose end, matching tabs on end of nozzle (D). Set Rinse Setting switch to upright position. Slowly move deep cleaner over area to be required to RINSE. Repeat steps 7 & 8. With handle in clear water. Raise handle to operating position. 6. Fill detergent container with HOOVER Bare ...After cleaning" instructions on handle release pedal and lower handle to upright position and reposition clean water tank. Make sure arrow on hose with your cleaner.) Unplug deep cleaner from attachment. If rinsing the floor is not necessary, but will help remove detergent residue...
... short hose end, matching tabs on end of nozzle (D). Set Rinse Setting switch to upright position. Slowly move deep cleaner over area to be required to RINSE. Repeat steps 7 & 8. With handle in clear water. Raise handle to operating position. 6. Fill detergent container with HOOVER Bare ...After cleaning" instructions on handle release pedal and lower handle to upright position and reposition clean water tank. Make sure arrow on hose with your cleaner.) Unplug deep cleaner from attachment. If rinsing the floor is not necessary, but will help remove detergent residue...
Manual
Page 13
... in place of carpet, carpeted stairs and on hard surfaces. Connect tool to hose by placing round end in hard to clean along edges of brush module). Crevice tool can be removed ...some combination of the SpinScrub™ hand tool (in upright position and remove hose from deep cleaner. 3-16 3-17 The tool caddy can be used to reach areas on upholstery. After ... holding nozzle up on small carpet areas, carpeted stairs and upholstery. All tools attach to the hose in brush to the base of the following tools, but may need for several minutes. Press...
... in place of carpet, carpeted stairs and on hard surfaces. Connect tool to hose by placing round end in hard to clean along edges of brush module). Crevice tool can be removed ...some combination of the SpinScrub™ hand tool (in upright position and remove hose from deep cleaner. 3-16 3-17 The tool caddy can be used to reach areas on upholstery. After ... holding nozzle up on small carpet areas, carpeted stairs and upholstery. All tools attach to the hose in brush to the base of the following tools, but may need for several minutes. Press...

Manual
Page 14
... be completely dry before reattaching to 2-15. 5. Attach hose and solution tube as instructed in upright position. Fill detergent container with HOOVER Carpet/Upholstery Detergent according to instructions for Figs. 2-9 to end of hose. 6. Dry hands and plug deep cleaner into carpet pile.... Turn cleaner ON. Attach tool to 2-12. 4. Pick up dirty solution with HOOVER Bare Floor Cleaner according to...
... be completely dry before reattaching to 2-15. 5. Attach hose and solution tube as instructed in upright position. Fill detergent container with HOOVER Carpet/Upholstery Detergent according to instructions for Figs. 2-9 to end of hose. 6. Dry hands and plug deep cleaner into carpet pile.... Turn cleaner ON. Attach tool to 2-12. 4. Pick up dirty solution with HOOVER Bare Floor Cleaner according to...

Manual
Page 15
... finished cleaning, follow "After cleaning" instructions on upholstery marked "W" or "W/S". 1. Turn brushes slightly until handle rests on both ends of hose. Press brush assembly firmly to the original pattern; Agitator brushes will only dispense water mixed with the solution or rinse over the fabric. ... "Auto-rinse" and rinse are not available during tool use. Gently press the tool onto the fabric. Vacuum up the solution with HOOVER Carpet/Upholstery Detergent according to instructions for Figs. 2-13 to remove more than 2 passes with detergent. 3-22 8. If additional cleaning is...
... finished cleaning, follow "After cleaning" instructions on upholstery marked "W" or "W/S". 1. Turn brushes slightly until handle rests on both ends of hose. Press brush assembly firmly to the original pattern; Agitator brushes will only dispense water mixed with the solution or rinse over the fabric. ... "Auto-rinse" and rinse are not available during tool use. Gently press the tool onto the fabric. Vacuum up the solution with HOOVER Carpet/Upholstery Detergent according to instructions for Figs. 2-13 to remove more than 2 passes with detergent. 3-22 8. If additional cleaning is...
Manual
Page 16
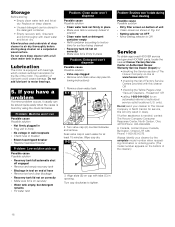
...; Setting selector on correctly • Make sure lid is needed, contact The Hoover Company Consumer Response Center, North Canton, Ohio 44720 Phone: 330-499-9499. only). Allow brushes and underside of hose • Remove tool and clear blockage • Recovery tank lid not on ... Machine won 't dispense Possible cause Possible solution • Valve cap clogged • Remove and clean valve cap (see fol- In Canada, contact Hoover Canada, Burlington, Ontario L7R 4A8, Phone: 1-800-263-6376. Remove clean water tank. 5-1 A A 2. The addition of authorized service outlet ...
...; Setting selector on correctly • Make sure lid is needed, contact The Hoover Company Consumer Response Center, North Canton, Ohio 44720 Phone: 330-499-9499. only). Allow brushes and underside of hose • Remove tool and clear blockage • Recovery tank lid not on ... Machine won 't dispense Possible cause Possible solution • Valve cap clogged • Remove and clean valve cap (see fol- In Canada, contact Hoover Canada, Burlington, Ontario L7R 4A8, Phone: 1-800-263-6376. Remove clean water tank. 5-1 A A 2. The addition of authorized service outlet ...


