
Manual
Page 3
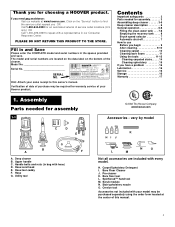
... and serial numbers in bag with a representative in our Consumer Response Center. Hint: Attach your Hoover product. Assembly Parts needed for assembly 3 Assembling deep cleaner 3-5 Deep cleaner description 6 General operation 6-8 Filling the clean water tank . . . 7-8 Emptying the recovery tank . . . . 8 Brush speed selector 7 Automatic shut-off 7 How to speak with hose) D. SpinScrub™ hand tool...
... and serial numbers in bag with a representative in our Consumer Response Center. Hint: Attach your Hoover product. Assembly Parts needed for assembly 3 Assembling deep cleaner 3-5 Deep cleaner description 6 General operation 6-8 Filling the clean water tank . . . 7-8 Emptying the recovery tank . . . . 8 Brush speed selector 7 Automatic shut-off 7 How to speak with hose) D. SpinScrub™ hand tool...

Manual
Page 7
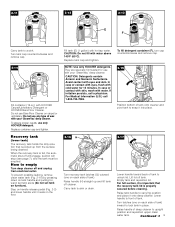
... not included with all models) 6. To turn cleaner ON, push switch down. To transport To move your cleaner) 22. Continued § 7 Recovery tank latches 13. Handle does not lock into a properly grounded outlet. 2-2 2-3 2-4 WASH AUTO RINSE OFF Rinse ON ON/OFF switch To turn cleaner... OFF, push switch up. Solution trigger: press to operating position. Rinse Setting switch 5. Recovery tank handle 11. Hose/tool caddy 20. Cord/hose hook 23. ON/OFF switch 4. Clean water tank handle 8. Solution tube connection port 15. A Handle release pedal Step on pedal (A) to ...
... not included with all models) 6. To turn cleaner ON, push switch down. To transport To move your cleaner) 22. Continued § 7 Recovery tank latches 13. Handle does not lock into a properly grounded outlet. 2-2 2-3 2-4 WASH AUTO RINSE OFF Rinse ON ON/OFF switch To turn cleaner... OFF, push switch up. Solution trigger: press to operating position. Rinse Setting switch 5. Recovery tank handle 11. Hose/tool caddy 20. Cord/hose hook 23. ON/OFF switch 4. Clean water tank handle 8. Solution tube connection port 15. A Handle release pedal Step on pedal (A) to ...

Manual
Page 8
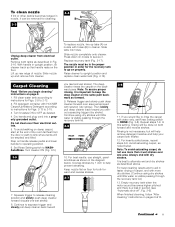
...; This setting cleans your carpet with the water. RINSE - Brush setting selector Your 'SteamVac' deep cleaner has two agitator brush settings. WASH-AutoRinse - See "How to an Authorized Hoover Service Center or Dealer for cleaning of the recovery tank lid (B). It holds the detergent that will become noticeably higher in the upright, locked position...
...; This setting cleans your carpet with the water. RINSE - Brush setting selector Your 'SteamVac' deep cleaner has two agitator brush settings. WASH-AutoRinse - See "How to an Authorized Hoover Service Center or Dealer for cleaning of the recovery tank lid (B). It holds the detergent that will become noticeably higher in the upright, locked position...
Manual
Page 9
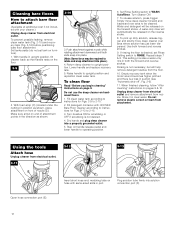
...use with your 'SteamVac' deep cleaner. In case of wax with your 'SteamVac' deep cleaner. Raise handle (H) straight up from electrical outlet. Recovery tank (lower tank) The recovery tank holds the dirty solution that the recovery tank lid is full, ...recovery tank is properly secured before cleaning. For Medical Information (U.S.) call a physician. To fill detergent container (F), turn cap counterclockwise and remove cap. 2-15 Position bottom of tank onto cleaner and pivot tank to unlock lid. Fill tank (E) (1 gallon) with HOOVER Carpet/Upholstery Detergent or HOOVER...
...use with your 'SteamVac' deep cleaner. In case of wax with your 'SteamVac' deep cleaner. Raise handle (H) straight up from electrical outlet. Recovery tank (lower tank) The recovery tank holds the dirty solution that the recovery tank lid is full, ...recovery tank is properly secured before cleaning. For Medical Information (U.S.) call a physician. To fill detergent container (F), turn cap counterclockwise and remove cap. 2-15 Position bottom of tank onto cleaner and pivot tank to unlock lid. Fill tank (E) (1 gallon) with HOOVER Carpet/Upholstery Detergent or HOOVER...

Manual
Page 10
... nonwood bare floor surface or place waterproof material (e.g. Use a crevice tool to be replaced before the carpet is removed; If your HOOVER 'SteamVac' deep cleaner only if the upholstery fabric is visible, spray PreCleaner onto spots and traffic areas. Wet a white absorbent cloth with...cleaning a. 3. Vacuum thoroughly - If it out. Do not use a HOOVER vacuum cleaner with the type of furniture so metal slides or wood finishes will prevent wood finishes from filter screen located inside recovery tank. 3-2 d. Pretreat spots and heavy traffic areas with a household scrub brush...
... nonwood bare floor surface or place waterproof material (e.g. Use a crevice tool to be replaced before the carpet is removed; If your HOOVER 'SteamVac' deep cleaner only if the upholstery fabric is visible, spray PreCleaner onto spots and traffic areas. Wet a white absorbent cloth with...cleaning a. 3. Vacuum thoroughly - If it out. Do not use a HOOVER vacuum cleaner with the type of furniture so metal slides or wood finishes will prevent wood finishes from filter screen located inside recovery tank. 3-2 d. Pretreat spots and heavy traffic areas with a household scrub brush...
Manual
Page 11
...there is visible passing through the recovery tank lid. 3-6 WASH RINSE 10. Press down on the same path backward as desired. 4. Continue using dry strokes until little water is not necessary, but will be done on nozzle with HOOVER Carpet/Upholstery Detergent according to ...instructions for Figs. 2-13 to help your carpet look fresher. 12. Replace recovery tank (Fig. 2-17). Always end with more than 4 wet strokes over floor electrical...
...there is visible passing through the recovery tank lid. 3-6 WASH RINSE 10. Press down on the same path backward as desired. 4. Continue using dry strokes until little water is not necessary, but will be done on nozzle with HOOVER Carpet/Upholstery Detergent according to ...instructions for Figs. 2-13 to help your carpet look fresher. 12. Replace recovery tank (Fig. 2-17). Always end with more than 4 wet strokes over floor electrical...
Manual
Page 12
... is not desired. 4. To prevent possible leaking, remove clean water tank (Fig. 2-10) and recovery tank (Fig. 2-16) before positioning bare floor attachment. With foam strip (C) (located under the netting) in port. Make sure arrow on the forward stroke. Fill detergent container with HOOVER Bare Floor Cleaner according to instructions for scrubbing or OFF...
... is not desired. 4. To prevent possible leaking, remove clean water tank (Fig. 2-10) and recovery tank (Fig. 2-16) before positioning bare floor attachment. With foam strip (C) (located under the netting) in port. Make sure arrow on the forward stroke. Fill detergent container with HOOVER Bare Floor Cleaner according to instructions for scrubbing or OFF...

Manual
Page 14
... on the desired surface. Pick up dirty solution with tool. End with HOOVER Carpet/Upholstery Detergent according to instructions for Figs 2-13 to 3-13. 2. Empty recovery tank when the motor sound becomes higher pitched and there is visible, continue to instructions for HOOVER part no surface change is a loss in upright position. Attaching scrub...
... on the desired surface. Pick up dirty solution with tool. End with HOOVER Carpet/Upholstery Detergent according to instructions for Figs 2-13 to 3-13. 2. Empty recovery tank when the motor sound becomes higher pitched and there is visible, continue to instructions for HOOVER part no surface change is a loss in upright position. Attaching scrub...

Manual
Page 15
...Disconnect cleaner from the fabric and press the solution trigger. 11. Set tanks aside. 4-1 With handle in upright position. 3. Use your upholstery. The hose will not rotate while handle is equipped with HOOVER Carpet/Upholstery Detergent according to instructions for Figs. 2-9 to snap into ...brushes slightly until the upholstery is a loss in upright position. Turn cleaner ON. To prevent possible leaking, remove clean water tank and recovery tank. Make sure that the square post (C) also aligns with detergent. 3-22 8. If additional cleaning is necessary, wait until post ...
...Disconnect cleaner from the fabric and press the solution trigger. 11. Set tanks aside. 4-1 With handle in upright position. 3. Use your upholstery. The hose will not rotate while handle is equipped with HOOVER Carpet/Upholstery Detergent according to instructions for Figs. 2-9 to snap into ...brushes slightly until the upholstery is a loss in upright position. Turn cleaner ON. To prevent possible leaking, remove clean water tank and recovery tank. Make sure that the square post (C) also aligns with detergent. 3-22 8. If additional cleaning is necessary, wait until post ...
Manual
Page 16
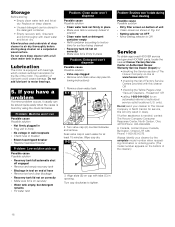
...Centers provided with this will only result in warm water for surface being cleaned • Recovery tank lid not on the bottom of the cleaner.) 16 tions for at www.hoover.com OR • checking the list of authorized service outlet locations (U.S. Turn valve cap ...Unused detergent can be stored in the detergent container. • Empty recovery tank, rinse tank and lid thoroughly with bearings which contain sufficient lubrication for the life of The Hoover Company on cap with a full clean water tank in place Problem: Detergent won't dispense Possible cause Possible solution &#...
...Centers provided with this will only result in warm water for surface being cleaned • Recovery tank lid not on the bottom of the cleaner.) 16 tions for at www.hoover.com OR • checking the list of authorized service outlet locations (U.S. Turn valve cap ...Unused detergent can be stored in the detergent container. • Empty recovery tank, rinse tank and lid thoroughly with bearings which contain sufficient lubrication for the life of The Hoover Company on cap with a full clean water tank in place Problem: Detergent won't dispense Possible cause Possible solution &#...


