

Manual
Page 1
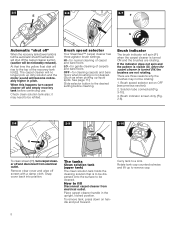
...ESPAÑOL § pág. 17-25 FRANÇAIS § p. 26-35 Contents Important safeguards 2 Parts needed for assembly 3 Assembling carpet cleaner . . . . . 3-5 Carpet cleaner description 6 General operation 6-9 Filling the clean solution tank . 7-8 Emptying the recovery tank . . 8-9 Brush speed selector 7 Brush Indicator 7 ...11-14 Cleaning carpeted stairs . . . . . 13 Cleaning upholstery . . . . . 13-14 If you have a problem 15 Lubrication 15 Service 16 Storage 16 Warranty 16 Parts & accessories mail order form 35 HOOVER® SteamVac™ cleans carpet fibers by applying,...
...ESPAÑOL § pág. 17-25 FRANÇAIS § p. 26-35 Contents Important safeguards 2 Parts needed for assembly 3 Assembling carpet cleaner . . . . . 3-5 Carpet cleaner description 6 General operation 6-9 Filling the clean solution tank . 7-8 Emptying the recovery tank . . 8-9 Brush speed selector 7 Brush Indicator 7 ...11-14 Cleaning carpeted stairs . . . . . 13 Cleaning upholstery . . . . . 13-14 If you have a problem 15 Lubrication 15 Service 16 Storage 16 Warranty 16 Parts & accessories mail order form 35 HOOVER® SteamVac™ cleans carpet fibers by applying,...
Manual
Page 3
.... Turn off all parts of purchase may be required for machine application. Do not use of the handle. Fill in and Retain This HOOVER carpet cleaner is not recommended. The model and serial numbers are located on the data label on the back of an extension cord is designed for ...and has serial no It is well ventilated. • To assist in reducing drying time, be used by Hoover; hoover.com 3 Keep cord away from carpets until they are dry. Do not allow carpet cleaner to be certain the area is used as a toy or to run appliance over floor electrical outlets. •...
.... Turn off all parts of purchase may be required for machine application. Do not use of the handle. Fill in and Retain This HOOVER carpet cleaner is not recommended. The model and serial numbers are located on the data label on the back of an extension cord is designed for ...and has serial no It is well ventilated. • To assist in reducing drying time, be used by Hoover; hoover.com 3 Keep cord away from carpets until they are dry. Do not allow carpet cleaner to be certain the area is used as a toy or to run appliance over floor electrical outlets. •...
Manual
Page 4
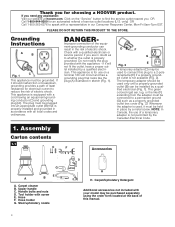
... a path of least resistance for choosing a HOOVER product. Whenever the adapter is equipped with all local codes and ordinances. Assembly Carton contents 1-1 C Carpet Upholstery Cleaner F Bare floor cleaner PreCleaner Accessories G Carpet Upholstery Cleaner E A B A. Carpet cleaner B. Hose holder G. only) OR Call 1-...The green colored rigid ear, lug, or the like the plug (A) illustrated in place by a qualified electrician. Carpet/Upholstery Detergent Additional accessories not included with screw E. If you for electrical current to speak with the appliance -...
... a path of least resistance for choosing a HOOVER product. Whenever the adapter is equipped with all local codes and ordinances. Assembly Carton contents 1-1 C Carpet Upholstery Cleaner F Bare floor cleaner PreCleaner Accessories G Carpet Upholstery Cleaner E A B A. Carpet cleaner B. Hose holder G. only) OR Call 1-...The green colored rigid ear, lug, or the like the plug (A) illustrated in place by a qualified electrician. Carpet/Upholstery Detergent Additional accessories not included with screw E. If you for electrical current to speak with the appliance -...

Manual
Page 5
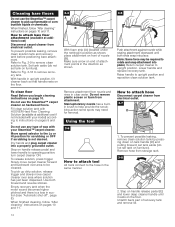
... 1-9 D Attach tool holder Remove tool and taped screw from holder. Insert screw at (D) and tighten with openings on front of carpet cleaner, push upper handle down into holes on back of handle. Make sure bolts are completely together, squeeze trigger (C) and depress Clean ...™ button (D) on this drawing. 1-3 A Attach upper handle Remove clean solution tank (upper tank) from carpet cleaner. 1-4 1-5 B With cord hook (A) to snap top of cleaner. Replace clean solution tank (upper tank) by matching tabs on rack with a Phillips screwdriver. Slide holder down ...
... 1-9 D Attach tool holder Remove tool and taped screw from holder. Insert screw at (D) and tighten with openings on front of carpet cleaner, push upper handle down into holes on back of handle. Make sure bolts are completely together, squeeze trigger (C) and depress Clean ...™ button (D) on this drawing. 1-3 A Attach upper handle Remove clean solution tank (upper tank) from carpet cleaner. 1-4 1-5 B With cord hook (A) to snap top of cleaner. Replace clean solution tank (upper tank) by matching tabs on rack with a Phillips screwdriver. Slide holder down ...
Manual
Page 6
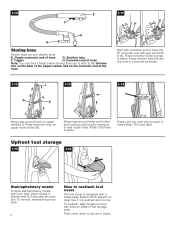
.... Solution tube F. Push cover down to secure in bracket and fit it securely into clip next to the informa- tion on the back of the carpet cleaner and on back of cover with slots on upper handle (J). Pull cord tight. Trigger H. Press cord into clips on upper hose holder (K). Upfront tool storage...
.... Solution tube F. Push cover down to secure in bracket and fit it securely into clip next to the informa- tion on the back of the carpet cleaner and on back of cover with slots on upper handle (J). Pull cord tight. Trigger H. Press cord into clips on upper hose holder (K). Upfront tool storage...
Manual
Page 7
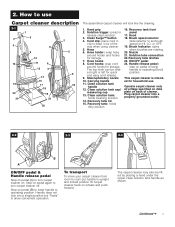
...floor) position. 2. Clean Surge™ button 4. Clean solution tank: holds cleaning solution. 14. Step on . The carpet cleaner may also be rotat- Hose hooks 8. This carpet cleaner is intended for quick and easy cord release. 9. Handle does not lock into a single position but "floats" to ...holder: wrap hose around hooks for storage. 7. ON/OFF pedal 24. Plug carpet cleaner Into a properly grounded outlet. 2-2 2-3 2-4 B A ON/OFF pedal & Handle release pedal Step on pedal (A) to turn carpet cleaner off. The top hook can be lifted by placing a hand under the upper...
...floor) position. 2. Clean Surge™ button 4. Clean solution tank: holds cleaning solution. 14. Step on . The carpet cleaner may also be rotat- Hose hooks 8. This carpet cleaner is intended for quick and easy cord release. 9. Handle does not lock into a single position but "floats" to ...holder: wrap hose around hooks for storage. 7. ON/OFF pedal 24. Plug carpet cleaner Into a properly grounded outlet. 2-2 2-3 2-4 B A ON/OFF pedal & Handle release pedal Step on pedal (A) to turn carpet cleaner off. The top hook can be lifted by placing a hand under the upper...
Manual
Page 8
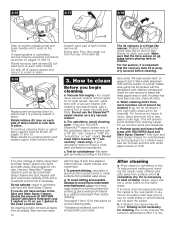
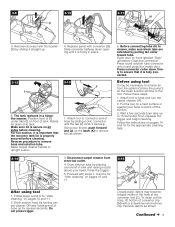
...on handle and pull forward. Brush indicator screen dirty (Fig. 2-8). 2-8 2-9 H 2-10 To clean screen (H), turn carpet cleaner off screen with a damp cloth. Place carpet cleaner handle in pitch. Carry tank to remove cap. 8 Rotate tank cap counterclockwise and lift up liquid spills. it may not...to be cleaned. There are not rotating. How to the top of the recovery tank lid (E). When this happens turn carpet cleaner off the carpet cleaner suction (suction will be rotating: 1. Hl - Brush indicator The brush indicator will become noticeably higher in the upright, locked...
...on handle and pull forward. Brush indicator screen dirty (Fig. 2-8). 2-8 2-9 H 2-10 To clean screen (H), turn carpet cleaner off screen with a damp cloth. Place carpet cleaner handle in pitch. Carry tank to remove cap. 8 Rotate tank cap counterclockwise and lift up liquid spills. it may not...to be cleaned. There are not rotating. How to the top of the recovery tank lid (E). When this happens turn carpet cleaner off the carpet cleaner suction (suction will be rotating: 1. Hl - Brush indicator The brush indicator will become noticeably higher in the upright, locked...
Manual
Page 9
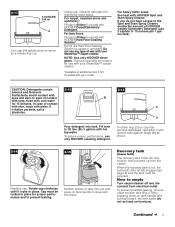
To assure proper performance, use with your SteamVac™ carpet cleaner. *Available at additional cost if not included with HOOVER Carpet/Upholstery Detergent. Position bottom of tank into unit and press on tank handle to empty Turn carpet cleaner off will engage (see page 8) and the tank must be emptied. How to snap tank into tank. To...
To assure proper performance, use with your SteamVac™ carpet cleaner. *Available at additional cost if not included with HOOVER Carpet/Upholstery Detergent. Position bottom of tank into unit and press on tank handle to empty Turn carpet cleaner off will engage (see page 8) and the tank must be emptied. How to snap tank into tank. To...
Manual
Page 10
...and 13. tions under tabs (G) on front of carpet cleaner and carry it to a sink or drain. 2-19 E Replace tank and press down onto tank. Pretreat spots and heavy traffic areas with your HOOVER SteamVac™ carpet cleaner only if the upholstery fabric is marked with Spot... and Stain Spray Cleaner. Test Spot and Stain Spray Cleaner for instructions on various cleaning tasks. *Available at least ten minutes. If ...
...and 13. tions under tabs (G) on front of carpet cleaner and carry it to a sink or drain. 2-19 E Replace tank and press down onto tank. Pretreat spots and heavy traffic areas with your HOOVER SteamVac™ carpet cleaner only if the upholstery fabric is marked with Spot... and Stain Spray Cleaner. Test Spot and Stain Spray Cleaner for instructions on various cleaning tasks. *Available at least ten minutes. If ...
Manual
Page 11
...cleaning, follow the same procedure for removing it is easier to replace if the filter is wet. Picking up spills Your HOOVER SteamVac™ carpet cleaner may also be used to dispense extra solution when cleaning particularly soiled areas of the spill, pull the nozzle very slowly ...over area just sprayed with HOOVER Carpet/ Upholstery Detergent according to instructions on top of the room farthest from recovery tank filter and rinse...
...cleaning, follow the same procedure for removing it is easier to replace if the filter is wet. Picking up spills Your HOOVER SteamVac™ carpet cleaner may also be used to dispense extra solution when cleaning particularly soiled areas of the spill, pull the nozzle very slowly ...over area just sprayed with HOOVER Carpet/ Upholstery Detergent according to instructions on top of the room farthest from recovery tank filter and rinse...
Manual
Page 12
...). Refer to Fig. 2-9 to the hose in the same manner. Make sure arrow on end of wax with your SteamVac™ carpet cleaner. To release solution, press trigger. When finished cleaning, follow "After cleaning" instructions on pages 8 and 9. Do not remove plastic ...or Hl position for removal. Use both ends snap into a properly grounded outlet. Fill clean solution tank with HOOVER Hard Floor Cleaning Solution (available at additional cost) Disconnect carpet cleaner from electrical outlet. 3-7 D 1. Step on page 10. Move speed selector to operating position; When finished,...
...). Refer to Fig. 2-9 to the hose in the same manner. Make sure arrow on end of wax with your SteamVac™ carpet cleaner. To release solution, press trigger. When finished cleaning, follow "After cleaning" instructions on pages 8 and 9. Do not remove plastic ...or Hl position for removal. Use both ends snap into a properly grounded outlet. Fill clean solution tank with HOOVER Hard Floor Cleaning Solution (available at additional cost) Disconnect carpet cleaner from electrical outlet. 3-7 D 1. Step on page 10. Move speed selector to operating position; When finished,...
Manual
Page 13
...for the appropriate cleaning task. 3-14 3. M After using tool It may become lodged inside door. Remove debris as shown. 5. Raise carpet cleaner handle to 15 seconds). Attach tool to remove hose and solution tube. Put the tool on pages 10 and 11. Follow the instructions...Stair/ upholstery Cleaning Connection". To clean out the hose, lift bottom of hose up . 4. Remove recovery tank front panel (F) by turning carpet cleaner ON and holding end of converter clip (M) with converter (G). Press the trigger. 5. Follow steps a and b for several seconds. For full...
...for the appropriate cleaning task. 3-14 3. M After using tool It may become lodged inside door. Remove debris as shown. 5. Raise carpet cleaner handle to 15 seconds). Attach tool to remove hose and solution tube. Put the tool on pages 10 and 11. Follow the instructions...Stair/ upholstery Cleaning Connection". To clean out the hose, lift bottom of hose up . 4. Remove recovery tank front panel (F) by turning carpet cleaner ON and holding end of converter clip (M) with converter (G). Press the trigger. 5. Follow steps a and b for several seconds. For full...

Manual
Page 14
...alternate wet and dry strokes as described above the carpet and push it into a properly grounded outlet. 6. It is in corners or creases, lift the tool one wet stroke). 14 8. Be sure to instructions on your HOOVER SteamVac™ carpet cleaner only on stairs. Attach tool to end of ...hose. Press the trigger and slowly pull the nozzle over carpet without pressing trigger (dry stroke). Lift tool, and position it snaps firmly in...
...alternate wet and dry strokes as described above the carpet and push it into a properly grounded outlet. 6. It is in corners or creases, lift the tool one wet stroke). 14 8. Be sure to instructions on your HOOVER SteamVac™ carpet cleaner only on stairs. Attach tool to end of ...hose. Press the trigger and slowly pull the nozzle over carpet without pressing trigger (dry stroke). Lift tool, and position it snaps firmly in...
Manual
Page 15
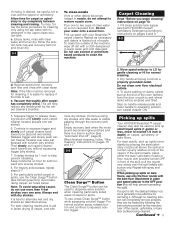
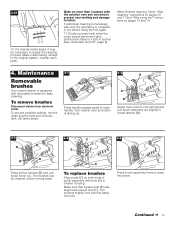
... assembly out slightly to snap into hole. Make crisscrossing strokes to fabric. The brushes can be necessary to lower handle. To remove brushes Disconnect cleaner from electrical outlet. Continued § 15 For heavily soiled areas, it may be cleaned under running water. 4-4 C 4-5 D E F ... fits easily into place. Make sure that square post (E) also aligns with removable brushes for easy cleaning. Maintenance Removable brushes Your carpet cleaner is facing up. 4-2 B A B B Grasp inner portion of brush assembly with the solution over any one area to prevent...
... assembly out slightly to snap into hole. Make crisscrossing strokes to fabric. The brushes can be necessary to lower handle. To remove brushes Disconnect cleaner from electrical outlet. Continued § 15 For heavily soiled areas, it may be cleaned under running water. 4-4 C 4-5 D E F ... fits easily into place. Make sure that square post (E) also aligns with removable brushes for easy cleaning. Maintenance Removable brushes Your carpet cleaner is facing up. 4-2 B A B B Grasp inner portion of brush assembly with the solution over any one area to prevent...
Manual
Page 16
... Empty solution tank and rinse thoroughly with clean water. Squeeze trigger and push carpet cleaner forward and back several times to expel any solution remaining in place • Pump needs to Hoover in delay. Allow brushes and underside of the following authorized warranty service outlets.... Refill tank according to instructions for a period of one of carpet cleaner to Low or Hi Full One Year Warranty (Domestic Use) Your HOOVER® appliance is firmly in the carpet cleaner's system. (Do not use carpet cleaner on securely • Recovery tank front panel not replaced after stair...
... Empty solution tank and rinse thoroughly with clean water. Squeeze trigger and push carpet cleaner forward and back several times to expel any solution remaining in place • Pump needs to Hoover in delay. Allow brushes and underside of the following authorized warranty service outlets.... Refill tank according to instructions for a period of one of carpet cleaner to Low or Hi Full One Year Warranty (Domestic Use) Your HOOVER® appliance is firmly in the carpet cleaner's system. (Do not use carpet cleaner on securely • Recovery tank front panel not replaced after stair...


