Product Manual
Page 1
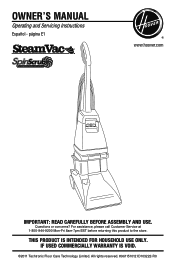
THIS PRODUCT IS INTENDED FOR HOUSEHOLD USE ONLY. For assistance, please call Customer Service at 1-800-944-9200 Mon-Fri 8am-7pm EST before returning this product to the store. IF USED COMMERCIALLY WARRANTY IS VOID. ©2011 Techtronic Floor Care Technology Limited. página E1 www.hoover.com IMPORTANT: READ CAREFULLY BEFORE ASSEMBLY AND USE. Questions or concerns? Owner's Manual Operating and Servicing Instructions Español - All rights reserved. #961151012 ID103222-R0
THIS PRODUCT IS INTENDED FOR HOUSEHOLD USE ONLY. For assistance, please call Customer Service at 1-800-944-9200 Mon-Fri 8am-7pm EST before returning this product to the store. IF USED COMMERCIALLY WARRANTY IS VOID. ©2011 Techtronic Floor Care Technology Limited. página E1 www.hoover.com IMPORTANT: READ CAREFULLY BEFORE ASSEMBLY AND USE. Questions or concerns? Owner's Manual Operating and Servicing Instructions Español - All rights reserved. #961151012 ID103222-R0
Product Manual
Page 2
... Instructions 3 Cleaner Assembly...5 How To Use...7 Cleaner Description 7 The Tanks ...8 Brush Speed Selector 9 Brush Indicator ...9 How To Clean...10 Before You Begin 10 Cleaning Carpet 10 Clean Surge® Button 11 Picking Up Spills 11 Cleaning Bare Floors 12 Tools...13 Using The Tools 13 How To Attach...14 Before Using Tool 14 Cleaning Carpeted Stairs 14 Cleaning Upholstery 15 After Using Tool...16 After Cleaning...16 Maintenance...17 Nozzle...17 Brushes...17 Storage...18 Lubrication...18 Troubleshooting...18 Helpful Reminders 19 Service...19 Cleaning Products...20 Warranty...
... Instructions 3 Cleaner Assembly...5 How To Use...7 Cleaner Description 7 The Tanks ...8 Brush Speed Selector 9 Brush Indicator ...9 How To Clean...10 Before You Begin 10 Cleaning Carpet 10 Clean Surge® Button 11 Picking Up Spills 11 Cleaning Bare Floors 12 Tools...13 Using The Tools 13 How To Attach...14 Before Using Tool 14 Cleaning Carpeted Stairs 14 Cleaning Upholstery 15 After Using Tool...16 After Cleaning...16 Maintenance...17 Nozzle...17 Brushes...17 Storage...18 Lubrication...18 Troubleshooting...18 Helpful Reminders 19 Service...19 Cleaning Products...20 Warranty...
Product Manual
Page 3
... accepts the machine plug. • Unplug carpet cleaner from electrical outlet before servicing the carpet cleaner. • Do not unplug by Hoover®; Do not allow carpet cleaner to a properly grounded outlet only. Turn off all controls before unplugging. • Unplug before connecting the powered hand tool (available on select models). • Always disconnect cord from outlet when not in the instructions. • Use only attachments recommended by...
... accepts the machine plug. • Unplug carpet cleaner from electrical outlet before servicing the carpet cleaner. • Do not unplug by Hoover®; Do not allow carpet cleaner to a properly grounded outlet only. Turn off all controls before unplugging. • Unplug before connecting the powered hand tool (available on select models). • Always disconnect cord from outlet when not in the instructions. • Use only attachments recommended by...
Product Manual
Page 4
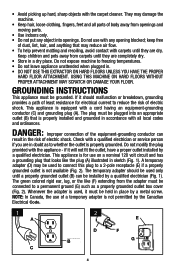
..., the use with the appliance - keep free of the equipment-grounding conductor can be connected to a permanent ground (G) such as to a 2-pole receptacle (E) if a properly grounded outlet is equipped with all parts of electric shock. Grounding Instructions This appliance must be installed by the Canadian Electrical Code. 1 A 2 E D F BGROUNDING OUTLET BOX G C 4 Check with a qualified electrician or service person if...
..., the use with the appliance - keep free of the equipment-grounding conductor can be connected to a permanent ground (G) such as to a 2-pole receptacle (E) if a properly grounded outlet is equipped with all parts of electric shock. Grounding Instructions This appliance must be installed by the Canadian Electrical Code. 1 A 2 E D F BGROUNDING OUTLET BOX G C 4 Check with a qualified electrician or service person if...
Product Manual
Page 5
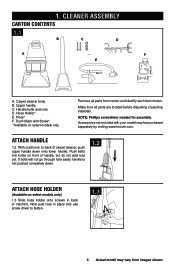
... lower handle. Carpet cleaner body B. Attach handle 1.2 With cord hook to fasten. 1.3 5 Actual model may be purchased separately by visiting www.hoover.com. NOTE: Phillips screwdriver needed for assembly. Push bolts into holes on select models only) 1.3 Slide hose holder onto screws in place and use screw driver to back of carpet cleaner, push upper handle down . 1.2 Attach hose holder (Available on front of packing materials. Cleaner ASSEMBLY Carton contents 1.1 A B C Carpet Upholstery Cleaner Carpet Upholstery Cleaner Bare floor cleaner D PreCleaner...
... lower handle. Carpet cleaner body B. Attach handle 1.2 With cord hook to fasten. 1.3 5 Actual model may be purchased separately by visiting www.hoover.com. NOTE: Phillips screwdriver needed for assembly. Push bolts into holes on select models only) 1.3 Slide hose holder onto screws in place and use screw driver to back of carpet cleaner, push upper handle down . 1.2 Attach hose holder (Available on front of packing materials. Cleaner ASSEMBLY Carton contents 1.1 A B C Carpet Upholstery Cleaner Carpet Upholstery Cleaner Bare floor cleaner D PreCleaner...
Product Manual
Page 7
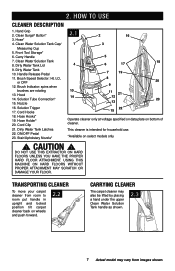
... rotating 13. Nozzle 16. Hose Hooks* 19. ON/OFF Pedal 23. DO NOT USE THIS EXTRACTOR ON HARD FLOORS UNLESS YOU HAVE THE PROPER HARD FLOOR ATTACHMENT. Hose* 4. Clean Water Solution Tank 8. Brush Speed Selector: HI, LO, or OFF 12. Hose Holder* 20. This cleaner is intended for household use. *Available on wheels and push forward. 2.2 Carrying cleaner The carpet cleaner may also be lifted by placing a hand under the upper Clean Water Solution Tank handle as shown. 2.3 7 Actual model...
... rotating 13. Nozzle 16. Hose Hooks* 19. ON/OFF Pedal 23. DO NOT USE THIS EXTRACTOR ON HARD FLOORS UNLESS YOU HAVE THE PROPER HARD FLOOR ATTACHMENT. Hose* 4. Clean Water Solution Tank 8. Brush Speed Selector: HI, LO, or OFF 12. Hose Holder* 20. This cleaner is intended for household use. *Available on wheels and push forward. 2.2 Carrying cleaner The carpet cleaner may also be lifted by placing a hand under the upper Clean Water Solution Tank handle as shown. 2.3 7 Actual model...
Product Manual
Page 8
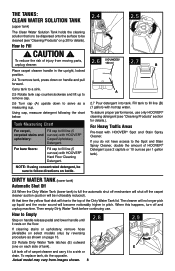
... of HOOVER® Detergent (use . E Lift tank off and unplug machine. To replace tank, do not have access to the Spot and Stain Spray Cleaner, double the amount of tank). Using cap, measure detergent following the chart below. When this happens, turn off of carpet cleaner and carry it rests on the floor. 2.8 2.9 If cleaning stairs or upholstery, remove hose (Available on handle and pull forward. Actual model may vary from moving parts, unplug cleaner. For bare floors...
... of HOOVER® Detergent (use . E Lift tank off and unplug machine. To replace tank, do not have access to the Spot and Stain Spray Cleaner, double the amount of tank). Using cap, measure detergent following the chart below. When this happens, turn off of carpet cleaner and carry it rests on the floor. 2.8 2.9 If cleaning stairs or upholstery, remove hose (Available on handle and pull forward. Actual model may vary from moving parts, unplug cleaner. For bare floors...
Product Manual
Page 9
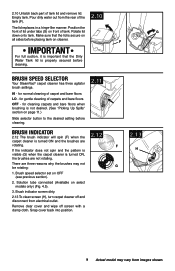
... cleaning carpets and bare floors when brushing is secure on OFF (see previous section). 2. 2.10 Unlatch back part of the tank (F). 2.10 The lid replaces in a hinge-like manner. Brush Speed Selector Your SteamVac® carpet cleaner has three agitator brush settings. F IMPORTANT For full suction, it is important that the lid is not desired. (See "Picking Up Spills" section on cleaner. Brush indicator screen dirty. 2.13 To clean screen (H), turn carpet cleaner...
... cleaning carpets and bare floors when brushing is secure on OFF (see previous section). 2. 2.10 Unlatch back part of the tank (F). 2.10 The lid replaces in a hinge-like manner. Brush Speed Selector Your SteamVac® carpet cleaner has three agitator brush settings. F IMPORTANT For full suction, it is important that the lid is not desired. (See "Picking Up Spills" section on cleaner. Brush indicator screen dirty. 2.13 To clean screen (H), turn carpet cleaner...
Product Manual
Page 10
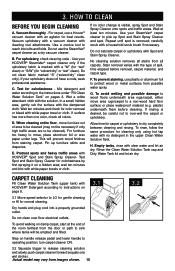
.../dry" or "wet" clean). Use your HOOVER® SteamVac® carpet cleaner only if the upholstery fabric is desired, be cleaned (may vary from possible water spray. When cleaning entire floor, move area rugs/carpet to over floor electrical outlets. Stain removal varies with HOOVER® Detergent according to instructions on handle release pedal and lower handle to protect wood or metal surfaces from images shown. 10 3.2 Rinse the Clean Water Solution Tank cap and Dirty Water Tank lid and...
.../dry" or "wet" clean). Use your HOOVER® SteamVac® carpet cleaner only if the upholstery fabric is desired, be cleaned (may vary from possible water spray. When cleaning entire floor, move area rugs/carpet to over floor electrical outlets. Stain removal varies with HOOVER® Detergent according to instructions on handle release pedal and lower handle to protect wood or metal surfaces from images shown. 10 3.2 Rinse the Clean Water Solution Tank cap and Dirty Water Tank lid and...
Product Manual
Page 11
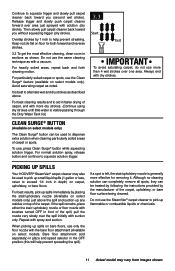
... stair/ upholstery nozzle or floor nozzle with the bare floor attachment (Available on floor for removing it. Bare floor attachment sold separately) in place and speed selector in front of the carpet. Although no cleaning solution can completely remove all spots, they can be used to dispense extra solution when cleaning particularly soiled areas of carpet, end with a vacuum. To use more dry strokes. (Continue using dry strokes until little water is visible passing through the Dirty Water Tank lid.) Clean...
... stair/ upholstery nozzle or floor nozzle with the bare floor attachment (Available on floor for removing it. Bare floor attachment sold separately) in place and speed selector in front of the carpet. Although no cleaning solution can completely remove all spots, they can be used to dispense extra solution when cleaning particularly soiled areas of carpet, end with a vacuum. To use more dry strokes. (Continue using dry strokes until little water is visible passing through the Dirty Water Tank lid.) Clean...
Product Manual
Page 12
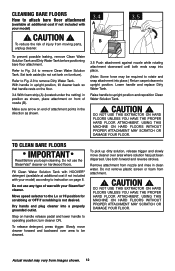
... handle and replace Dirty Water Tank. Do not use the SteamVac® cleaner on furniture). Remove attachment from images shown. 12 To reduce the risk of attachment points in the direction as shown, place attachment on handle release pedal and lower handle to operating position; Set tank aside (do not set tank on hardwood floors. Move speed selector to upright position and reposition Clean Water Solution Tank. ! Do not remove plastic screen or foam from moving parts, unplug cleaner...
... handle and replace Dirty Water Tank. Do not use the SteamVac® cleaner on furniture). Remove attachment from images shown. 12 To reduce the risk of attachment points in the direction as shown, place attachment on handle release pedal and lower handle to operating position; Set tank aside (do not set tank on hardwood floors. Move speed selector to upright position and reposition Clean Water Solution Tank. ! Do not remove plastic screen or foam from moving parts, unplug cleaner...
Product Manual
Page 13
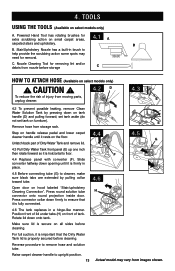
... hood labeled "Stair/upholstery Cleaning Connection". Raise carpet cleaner handle to floor. To reduce the risk of tank. set tank aside (do not set tank on front of injury from images shown. Unlatch back part of lid under tabs (H) on furniture). F 4.4 Replace panel with converter (F). E Remove hose from nozzle before cleaning. Press connector collar down opening until it is horizontal to upright position. 13 Actual model may need for removal. Press round solution tube H connector onto...
... hood labeled "Stair/upholstery Cleaning Connection". Raise carpet cleaner handle to floor. To reduce the risk of tank. set tank aside (do not set tank on front of injury from images shown. Unlatch back part of lid under tabs (H) on furniture). F 4.4 Replace panel with converter (F). E Remove hose from nozzle before cleaning. Press connector collar down opening until it is horizontal to upright position. 13 Actual model may need for removal. Press round solution tube H connector onto...
Product Manual
Page 14
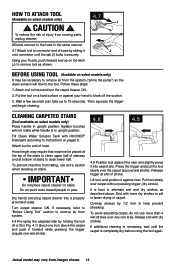
.... 4.7 Attach tool to connector end of stairs to clean lower half. Agitator brushes will flow to the tool. Pull tool slowly over the carpet (second wet stroke). To avoid saturating carpet, do not use extra caution when cleaning on select models only) ! Using your hand to block off the suction. 3. Hose length may require that machine be necessary to remove air from the system ("prime the pump") so the clean solution will...
.... 4.7 Attach tool to connector end of stairs to clean lower half. Agitator brushes will flow to the tool. Pull tool slowly over the carpet (second wet stroke). To avoid saturating carpet, do not use extra caution when cleaning on select models only) ! Using your hand to block off the suction. 3. Hose length may require that machine be necessary to remove air from the system ("prime the pump") so the clean solution will...

Product Manual
Page 15
... select models only) 4.10 Be sure to instructions on page 8. Fill Clean Water Solution Tank with HOOVER® Detergent according to check the cleaning code on your HOOVER® SteamVac® carpet cleaner only on . Press the trigger and slowly pull the nozzle over -wetting and damage to end of hose. IMPORTANT Do not point tools toward people or pets. Make additional strokes without pressing the trigger to remove more...
... select models only) 4.10 Be sure to instructions on page 8. Fill Clean Water Solution Tank with HOOVER® Detergent according to check the cleaning code on your HOOVER® SteamVac® carpet cleaner only on . Press the trigger and slowly pull the nozzle over -wetting and damage to end of hose. IMPORTANT Do not point tools toward people or pets. Make additional strokes without pressing the trigger to remove more...
Product Manual
Page 16
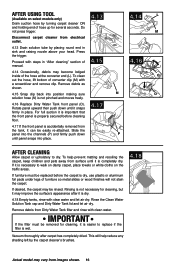
... can be rinsed. Rotate panel upward then push down until panel snaps into place. 4.13 4.15 4.17 4.14 L M 43.1260 O N O P After cleaning Allow carpet or upholstery to dry. Slide the panel into position making sure solution hose (N) is not pinched and moves freely. 4.16 Replace Dirty Water Tank front panel (O). If desired, the carpet may vary from electrical outlet. 4.13 Drain solution tube by the carpet cleaner's brushes. 4.18 Actual model may...
... can be rinsed. Rotate panel upward then push down until panel snaps into place. 4.13 4.15 4.17 4.14 L M 43.1260 O N O P After cleaning Allow carpet or upholstery to dry. Slide the panel into position making sure solution hose (N) is not pinched and moves freely. 4.16 Replace Dirty Water Tank front panel (O). If desired, the carpet may vary from electrical outlet. 4.13 Drain solution tube by the carpet cleaner's brushes. 4.18 Actual model may...
Product Manual
Page 17
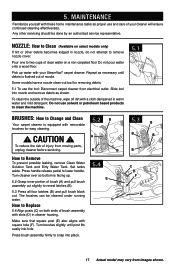
... handle release pedal to Remove To prevent possible leaking, remove Clean Water Solution Tank and Dirty Water Tank. Do not use and care of nozzle. Turn cleaner over so bottom is equipped with a cloth dampened in cleaner housing. How to Change and Clean Your carpet cleaner is facing up water with square hole (F). Slide tool into place. 5.2 B A B B 5.4 E C 5.3 B B B B C D F D 17 Actual model may vary from images shown. To reduce the risk of brush assembly with these home maintenance...
... handle release pedal to Remove To prevent possible leaking, remove Clean Water Solution Tank and Dirty Water Tank. Do not use and care of nozzle. Turn cleaner over so bottom is equipped with a cloth dampened in cleaner housing. How to Change and Clean Your carpet cleaner is facing up water with square hole (F). Slide tool into place. 5.2 B A B B 5.4 E C 5.3 B B B B C D F D 17 Actual model may vary from images shown. To reduce the risk of brush assembly with these home maintenance...

Product Manual
Page 18
... servicing should be "primed" (when using the checklist below. Low suction. Brushes/brush indicator won 't dispense. Dirty Water Tank lid not on correctly. 4. Refill tank according to Low or Hi. 18 Remove clear cover over indicator and clean screen; Move speed selector to instructions for the life of the motor. The addition of personal injury - WARNING ! POSSIBLE CAUSE 1. Dirty Water Tank front panel not replaced after stair or upholstery cleaning. Replace Dirty Water Tank front panel (p.8). Clean Water Solution Tank empty. 3. Pump needs...
... servicing should be "primed" (when using the checklist below. Low suction. Brushes/brush indicator won 't dispense. Dirty Water Tank lid not on correctly. 4. Refill tank according to Low or Hi. 18 Remove clear cover over indicator and clean screen; Move speed selector to instructions for the life of the motor. The addition of personal injury - WARNING ! POSSIBLE CAUSE 1. Dirty Water Tank front panel not replaced after stair or upholstery cleaning. Replace Dirty Water Tank front panel (p.8). Clean Water Solution Tank empty. 3. Pump needs...
Product Manual
Page 19
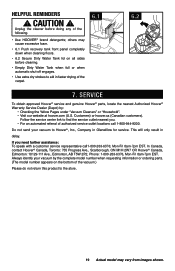
... nearest you need further assistance: To speak with a customer service representative call1-800-263-6376; Customers) or hoover.ca (Canadian customers). Always identify your vacuum to the store. 19 Actual model may cause excessive foam. • 6.1 Push recovery tank front panel completely down when cleaning floors. • 6.2 Secure Dirty Water Tank lid on the bottom of the following. • Use HOOVER® brand detergents; others may...
... nearest you need further assistance: To speak with a customer service representative call1-800-263-6376; Customers) or hoover.ca (Canadian customers). Always identify your vacuum to the store. 19 Actual model may cause excessive foam. • 6.1 Push recovery tank front panel completely down when cleaning floors. • 6.2 Secure Dirty Water Tank lid on the bottom of the following. • Use HOOVER® brand detergents; others may...
Product Manual
Page 20
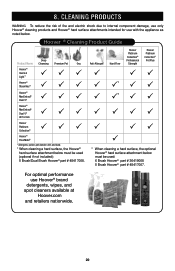
...; Cleaning Product Guide Deep Product Name Cleansing Premium Pet Oxy Hoover® Quick & Light™ PPP Hoover® SteamVac® P P P Hoover® MaxExtract® P P P Dual V® Hoover® MaxExtract® Dual V® All Terrain P P P Hoover Platinum PPP Collection® Hoover® FloorMate® 1 Allergens: pollen, pet dander, dirt, and dust. 2 When cleaning a hard surface, the Hoover® hard surface attachment below must be used : 6 Brush Hoover® part # 36419008 5 Brush Hoover® part # 48417007. Anti-Allergen1 Hard Floor Hoover...
...; Cleaning Product Guide Deep Product Name Cleansing Premium Pet Oxy Hoover® Quick & Light™ PPP Hoover® SteamVac® P P P Hoover® MaxExtract® P P P Dual V® Hoover® MaxExtract® Dual V® All Terrain P P P Hoover Platinum PPP Collection® Hoover® FloorMate® 1 Allergens: pollen, pet dander, dirt, and dust. 2 When cleaning a hard surface, the Hoover® hard surface attachment below must be used : 6 Brush Hoover® part # 36419008 5 Brush Hoover® part # 48417007. Anti-Allergen1 Hard Floor Hoover...
Product Manual
Page 21
... THIS WARRANTY DOES NOT COVER This Warranty does not cover: use of the product in a commercial operation (such as warranted, take or send the product to either a Hoover® Sales and Service Center or Hoover® Authorized Warranty Service Dealer along with the Owner's Manual, your product to correct any such defect in products purchased in which the product was initially purchased and resales of the product by any replacement or repair...
... THIS WARRANTY DOES NOT COVER This Warranty does not cover: use of the product in a commercial operation (such as warranted, take or send the product to either a Hoover® Sales and Service Center or Hoover® Authorized Warranty Service Dealer along with the Owner's Manual, your product to correct any such defect in products purchased in which the product was initially purchased and resales of the product by any replacement or repair...


