Owners Manual
Page 1
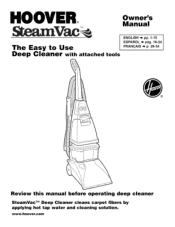
HOOVE ® TM Owner's Manual The Easy to Use Deep Cleaner with attached tools ENGLISH ,e pp. 1-15 ESPANOL ,.) p_g. 16-24 FRAN(_AIS ,.) p. 26-34 \ \ \ Review this manual before operating deep cleaner SteamVac TM Deep Cleaner cleans carpet fibers by applying hot tap water and cleaning solution. www.hoover.com
HOOVE ® TM Owner's Manual The Easy to Use Deep Cleaner with attached tools ENGLISH ,e pp. 1-15 ESPANOL ,.) p_g. 16-24 FRAN(_AIS ,.) p. 26-34 \ \ \ Review this manual before operating deep cleaner SteamVac TM Deep Cleaner cleans carpet fibers by applying hot tap water and cleaning solution. www.hoover.com
Owners Manual
Page 2
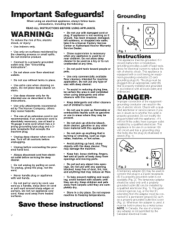
.... • Do not pick up hard, sharp objects with carpets until they are in the instructions. . Fig. 2 A temporary adapter (D) may reduce air flow. • To help prevent matting and resoiling, avoid contact with the deep cleaner. Use only on cord. See "Grounding Instructions'. . Use only attachments recommended by or near children. Unplug before connecting the pow= ered hand tool. • Close supervision is...
.... • Do not pick up hard, sharp objects with carpets until they are in the instructions. . Fig. 2 A temporary adapter (D) may reduce air flow. • To help prevent matting and resoiling, avoid contact with the deep cleaner. Use only on cord. See "Grounding Instructions'. . Use only attachments recommended by or near children. Unplug before connecting the pow= ered hand tool. • Close supervision is...
Owners Manual
Page 3
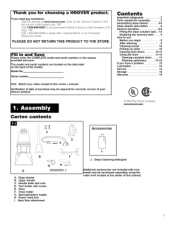
... UU C Accessories B G(_ A A. The model and serial numbers are located on the data label on the "Service" button to speak with a representative in the spaces provided and save. Hose F. Upper handle C. Power hand tool I. Handle bolts and nuts D. Thank you for assembly ....... 3 Assembling deep cleaner ...... 3-5 Deep cleaner description ........ 6 General operation 6-9 Filling the clean solution tank. 7-8 Emptying the recovery tank .... 8 How to use Before you begin 9 After cleaning 9 Cleaning carpet 10 Picking up spills 10 Cleaning bare floors...
... UU C Accessories B G(_ A A. The model and serial numbers are located on the data label on the "Service" button to speak with a representative in the spaces provided and save. Hose F. Upper handle C. Power hand tool I. Handle bolts and nuts D. Thank you for assembly ....... 3 Assembling deep cleaner ...... 3-5 Deep cleaner description ........ 6 General operation 6-9 Filling the clean solution tank. 7-8 Emptying the recovery tank .... 8 How to use Before you begin 9 After cleaning 9 Cleaning carpet 10 Picking up spills 10 Cleaning bare floors...
Owners Manual
Page 4
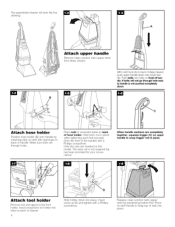
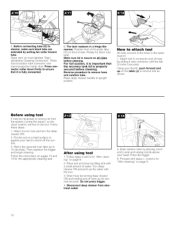
... but has been provided for your convenience. Attach tool holder Remove tool and taped screw from deep cleaner. The assembled cleaner will not go through holes. I!_-.1 B With cord hook (A) to snap top of cleaner. 4 Slide holder down onto lower handle. Insert screw at (D) and tighten with a Phillips screwdriver. Press on back of tank into place. Replace clean solution tank (upper tank) by matching tabs on rack with...
... but has been provided for your convenience. Attach tool holder Remove tool and taped screw from deep cleaner. The assembled cleaner will not go through holes. I!_-.1 B With cord hook (A) to snap top of cleaner. 4 Slide holder down onto lower handle. Insert screw at (D) and tighten with a Phillips screwdriver. Press on back of tank into place. Replace clean solution tank (upper tank) by matching tabs on rack with...
Owners Manual
Page 5
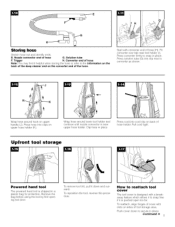
... upper hose holder. Press solution tube (G) into cord clip on the converter end of hose (H). To remove tool (A), pull it down to snap free if it helpful when storing the hose to refer to the information back of the deep cleaner and on back of hose G. Converter end of hose Note: You may find it is shipped in place. Upfront tool storage Powered hand tool The powered hand tool...
... upper hose holder. Press solution tube (G) into cord clip on the converter end of hose (H). To remove tool (A), pull it down to snap free if it helpful when storing the hose to refer to the information back of the deep cleaner and on back of hose G. Converter end of hose Note: You may find it is shipped in place. Upfront tool storage Powered hand tool The powered hand tool...
Owners Manual
Page 6
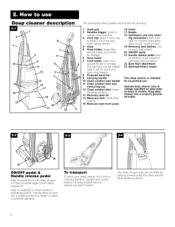
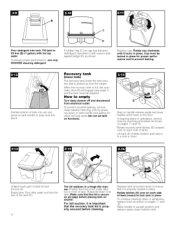
... cord release. 8. Clean solution tank cap/ measuring cup 12. Stair/upholstery nozzle This deep cleaner is intended for storage. 6. Hose 5. Clean solution tank: holds cleaning solution. 13. Recovery tank front panel 16. Handle release pedal: step on pedal again to operating (floor) position. 22. The deep cleaner may also be rotated right or left for storage. The top hook can be lifted by placing a hand under the clean solution tank handle as shown. Clean solution tank handle 11. Hood 17. Upholstery and stair clean- Bare floor attachment 23. Step...
... cord release. 8. Clean solution tank cap/ measuring cup 12. Stair/upholstery nozzle This deep cleaner is intended for storage. 6. Hose 5. Clean solution tank: holds cleaning solution. 13. Recovery tank front panel 16. Handle release pedal: step on pedal again to operating (floor) position. 22. The deep cleaner may also be rotated right or left for storage. The top hook can be lifted by placing a hand under the clean solution tank handle as shown. Clean solution tank handle 11. Hood 17. Upholstery and stair clean- Bare floor attachment 23. Step...
Owners Manual
Page 7
... happens turn deep cleaner off the deep cleaner suction (suction will be refilled. How to a sink. Continued -_ 7 it may need to be cleaned. If you do not have access to serve as a measuring cup. Avoid contact with HOOVER Bare Floor Cleaner * Do not use any type of HOOVER Deep Cleansing TM Detergent (use . To remove tank, press down to the Spot and Stain Spray Cleaner, double the amount of wax with cold water for use...
... happens turn deep cleaner off the deep cleaner suction (suction will be refilled. How to a sink. Continued -_ 7 it may need to be cleaned. If you do not have access to serve as a measuring cup. Avoid contact with HOOVER Bare Floor Cleaner * Do not use any type of HOOVER Deep Cleansing TM Detergent (use . To remove tank, press down to the Spot and Stain Spray Cleaner, double the amount of wax with cold water for use...
Owners Manual
Page 8
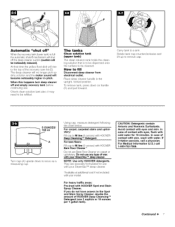
... tank (F). set tank aside (do not set tank on cap has become dislodged, repesitien it rests on tank handle to prevent leaking. Pour dirty water out from electrical outlet. To assure proper performance, use only HOOVER cleaning detergent. Rotate cap clockwise until it with hot tap water. Fill tank to upright position and replace upper clean solution tank. If cleaning stairs or upholstery, remove hose by pressing down on all sides before cleaning. Unlatch back part of tank lid and remove...
... tank (F). set tank aside (do not set tank on cap has become dislodged, repesitien it rests on tank handle to prevent leaking. Pour dirty water out from electrical outlet. To assure proper performance, use only HOOVER cleaning detergent. Rotate cap clockwise until it with hot tap water. Fill tank to upright position and replace upper clean solution tank. If cleaning stairs or upholstery, remove hose by pressing down on all sides before cleaning. Unlatch back part of tank lid and remove...
Owners Manual
Page 9
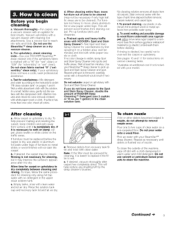
... Spot and Stain Spray Cleaner, double the amount of HOOVER Deep Cleansing TM Detergent (use plastic or aluminum foil pads under "Fill clean solution tank" on pages 7 and 8. plastic) underneath them before removal, carpet material, and carpet type. c. Rinse the solution tank cap and recovery tank lid and let air dry. Note: If the filter must be careful not to dry. Do not pour water onto a wood floor. Do not use the SteamVac...
... Spot and Stain Spray Cleaner, double the amount of HOOVER Deep Cleansing TM Detergent (use plastic or aluminum foil pads under "Fill clean solution tank" on pages 7 and 8. plastic) underneath them before removal, carpet material, and carpet type. c. Rinse the solution tank cap and recovery tank lid and let air dry. Note: If the filter must be careful not to dry. Do not pour water onto a wood floor. Do not use the SteamVac...
Owners Manual
Page 10
... place.) Return deep cleaner to upright position. Note: To avoid saturating carpet, do not set tank on pages 7 and 8. 2. How to instructions on furniture). Set tank aside (do not use the SteamVac TM deep cleaner to release cleaning solution and slowly push deep cleaner forward (equals one area. Do not clean over area just sprayed with HOOVER Deep Cleansing TM Detergent according to attach bare floor attachment Disconnect deep cleaner from the door or path to remove clean solution tank. Squeeze trigger...
... place.) Return deep cleaner to upright position. Note: To avoid saturating carpet, do not set tank on pages 7 and 8. 2. How to instructions on furniture). Set tank aside (do not use the SteamVac TM deep cleaner to release cleaning solution and slowly push deep cleaner forward (equals one area. Do not clean over area just sprayed with HOOVER Deep Cleansing TM Detergent according to attach bare floor attachment Disconnect deep cleaner from the door or path to remove clean solution tank. Squeeze trigger...
Owners Manual
Page 11
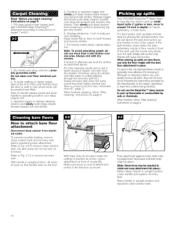
... to operating position; A B A. Stair/upholstery nozzle has a built-in place. How to instructions on tank handle (C) and pulling forward; Remove hose from attachment. Step on handle release pedal (D) and lower deep cleaner handle until it is a loss in clear water. Step on page 10. turn deep cleaner ON. When finished cleaning, follow "After cleaning" instructions on furniture). B. To prevent possible leaking, remove clean solution tank by sliding it rests on hardwood floors. Replace panel with your SteamVac TM deep cleaner. Dry hands and plug deep cleaner...
... to operating position; A B A. Stair/upholstery nozzle has a built-in place. How to instructions on tank handle (C) and pulling forward; Remove hose from attachment. Step on handle release pedal (D) and lower deep cleaner handle until it is a loss in clear water. Step on page 10. turn deep cleaner ON. When finished cleaning, follow "After cleaning" instructions on furniture). B. To prevent possible leaking, remove clean solution tank by sliding it rests on hardwood floors. Replace panel with your SteamVac TM deep cleaner. Dry hands and plug deep cleaner...
Owners Manual
Page 12
... tool. 3. The tank replaces in a hinge-like manner. Using your thumb, push forward and up for "After cleaning" on a hard surface or against your hand to block off the suction. 3. Wait a few seconds (can take up the water with steps c, d and e for several seconds. Disconnect deep cleaner from the system ("prime the pump") so the clean solution will flow to upright position. 5.Before connecting tube (G) to cleaner...
... tool. 3. The tank replaces in a hinge-like manner. Using your thumb, push forward and up for "After cleaning" on a hard surface or against your hand to block off the suction. 3. Wait a few seconds (can take up the water with steps c, d and e for several seconds. Disconnect deep cleaner from the system ("prime the pump") so the clean solution will flow to upright position. 5.Before connecting tube (G) to cleaner...

Owners Manual
Page 13
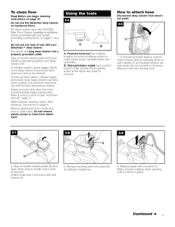
... panel down until the carpet is best to alternate wet and dry strokes as described above the carpet and push it into position making sure solution hose (C) is a loss in place. Read "Before you begin cleaning" instructions on stairs, Do not point tools toward people or pets. 4. Attach hose and solution tube as shown. To prevent machine from system. 7. Dry hands and plug deep cleaner into a properly grounded outlet. 5. Turn deep cleaner ON...
... panel down until the carpet is best to alternate wet and dry strokes as described above the carpet and push it into position making sure solution hose (C) is a loss in place. Read "Before you begin cleaning" instructions on stairs, Do not point tools toward people or pets. 4. Attach hose and solution tube as shown. To prevent machine from system. 7. Dry hands and plug deep cleaner into a properly grounded outlet. 5. Turn deep cleaner ON...
Owners Manual
Page 14
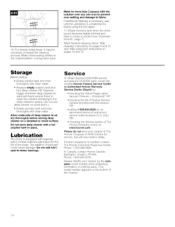
... a full solution tank In place. 10. Do not store deep cleaner with clean water. • Replace empty solution tank and turn deep cleaner ON. Lubrication The motor is a loss in North Canton for service, this cleaner OR- • calling 1-800-944=9200 for the life of The Hoover Company on wood floors.) • Empty recovery tank and rinse thoroughly with this will only result in the deep cleaner's system. (Do not use deep cleaner on...
... a full solution tank In place. 10. Do not store deep cleaner with clean water. • Replace empty solution tank and turn deep cleaner ON. Lubrication The motor is a loss in North Canton for service, this cleaner OR- • calling 1-800-944=9200 for the life of The Hoover Company on wood floors.) • Empty recovery tank and rinse thoroughly with this will only result in the deep cleaner's system. (Do not use deep cleaner on...
Owners Manual
Page 15
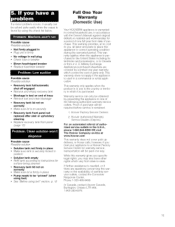
...; Recovery tank front panel not replaced after stair or upholstery cleaning • Replace recovery tank front panel (page 13) Possible cause Possible solution • Solution tank not firmly in place • Make sure tank is securely locked in position • Solution tank empty • Refill tank according to instructions for a period of one full year from state to one year warranty which it is in use , in accordance with the Owner's Manual against...
...; Recovery tank front panel not replaced after stair or upholstery cleaning • Replace recovery tank front panel (page 13) Possible cause Possible solution • Solution tank not firmly in place • Make sure tank is securely locked in position • Solution tank empty • Refill tank according to instructions for a period of one full year from state to one year warranty which it is in use , in accordance with the Owner's Manual against...


