Manual
Page 1
... inspected and packaged carefully before operating deep cleaner. A temporary adapter (C) may be held in accordance with a Hoover representative or check the Service section of the deep cleaner handle. Record and Retain This HOOVER deep cleaner is for an automated referral of authorized service outlet locations (U.S. The model and serial numbers are in the spaces provided and...
... inspected and packaged carefully before operating deep cleaner. A temporary adapter (C) may be held in accordance with a Hoover representative or check the Service section of the deep cleaner handle. Record and Retain This HOOVER deep cleaner is for an automated referral of authorized service outlet locations (U.S. The model and serial numbers are in the spaces provided and...
Manual
Page 2
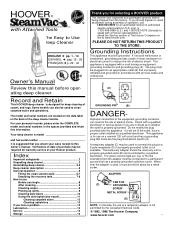
...6376 (Canada) to quickly resolve any opening blocked; Remove and dispose of authorized service outlet locations (U.S. SteamVac™ Deep Cleaner cleans carpet fibers by The Hoover Company; Important Safeguards! Do not run unattended at any time. • Do not point stair/upholstery tool toward people ...or pets. • To assist in the instructions. The Hoover Company wants to speak with some models. PLEASE DO NOT RETURN THIS PRODUCT TO THE STORE OR SEND IT TO NORTH CANTON FOR SERVICE. Deep cleaner B. Nuts (3 - Bare floor attachment* I K J L A. Do...
...6376 (Canada) to quickly resolve any opening blocked; Remove and dispose of authorized service outlet locations (U.S. SteamVac™ Deep Cleaner cleans carpet fibers by The Hoover Company; Important Safeguards! Do not run unattended at any time. • Do not point stair/upholstery tool toward people ...or pets. • To assist in the instructions. The Hoover Company wants to speak with some models. PLEASE DO NOT RETURN THIS PRODUCT TO THE STORE OR SEND IT TO NORTH CANTON FOR SERVICE. Deep cleaner B. Nuts (3 - Bare floor attachment* I K J L A. Do...
Manual
Page 3
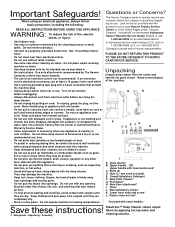
... handle. Continued § Assembly 3 The extra nut is not pushed completely down onto lower handle. (Fig.3). Press on tank handle to back of deep cleaner, push upper handle down . 5 Attach upper handle 1 2 Place nuts in place while tightening each bolt securely with 4 attached tools will look like this... (Fig. 6). 7 CORD HOOK TANK HANDLE With cord hook to snap top of tank into holes on back of handle (Fig. 4). Assembling deep cleaner Assembled models without Assembled models with a Phillips screw driver (Fig. 5). like attached tools will look this...
... handle. Continued § Assembly 3 The extra nut is not pushed completely down onto lower handle. (Fig.3). Press on tank handle to back of deep cleaner, push upper handle down . 5 Attach upper handle 1 2 Place nuts in place while tightening each bolt securely with 4 attached tools will look like this... (Fig. 6). 7 CORD HOOK TANK HANDLE With cord hook to snap top of tank into holes on back of handle (Fig. 4). Assembling deep cleaner Assembled models without Assembled models with a Phillips screw driver (Fig. 5). like attached tools will look this...
Manual
Page 4
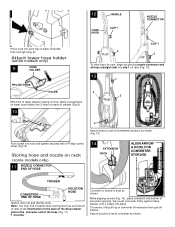
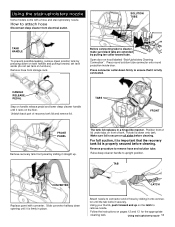
...Fig. 14), place extension into place. Storing hose and nozzle on rack (some models only) 9 HOSE HOLDER PROJECTIONS HOLES With front of deep cleaner resting on floor, place 2 projections on lower hose holder into 2 holes on back of cleaner (Fig 9). 10 CLIP 1 2 2 To store hose on rack, begin by ... 13 1 4 2 3 Secure hose to rack at numbered locations as shown. Secure solution hose to the information on the back of the deep cleaner and on back of converter off extension then pull off bottom. 8 12 HANDLE NOZZLE CONNECTOR CORD HOOK CLIP 1 Press cord into hole and tighten ...
...Fig. 14), place extension into place. Storing hose and nozzle on rack (some models only) 9 HOSE HOLDER PROJECTIONS HOLES With front of deep cleaner resting on floor, place 2 projections on lower hose holder into 2 holes on back of cleaner (Fig 9). 10 CLIP 1 2 2 To store hose on rack, begin by ... 13 1 4 2 3 Secure hose to rack at numbered locations as shown. Secure solution hose to the information on the back of the deep cleaner and on back of converter off extension then pull off bottom. 8 12 HANDLE NOZZLE CONNECTOR CORD HOOK CLIP 1 Press cord into hole and tighten ...
Manual
Page 5
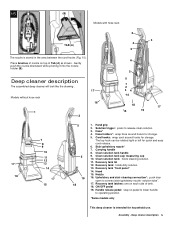
... tank cap/ measuring cup 10. Gently push the nozzle downward while pivoting it into the nozzle holder (B). Recovery tank: holds dirty solution. 13. Deep cleaner description 5 15 (B) Models with hose rack TAB (A) 2 1 3 4 5 The nozzle is intended for household use. Solution trigger: press to connect stair/upholstery nozzle "solution tube". 17. Carrying handle...
... tank cap/ measuring cup 10. Gently push the nozzle downward while pivoting it into the nozzle holder (B). Recovery tank: holds dirty solution. 13. Deep cleaner description 5 15 (B) Models with hose rack TAB (A) 2 1 3 4 5 The nozzle is intended for household use. Solution trigger: press to connect stair/upholstery nozzle "solution tube". 17. Carrying handle...
Manual
Page 7
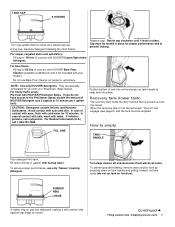
... " will engage (see page 6) and the tank must be emptied. Rotate cap clockwise until it with your model.) Do not use Bare Floor Cleaner on carpet or upholstery. Cap must be locked in place. They are specially formulated for use with uneven side against cap ledge...place. To prevent possible leaking, remove clean solution tank by pressing down to fill line (5 ounces) with HOOVER Bare Floor Cleaner (available at additional cost if not included with your 'SteamVac' deep cleaner. Continued § Filling solution tank - For carpet, carpeted stairs and upholstery: Fill cap to snap ...
... " will engage (see page 6) and the tank must be emptied. Rotate cap clockwise until it with your model.) Do not use Bare Floor Cleaner on carpet or upholstery. Cap must be locked in place. They are specially formulated for use with uneven side against cap ledge...place. To prevent possible leaking, remove clean solution tank by pressing down to fill line (5 ounces) with HOOVER Bare Floor Cleaner (available at additional cost if not included with your 'SteamVac' deep cleaner. Continued § Filling solution tank - For carpet, carpeted stairs and upholstery: Fill cap to snap ...
Manual
Page 8
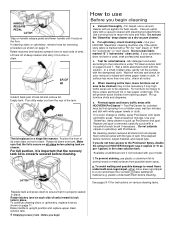
...dry" or "wet" clean). Use a crevice tool to upright position and replace upper clean solution tank. 8 Emptying recovery tank - b. Use your model. Do not clean fabric marked "S" ("solvent/dry" clean only). c. Mix detergent and water according to be necessary if only high traffic areas are ...with the type of the tank. Use your upholstery does not have access to ensure that it rests on front of HOOVER Detergent (use a vacuum cleaner with cleaning tool attachments. Repeat until it is visible, spray PreCleaner onto spots and traffic areas. Do not saturate carpet...
...dry" or "wet" clean). Use a crevice tool to upright position and replace upper clean solution tank. 8 Emptying recovery tank - b. Use your model. Do not clean fabric marked "S" ("solvent/dry" clean only). c. Mix detergent and water according to be necessary if only high traffic areas are ...with the type of the tank. Use your upholstery does not have access to ensure that it rests on front of HOOVER Detergent (use a vacuum cleaner with cleaning tool attachments. Repeat until it is visible, spray PreCleaner onto spots and traffic areas. Do not saturate carpet...
Manual
Page 9
... water and let air dry. For best cleaning results and to pick up any residue on top of the carpet. Picking up spills Your HOOVER 'SteamVac' deep cleaner may also be used to aid in depth) on page 9. Repeat with clean water. Although no detergent in warm water and a mild detergent...below, for removing it is dry, use solvent or petroleum based products to exceed 1/4 inch in faster drying of clear water on page 8. Some models have a nozzle clean-out tool, as necessary until it is completely dry. Always end with no cleaning solution can completely remove all spots, they ...
... water and let air dry. For best cleaning results and to pick up any residue on top of the carpet. Picking up spills Your HOOVER 'SteamVac' deep cleaner may also be used to aid in depth) on page 9. Repeat with clean water. Although no detergent in warm water and a mild detergent...below, for removing it is dry, use solvent or petroleum based products to exceed 1/4 inch in faster drying of clear water on page 8. Some models have a nozzle clean-out tool, as necessary until it is completely dry. Always end with no cleaning solution can completely remove all spots, they ...
Manual
Page 10
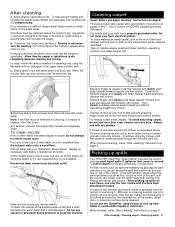
... Some models come with foam strip (under netting) in position as shown. For others, the tool is properly seated in upright position, tilt deep cleaner back so that it rests on each side of wax with your Authorized Hoover Dealer (Depot) or a Hoover Factory Service...Raise handle to attach bare floor attachment Disconnect deep cleaner from your 'Steamvac' deep cleaner. Fill clean solution tank according to upright position. Dry hands and plug deep cleaner into place.) Return deep cleaner to instructions on front of HOOVER Bare Floor Cleaner. To release solution, press trigger.
... Some models come with foam strip (under netting) in position as shown. For others, the tool is properly seated in upright position, tilt deep cleaner back so that it rests on each side of wax with your Authorized Hoover Dealer (Depot) or a Hoover Factory Service...Raise handle to attach bare floor attachment Disconnect deep cleaner from your 'Steamvac' deep cleaner. Fill clean solution tank according to upright position. Dry hands and plug deep cleaner into place.) Return deep cleaner to instructions on front of HOOVER Bare Floor Cleaner. To release solution, press trigger.
Manual
Page 11
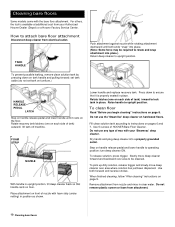
... appropriate cleaning task. Remove hose from electrical outlet. Before connecting tube to remove nozzle. HANDLE RELEASE PEDAL Step on handle release pedal and lower deep cleaner handle until the tab locks it is firmly in a hinge-like manner. TABS FRONT FRONT PANEL Remove recovery tank front panel by sliding it rests..., remove clean solution tank by pulling tan collar toward tube. Unlatch back part of tank. Slide converter halfway down firmly to attach hose Disconnect deep cleaner from storage rack. Using the stair/upholstery nozzle Some models come with converter.
... appropriate cleaning task. Remove hose from electrical outlet. Before connecting tube to remove nozzle. HANDLE RELEASE PEDAL Step on handle release pedal and lower deep cleaner handle until the tab locks it is firmly in a hinge-like manner. TABS FRONT FRONT PANEL Remove recovery tank front panel by sliding it rests..., remove clean solution tank by pulling tan collar toward tube. Unlatch back part of tank. Slide converter halfway down firmly to attach hose Disconnect deep cleaner from storage rack. Using the stair/upholstery nozzle Some models come with converter.
Manual
Page 14
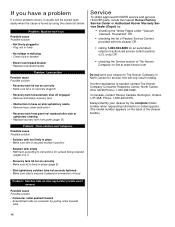
... firmly in place (page 8) • Stair/upholstery solution tube not securely fastened • Make sure tube is securely fastened at www.hoover.com Do not send your cleaner by the complete model number when requesting information or ordering parts. (The model number appears on the back of authorized service outlet locations (U.S. In Canada, contact...
... firmly in place (page 8) • Stair/upholstery solution tube not securely fastened • Make sure tube is securely fastened at www.hoover.com Do not send your cleaner by the complete model number when requesting information or ordering parts. (The model number appears on the back of authorized service outlet locations (U.S. In Canada, contact...


