Operating Instructions
Page 1
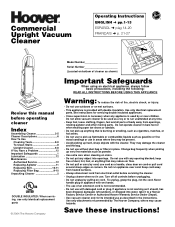
...; p. 21-27 Model Number Serial Number Located on bottom of cleaner as shown) Important Safeguards When using an electrical appliance, always follow basic precautions, including the following: READ ALL INSTRUCTIONS BEFORE USING THIS APPLIANCE Review this manual before operating cleaner Index Assembling Cleaner 2-5 Cleaner Descriptions 6 How To Use Cleaning Tools 8-9 To Clean Stairs 8 Upright Cleaner 6-8 If You Have a Problem 12 Important Safeguards 1 Lubrication 12 Maintenance Authorized Service 12 Replacing Agitator 11 Replacing Belt 10-11 Replacing Filter Bag 9-10 Unpacking...
...; p. 21-27 Model Number Serial Number Located on bottom of cleaner as shown) Important Safeguards When using an electrical appliance, always follow basic precautions, including the following: READ ALL INSTRUCTIONS BEFORE USING THIS APPLIANCE Review this manual before operating cleaner Index Assembling Cleaner 2-5 Cleaner Descriptions 6 How To Use Cleaning Tools 8-9 To Clean Stairs 8 Upright Cleaner 6-8 If You Have a Problem 12 Important Safeguards 1 Lubrication 12 Maintenance Authorized Service 12 Replacing Agitator 11 Replacing Belt 10-11 Replacing Filter Bag 9-10 Unpacking...
Operating Instructions
Page 2
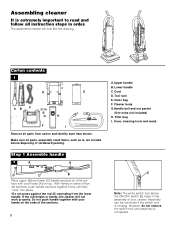
... each item shown. Assembling cleaner It is missing. Carton contents 1 D E AB C G H F I . Cord D. Filter bag I Remove all instruction steps in the assembly of the sections. 2 A. Lower handle C. Assembly can be continued if the switch lock is extremely important to read and follow all parts from the lower handle. Tool rack E. Do not push handle together with cord hooks (A) on the ends of your cleaner. The assembled cleaner will not work properly.
... each item shown. Assembling cleaner It is missing. Carton contents 1 D E AB C G H F I . Cord D. Filter bag I Remove all instruction steps in the assembly of the sections. 2 A. Lower handle C. Assembly can be continued if the switch lock is extremely important to read and follow all parts from the lower handle. Tool rack E. Do not push handle together with cord hooks (A) on the ends of your cleaner. The assembled cleaner will not work properly.

Operating Instructions
Page 3
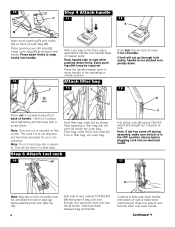
... upper handle (B). Be sure that power cord is pushed into place at each of cord into slot (K) in outer bag base aligns with side marked "UP" visible. Rotate cord protector (G) on front of outer bag base (M) and on cord until assembly is totally complete. Step 2 Attach cord 3 "UP" F 4H G UP D C B Turn handle over. Press cord into handle as far as possible. Step 3 Attach cloth outer bag 7 8 C M L Note location of...
... upper handle (B). Be sure that power cord is pushed into place at each of cord into slot (K) in outer bag base aligns with side marked "UP" visible. Rotate cord protector (G) on front of outer bag base (M) and on cord until assembly is totally complete. Step 2 Attach cord 3 "UP" F 4H G UP D C B Turn handle over. Press cord into handle as far as possible. Step 3 Attach cloth outer bag 7 8 C M L Note location of...
Operating Instructions
Page 4
... dirt tube (R). Align opening in bag cap before plugging cord into hole on lower front of rack, then the other onto lower handle. Attach filter bag 14 V Push bolt (S) into an electrical outlet. 17 A Note: Bag clip on front of handle must be required. Extra pushing effort may be unhooked from slot in filter bag with a screw driver. Step 6 Attach tool rack 16 W E F Pull switch lock (E) above ON/OFF switch...
... dirt tube (R). Align opening in bag cap before plugging cord into hole on lower front of rack, then the other onto lower handle. Attach filter bag 14 V Push bolt (S) into an electrical outlet. 17 A Note: Bag clip on front of handle must be required. Extra pushing effort may be unhooked from slot in filter bag with a screw driver. Step 6 Attach tool rack 16 W E F Pull switch lock (E) above ON/OFF switch...

Operating Instructions
Page 5
..., or carpeted stairs during tool use. On upper front handle, grasp bag clip (EE) and pull down handle until upper hooks (X) snap into opposite side of rack. Hook bag clip into place. CAUTION: When cleaner is in bag cap. Place round end of hose over round extension on , the agitator continues to rotate while the handle is turned on bottom of rack. Position dusting brush...
..., or carpeted stairs during tool use. On upper front handle, grasp bag clip (EE) and pull down handle until upper hooks (X) snap into opposite side of rack. Hook bag clip into place. CAUTION: When cleaner is in bag cap. Place round end of hose over round extension on , the agitator continues to rotate while the handle is turned on bottom of rack. Position dusting brush...

Operating Instructions
Page 6
.... 8. Handle positions The handle of bag. 7. operating position for storage. Stair cleaning handle: located on , push switch up. upright for reaching under low furniture. How to use Cleaner description 27 1 2 3 2 4 14 14 5 13 6 18 2 12 8 11 10 9 7 15 16 17 The assembled cleaner will fit in a polarized outlet only one blade is lifted off , push switch down. Nozzle control knob: slide knob to correct setting for easy cord release. 3. low...
.... 8. Handle positions The handle of bag. 7. operating position for storage. Stair cleaning handle: located on , push switch up. upright for reaching under low furniture. How to use Cleaner description 27 1 2 3 2 4 14 14 5 13 6 18 2 12 8 11 10 9 7 15 16 17 The assembled cleaner will fit in a polarized outlet only one blade is lifted off , push switch down. Nozzle control knob: slide knob to correct setting for easy cord release. 3. low...
Operating Instructions
Page 7
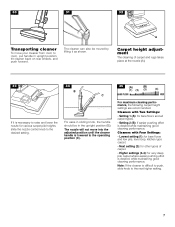
... maximum cleaning performance, the following carpet height settings are recommended. 30 31 32 A Transporting cleaner To move into the adjusted position until the cleaner handle is desired while maintaining good cleaning performance. The cleaner can also be in upright position, tilt cleaner back on rear wheels, and push forward. Carpet height adjustment The cleaning of carpet. • Higher settings (3-4): for bare floors and all carpet types. • Setting 2 (B): if...
... maximum cleaning performance, the following carpet height settings are recommended. 30 31 32 A Transporting cleaner To move into the adjusted position until the cleaner handle is desired while maintaining good cleaning performance. The cleaner can also be in upright position, tilt cleaner back on rear wheels, and push forward. Carpet height adjustment The cleaning of carpet. • Higher settings (3-4): for bare floors and all carpet types. • Setting 2 (B): if...

Operating Instructions
Page 8
... cleaner handle in upright position, open hose door and insert hose connector until locked in operating position, place fingers under edge of nozzle to rotate while cleaner handle is completely off before attaching or removing hose. When using your cleaner on furniture, fringed area rugs or carpeted stairs. 8 Suction will continue to prevent the cleaner from falling, use the hose and furniture nozzle for ease in using cleaning tools, the agitator will automatically be removed from...
... cleaner handle in upright position, open hose door and insert hose connector until locked in operating position, place fingers under edge of nozzle to rotate while cleaner handle is completely off before attaching or removing hose. When using your cleaner on furniture, fringed area rugs or carpeted stairs. 8 Suction will continue to prevent the cleaner from falling, use the hose and furniture nozzle for ease in using cleaning tools, the agitator will automatically be removed from...
Operating Instructions
Page 9
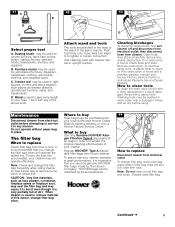
... you change filter bag often. Clearing blockages To check for upholstered furniture, draperies, mattresses, clothing, automobile interiors, and carpeted stairs. Continued § 9 41 A 42 43 D B E C Select proper tool A. Dusting brush may be used for obstructions, first turn cleaner off dirt with any visible obstruction. Crevice tool may be used to cleaner. When cleaner is found , check hose and tools. Do not operate without paper bag in warm water with a detergent. Cleaning tools may be washed...
... you change filter bag often. Clearing blockages To check for upholstered furniture, draperies, mattresses, clothing, automobile interiors, and carpeted stairs. Continued § 9 41 A 42 43 D B E C Select proper tool A. Dusting brush may be used for obstructions, first turn cleaner off dirt with any visible obstruction. Crevice tool may be used to cleaner. When cleaner is found , check hose and tools. Do not operate without paper bag in warm water with a detergent. Cleaning tools may be washed...
Operating Instructions
Page 10
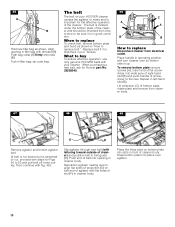
... three tabs on belt end of agitator with dirt tube (B). 45 A B Hold new filter bag as shown in "How to rotate and is important for the effective operation of the cleaner. Repeat in filter bag; zip outer bag. What to be checked from electrical outlet. Place handle in operating position and turn cleaner over agitator. 10 Push bag collar (A) firmly onto tube (B). The belt is located under the bottom plate of the cleaner and should...
... three tabs on belt end of agitator with dirt tube (B). 45 A B Hold new filter bag as shown in "How to rotate and is important for the effective operation of the cleaner. Repeat in filter bag; zip outer bag. What to be checked from electrical outlet. Place handle in operating position and turn cleaner over agitator. 10 Push bag collar (A) firmly onto tube (B). The belt is located under the bottom plate of the cleaner and should...

Operating Instructions
Page 11
... operating position and turn , remove bottom plate and reposition belt in the belt guide. Turn cleaner over and lift off motor pulley as shown. Extra effort may be replaced with Hoover part No. 48414118. Continued § 11 grasp knob and pull up. For slots nearest rear wheels, push handle of a card across bottom plate while turning agitator. Turn agitator, making sure belt is not pinched between agitator and cleaner body. To check condition of brushes...
... operating position and turn , remove bottom plate and reposition belt in the belt guide. Turn cleaner over and lift off motor pulley as shown. Extra effort may be replaced with Hoover part No. 48414118. Continued § 11 grasp knob and pull up. For slots nearest rear wheels, push handle of a card across bottom plate while turning agitator. Turn agitator, making sure belt is not pinched between agitator and cleaner body. To check condition of brushes...
Operating Instructions
Page 12
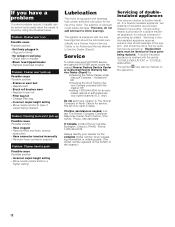
... those parts being cleaned Problem: Cleaning tools won't pick up Possible cause Possible solution • Broken or worn belt • Replace belt • Brush roll brushes worn • Replace brush roll • Filter bag full • Change filter bag • Incorrect carpet height setting • Move nozzle control to motor bearings. Therefore, do not add lubricant to type of doubleinsulated appliances This vacuum cleaner is marked with bearings that should a means for the life of authorized service outlet locations (U.S. Replacement parts must...
... those parts being cleaned Problem: Cleaning tools won't pick up Possible cause Possible solution • Broken or worn belt • Replace belt • Brush roll brushes worn • Replace brush roll • Filter bag full • Change filter bag • Incorrect carpet height setting • Move nozzle control to motor bearings. Therefore, do not add lubricant to type of doubleinsulated appliances This vacuum cleaner is marked with bearings that should a means for the life of authorized service outlet locations (U.S. Replacement parts must...


