
Owner's Manual
Page 1
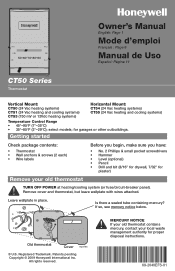
... M23786 ® U.S. Registered Trademark. Leave wallplate in place. Copyright © 2009 Honeywell International Inc. MERCURY NOTICE If your old thermostat contains mercury, contact your old thermostat Before you begin, make sure you have: • No. 2 Phillips & small pocket screwdrivers • Hammer • Level (...CT51 (24 Vac heating and cooling systems) CT53 (750 mV or 12Vdc heating systems) Horizontal Mount: CT54 (24 Vac heating systems) CT55 (24 Vac heating and cooling systems) Temperature Control Range • 45°-95°F (7°-35°C) • 35°...
... M23786 ® U.S. Registered Trademark. Leave wallplate in place. Copyright © 2009 Honeywell International Inc. MERCURY NOTICE If your old thermostat contains mercury, contact your old thermostat Before you begin, make sure you have: • No. 2 Phillips & small pocket screwdrivers • Hammer • Level (...CT51 (24 Vac heating and cooling systems) CT53 (750 mV or 12Vdc heating systems) Horizontal Mount: CT54 (24 Vac heating systems) CT55 (24 Vac heating and cooling systems) Temperature Control Range • 45°-95°F (7°-35°C) • 35°...
Owner's Manual
Page 2
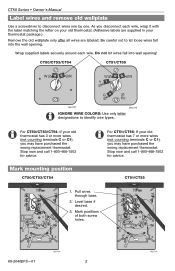
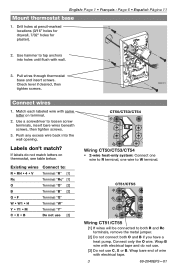
... each wire. Pull wires through base. 2. Mark mounting position CT50/CT53/CT54 For CT51/CT55: If your thermostat package.) Remove the old wallplate only after all wires are supplied in your old thermostat has 7 or more wires (not counting terminals C or C1), you may have purchased the...WIRE COLORS: Use only letter designations to disconnect wires one by one. CT51/CT55 1. Wrap supplied labels securely around each wire, wrap it with the label matching the letter on your old thermostat. (Adhesive labels are labeled. M23789 69-2040EFS-01 2 M23790 Be careful not...
... each wire. Pull wires through base. 2. Mark mounting position CT50/CT53/CT54 For CT51/CT55: If your thermostat package.) Remove the old wallplate only after all wires are supplied in your old thermostat has 7 or more wires (not counting terminals C or C1), you may have purchased the...WIRE COLORS: Use only letter designations to disconnect wires one by one. CT51/CT55 1. Wrap supplied labels securely around each wire, wrap it with the label matching the letter on your old thermostat. (Adhesive labels are labeled. M23789 69-2040EFS-01 2 M23790 Be careful not...
Owner's Manual
Page 3
... tape and do not match letters on terminal. 2. CT51/CT55 Wiring CT51/CT55 M23792 [1] If wires will be connected to loosen screw terminals, insert bare wires beneath screws, then tighten screws. 3. Pull wires through thermostat base and insert screws. If labels do not use. [3]... • Français : Page 6 • Español: Página 11 Mount thermostat base 1. Connect only the O wire. Wrap B wire with wall. 3. Wrap bare end of wire with same letter on thermostat, see table below. Labels don't match? M23791 Connect wires 1. Use hammer to : R •...
... tape and do not match letters on terminal. 2. CT51/CT55 Wiring CT51/CT55 M23792 [1] If wires will be connected to loosen screw terminals, insert bare wires beneath screws, then tighten screws. 3. Pull wires through thermostat base and insert screws. If labels do not use. [3]... • Français : Page 6 • Español: Página 11 Mount thermostat base 1. Connect only the O wire. Wrap B wire with wall. 3. Wrap bare end of wire with same letter on thermostat, see table below. Labels don't match? M23791 Connect wires 1. Use hammer to : R •...
Owner's Manual
Page 4
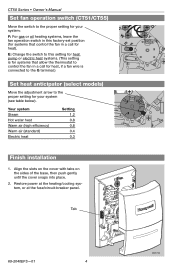
... cover snaps into place. 2. CT50 Series • Owner's Manual Set fan operation switch (CT51/CT55) Move the switch to the proper setting for heat). E: Change the switch to this factory-set position (for systems that allow the thermostat to the proper setting for your system: F: For gas or oil heating systems, leave...
... cover snaps into place. 2. CT50 Series • Owner's Manual Set fan operation switch (CT51/CT55) Move the switch to the proper setting for heat). E: Change the switch to this factory-set position (for systems that allow the thermostat to the proper setting for your system: F: For gas or oil heating systems, leave...


