
Owner's Manual
Page 2
...damage, do not operate cooling system when outdoor temperature is below 50°F (10°C). This manual covers the RTH7400 and RTH7500 models. (Pull thermostat from wallplate and turn over to find model number) This thermostat contains a Lithium battery which may apply...other patents pending Copyright © 2010 Honeywell International Inc. All rights reserved. Need Help? For assistance with this product please visit http://yourhome.honeywell.com or call Honeywell Customer Care toll-free at 1-800-468-1502 Read and save these instructions. ® U.S. Patents pending. Perchlorate...
...damage, do not operate cooling system when outdoor temperature is below 50°F (10°C). This manual covers the RTH7400 and RTH7500 models. (Pull thermostat from wallplate and turn over to find model number) This thermostat contains a Lithium battery which may apply...other patents pending Copyright © 2010 Honeywell International Inc. All rights reserved. Need Help? For assistance with this product please visit http://yourhome.honeywell.com or call Honeywell Customer Care toll-free at 1-800-468-1502 Read and save these instructions. ® U.S. Patents pending. Perchlorate...

Owners Guide
Page 1
Honeywell RTH7500D Programmable Thermostat OWNER'S SNOB The RTH7500O Thermostat provides electronic control of 24 Vac heating and cooling systems or 750 mV heating systems 14/ ' am' kistr' For assistance with your Honeywell product, please visit www honeywell.comiyourhome or call Honeywell Customer Care toll free at 1-80O-468-1502 Read and Save these Instructions Paionb Pooling • U S RegoIsn40 Trolionsri o 2004 Hoflerooll Inlernoncessl Inc Al Rare' Ctiosern40
Honeywell RTH7500D Programmable Thermostat OWNER'S SNOB The RTH7500O Thermostat provides electronic control of 24 Vac heating and cooling systems or 750 mV heating systems 14/ ' am' kistr' For assistance with your Honeywell product, please visit www honeywell.comiyourhome or call Honeywell Customer Care toll free at 1-80O-468-1502 Read and Save these Instructions Paionb Pooling • U S RegoIsn40 Trolionsri o 2004 Hoflerooll Inlernoncessl Inc Al Rare' Ctiosern40

Owners Guide
Page 2
Prepare for Installation Follow Important Instructions Remove Old Thermostat Follow Special Instructions Label Old ThennCallt Wins Mount New Wallpfaie to Wall Connect Wires to New Wallpiala Install Batteries Attach New Thermostat to the store 69-1730 Contents Prepare for Installation . call Honeywell Customer Care at 1-800-468-1502 before returning the thermostat to Wallpiele...
Prepare for Installation Follow Important Instructions Remove Old Thermostat Follow Special Instructions Label Old ThennCallt Wins Mount New Wallpfaie to Wall Connect Wires to New Wallpiala Install Batteries Attach New Thermostat to the store 69-1730 Contents Prepare for Installation . call Honeywell Customer Care at 1-800-468-1502 before returning the thermostat to Wallpiele...

Owners Guide
Page 3
...3/16 in for drywall: use the enclosed wire labels to correctly mark the wires connected to use 7/32 in for Installation (Cont) 2. Follow Important Instructions 1. Do not connect the wires to the new thermostat based on wire color because damage can occur to the heating and/or cooling system These... Installation Instructions explain later how to your old thermostat OLD THERMOSTAT TE DO NOT WIRE NEW THERMOSTAT BASED ON WIRE COLOR. 69-1730 Prepare for plaster...
...3/16 in for drywall: use the enclosed wire labels to correctly mark the wires connected to use 7/32 in for Installation (Cont) 2. Follow Important Instructions 1. Do not connect the wires to the new thermostat based on wire color because damage can occur to the heating and/or cooling system These... Installation Instructions explain later how to your old thermostat OLD THERMOSTAT TE DO NOT WIRE NEW THERMOSTAT BASED ON WIRE COLOR. 69-1730 Prepare for plaster...
Owners Guide
Page 4
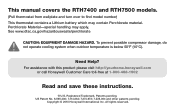
... Cl wires connected to your old thermostat, do not connect them to your local waste management authonty for instructions regarding recycling and the proper disposal of each other or any other wires. 3. Follow Special Instructions 1. Do not remove the wires. If you are replacing a thermostat that contains mercury n a sealed tube, do not...
... Cl wires connected to your old thermostat, do not connect them to your local waste management authonty for instructions regarding recycling and the proper disposal of each other or any other wires. 3. Follow Special Instructions 1. Do not remove the wires. If you are replacing a thermostat that contains mercury n a sealed tube, do not...

Owners Guide
Page 5
Follow Special Instructions (Cont) 4. If you have only one C and/or C1 wire connected to your old thermostat, connect this wire to C on the new thermostat Visit www honevwell com/yourhome or call Honeywell Customer Care at 1-800-468-1502 before returning the thermostat to the store. Wrap the end of the wires... THE NEW THERMOSTAT M27223 Step 4. do not connect them to your new thermostat 6. DO NOT CONNECT TO NEW THERMOSTAT imoso 541no 9 9 66-1730 Follow Special Instructions (Cont) 5. Step 4. If you find any wires not connected to your old thermostat.
Follow Special Instructions (Cont) 4. If you have only one C and/or C1 wire connected to your old thermostat, connect this wire to C on the new thermostat Visit www honevwell com/yourhome or call Honeywell Customer Care at 1-800-468-1502 before returning the thermostat to the store. Wrap the end of the wires... THE NEW THERMOSTAT M27223 Step 4. do not connect them to your new thermostat 6. DO NOT CONNECT TO NEW THERMOSTAT imoso 541no 9 9 66-1730 Follow Special Instructions (Cont) 5. Step 4. If you find any wires not connected to your old thermostat.

Owners Guide
Page 14
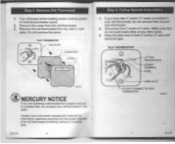
Follow the steps in this section to your thermostat 2. Press the Done button emo3 59 ete-P Spam , Arm 1)8 %sr.4Pell inkeillig llama&WM 0 0- . 32 If The calendar can be set up your heating and/or cooling system. Set the Calendar (Cont) UP AND DOWN BUTTONS CHANGES TIME • Step 11. Press and release the System button c. 0 - Use the Installer Setup Menu to match your new thermostat to set anytime See Step 11. Configure Installer Setup for instructions 69-173c 2f3 27 69.1731) Configure Installer Setup 1. DONE BUTTON ADVANCES TO HOME SCREEN 8. Step 10.
Follow the steps in this section to your thermostat 2. Press the Done button emo3 59 ete-P Spam , Arm 1)8 %sr.4Pell inkeillig llama&WM 0 0- . 32 If The calendar can be set up your heating and/or cooling system. Set the Calendar (Cont) UP AND DOWN BUTTONS CHANGES TIME • Step 11. Press and release the System button c. 0 - Use the Installer Setup Menu to match your new thermostat to set anytime See Step 11. Configure Installer Setup for instructions 69-173c 2f3 27 69.1731) Configure Installer Setup 1. DONE BUTTON ADVANCES TO HOME SCREEN 8. Step 10.


